


2
Assemble units as described herein only. To do otherwise
may result in instability. All screws, nuts and bolts must be
tightened securely and must be checked periodically after
assembly. Failure to assemble properly, or to secure parts
may result in assembly failure and personal injury.
Genesis
®
Desking - Privacy Screens
Assembly Instructions
Tools Required:
•
3
/
8
” hex driver socket
• Driver extension at least 2”
• Phillips screwdriver
Note:
Privacy screens are an
optional accessory that must be
ordered separately. If optional privacy
screens are to be installed, proceed
to “Privacy Screen(s) Installation”
instructions below. If optional
screen is not required, proceed to
“Cross Brace and/or Wire Trough
Installation” instructions on page 4.
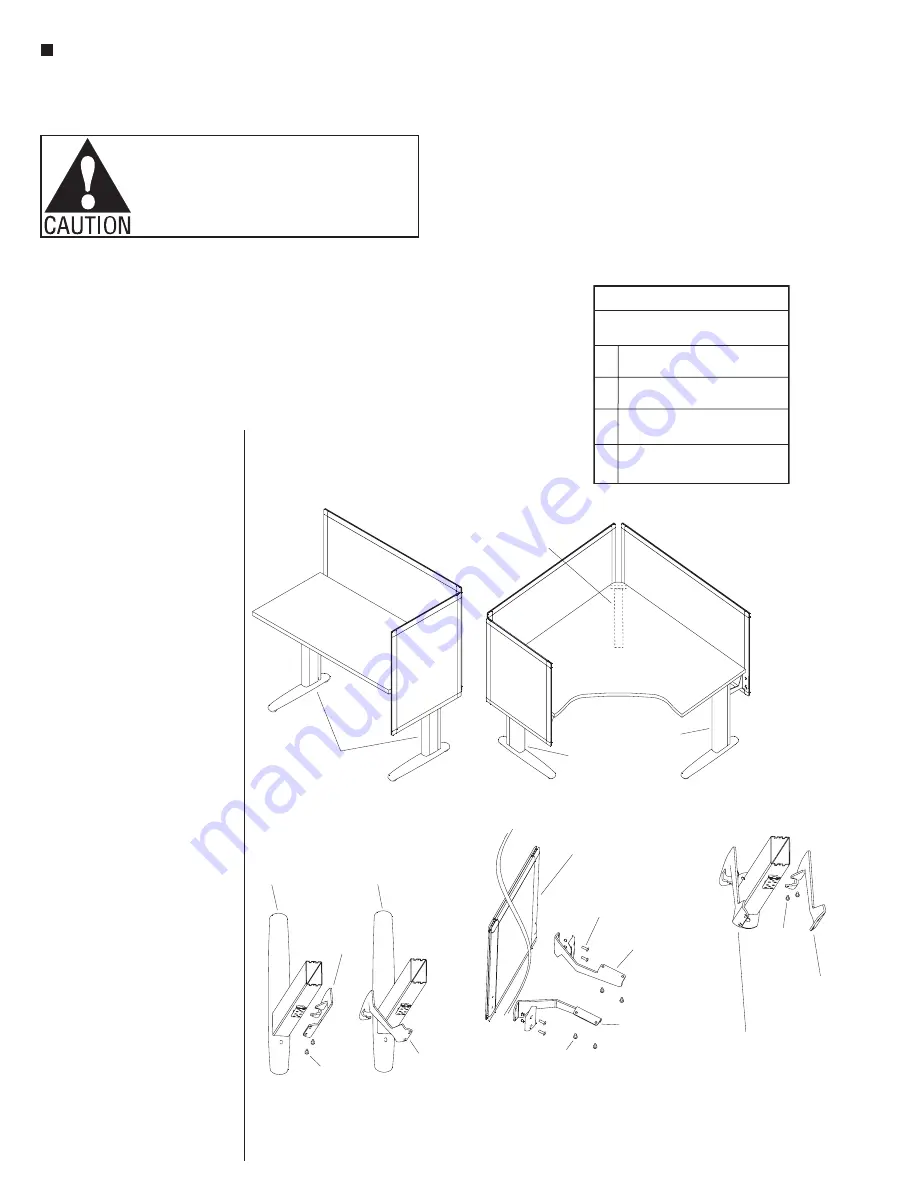
Privacy Screen(s) Installation
(optional)
1. Carefully unpack all parts and place
privacy screens onto a soft, protective
surface. Identify screens from the
“Privacy Screen Part Numbers”
diagram & Figure 1.
2. Identify the applicable brackets
below from Figures 2, 3 & 4.
Note:
All privacy screen brackets
must
be assembled to table(s)
before proceeding with table
assembly. Privacy screens may be
attached to brackets at end of table
assembly if desired.
a. Standard Leg Brackets: Used to
attach straight (A) and corner (C
& D) privacy screens to standard
legs (Figure 2).
b. Screen-to-Table Brackets: Used to
attach end-of-run privacy screen
(B) to underside of the worksurface
(Figure 3). These brackets are used
on non-adjustable tables only.
c. Corner Post Leg Brackets: Used to
attach corner privacy screens (C &
D) to corner post leg.
3. Attach the privacy screen brackets as
follows:
a. Attach left- and right-hand
brackets to the standard legs
using the
1
/
4
-20 x
1
/
2
” Allen socket
head screws (two per leg)
(Figure 2).
Figure 2
left-hand
leg
right-hand
leg
right-hand
bracket
left-hand
bracket
1
1
/ -20 x / ”
Allen head
screw
4
2
Standard Leg Brackets
(for straight and corner
privacy screens - A, C & D)
Figure 3
Screen-to-Table Brackets
(worksurface-to-end
privacyscreens B)
end privacy
screen (B)
1
3
/ -20 x / ”
Allen head
screw
4
4
left-hand
bracket
#12 x 1”
sheet metal
screw
right-hand
bracket
Corner Post Leg Brackets
(for corner privacy
screens - C & D)
left-hand bracket
(on left-hand of a
right-hand corner
privacy screen)
right-hand bracket
(on right-hand of a
left-hand corner
privacy screen)
1
1
/ -20 x / ”
Allen head
screw
4
2
Figure 4
Screen Part Numbers
GSCR/_XXX/...where XXX denotes
table type and/or locations
A STR (Straight) back of rectangles
and shoes
B END (End of any table) mounts
to top
C CLH (Corner LH) to the left-hand
of user on corners or shoes
D CRH (Corner RH) to the right-hand
of user on corners or shoes
b. Attach left- and right-hand
brackets to the end-of-run privacy
screen B using the
1
/
4
-20 x
3
/
4
”
Allen socket head screws
(Figure 3).
c. Attach left- and right-hand
brackets to the corner post leg(s)
using the
1
/
4
-20 x
1
/
2
” Allen socket
head screws (Figure 4).
Figure 1
desk
A
B
standard
leg
corner
post leg
C
D
B
corner desk
standard leg
standard leg
Содержание Genesis Desking
Страница 1: ...Assembly Instructions Genesis Desking May 2019...
Страница 14: ...14 Genesis Desking Assembly Instructions...
Страница 15: ...Genesis Desking Assembly Instructions 15...


