background image

ENGLISH

Easy Link PRO Series: Quick Setup Guide

DVR User’s Manual

21

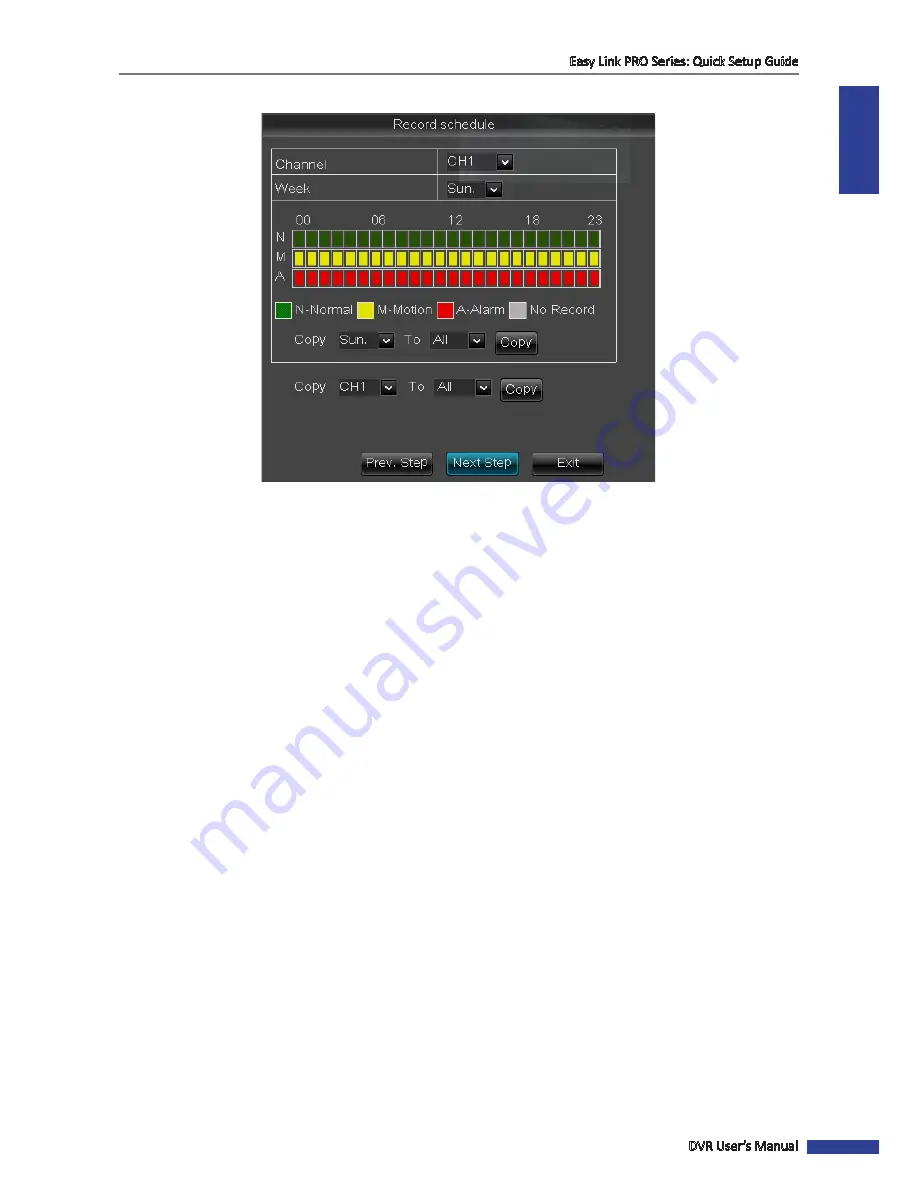
Record Schedule

If you know the recording schedule in advance, you can define it in this step but you can do it also later via OSD menu. 
Please be noted that after you format the HDD, the default continuous recording from the connected cameras start 
automatically.

Channel

: Select the channel where you want to apply the schedule.

Week

: Select the day of the week where you want to apply the schedule. For example, after you define the schedule 

for Monday, you can use the Copy function to apply the same schedule for Tuesday ~ Friday.

Normal (N) Recording

: When the time slot is marked green, it means the channel performs normal recording for that 

time slot. If you do not want to record all 24 hours in a specified day, click on the green slot to mark it 

No Record

 (gray 

slot).

Motion (M) Recording

: When the time slot is marked yellow, it means the channel records only when a motion is 

detected during that time slot. We recommend to use this type of recording. The motion recording means that the 
recording is triggered only if a movement is detected.

Alarm Recording

 (for 16 channel only): When the time slot is marked red, the channel records only when the alarm is 

triggered during that time slot.
Click 

Next Step

 to move to the next screen.

Содержание Easy Link PRO EL1622

Страница 1: ...USER MANUAL DVR Easy Link PRO Series EL422 EL822 EL1622 Default user name admin Default password 123456 DVR with Cloud Technology ...

Страница 2: ...ith part 15 of the FCC Rules Operation is subject to the following two conditions 1 This device may not cause harmful interference 2 This device must accept any interference received including interference that may cause undesired operation Copyright Limitation of Liability This publication is provided AS IS without warranty of any kind either expressed or implied including but not limited to the ...

Страница 3: ...ock Do not use worn damaged or bare cables Always avoid open circuit voltage The added voltages increase the severity of electric shock hazard Always wear insulated gloves while you adjust equipment Electric power should be turned off and insulated gloves should be worn when making any equipment adjustment to assure shock protection Always wear protective clothing such as long sleeve shirts while ...

Страница 4: ... Channel DVR 25 16 Channel DVR 25 Understanding the Live Viewing Screen 26 Pop Up Menu on Live Viewing Screen 30 Basic DVR Operation 34 Using the Supplied USB Mouse 34 Virtual Keyboard 34 Locking the Screen 34 Using the Supplied Remote Control 35 Rebooting Shutting Down the DVR 36 Accessibility Features 37 Downloading KViewQR App 37 Using Cloud Storage 43 Dropbox 43 How to Create a Dropbox Account...

Страница 5: ...tection 76 Set Motion Detection Area 76 Other Alarm Settings 16 Channel only 77 Device HDD 78 Device PTZ 79 Device Cloud Storage 80 Google Drive 80 Dropbox 82 System General 85 System Users 86 System Info 87 Advanced Maintain 88 Remote Access Via Web Client 93 Logging In 93 Interface Overview 94 Live Viewing 95 Switching Screen Modes 96 Viewing or Hiding Channels 96 Recording Channels Manually 96 ...

Страница 6: ...y the configured settings for some or all of the cameras As to the accessibility options the DVR allows you to see live view from the cameras via smart phone tablet or PC For an easy access and backup purposes you can configure the DVR to send photos or videos from the device directly to the cloud storage Dropbox or Google Drive Step 1 Unpack Your DVR Please take a moment to check if all the neces...

Страница 7: ... Mouse 12V 2A power adapter Remote control 1 2 3 4 5 6 7 8 9 DISPLAY MODE 0 REC SEARCH 2X2 3X3 4X4 AUTO ENTER PIP STOP PLAY FWD REW PAUSE FRAME SLOW MENU ESC MUTE ZOOM FOCUS IRIS Z _ F _ I _ LOCK Z F I PTZ HDMI cable RJ45 cable Battery 3 5 2 5 HDD Screws Quick Start Guide CD Quick Guide ...

Страница 8: ...nstructions below NOTE Depending on the model you purchased the actual product may slightly differ from the images below The illustrations below show an 8 channel DVR same procedures apply to a 4 channel and 16 channel DVR 1 Remove the cover Loosen the screws as shown 2 Install and secure the HDD Connect the data and power cables to the HDD and place the HDD on the DVR case 3 Replace the cover Att...

Страница 9: ...ontrol LEDs Please take a moment to review the front and rear panel Front Panel NOTE The following example illustrates the front panel of the 8 channel DVR 1 2 3 1 HDD Indicator Flashing red when the HDD is being accessed read write operation 2 Power Indicator Lights green to indicate the power is turned on 3 USB 2 0 Port Connects to a USB mouse flash disk and other external storage drive ...

Страница 10: ... input 4 Channel DVR Connects to a maximum of 4 cameras BNC 8 Channel DVR Connects to a maximum of 8 cameras BNC 2 Video output Connects to a monitor TV via BNC 3 Audio output Connects to an audio output device for example speaker via RCA 4 Audio input Connects to a maximum of 2 microphones and or audio supported camera not included via RCA 5 HDMI output Connects to a monitor TV via HDMI 6 VGA out...

Страница 11: ...ts to a maximum of 4 microphones and or audio supported camera not included via RCA 5 HDMI output Connects to a monitor TV via HDMI 6 VGA output Connects to a VGA monitor 7 USB port Connects to a USB mouse flash disk and other external storage drives 8 LAN port Connects to a router via RJ 45 9 RS 485 port Connects to a Speed dome camera via RS 485 10 Alarm and Sensor I O block Connect to external ...

Страница 12: ...12 VIDEO INPUT 3 4 AUDIO INPUT VIDEO OUTPUT LAN VGA IR EXT 12V VIDEO INPUT LAN RS 485 VGA 12V CAUTION RISK OF ELECTRIC SHOCK DO NOT OPEN HDMI 5 6 7 8 1 2 AUDIO OUTPUT 1 2 3 4 VIDEO INPUT AUDIO INPUT VIDEO OUTPUT HDMI VGA VIDEO OUTPUT Or connect the video output of the DVR to the monitor via BNC connector Or connect the video output of the DVR to the monitor via VGA connector If your monitor TV sup...

Страница 13: ...S 485 VGA 12V CAUTION RISK OF ELECTRIC SHOCK DO NOT OPEN HDMI 5 6 7 8 1 2 AUDIO OUTPUT 1 2 3 4 VIDEO INPUT AUDIO INPUT VIDEO OUTPUT RS 485 ALARM SENSOR G 1 2 3 4 G 5 6 7 8 5 6 7 8 1 2 3 4 13 14 15 16 9 10 11 12 VIDEO INPUT Connect the BNC plug of the camera s extension cable to the Video input connector on the rear of the DVR 4 Channel DVR 8 Channel DVR 16 Channel DVR If you are using a PTZ speed ...

Страница 14: ...O OUTPUT 1 2 3 4 13 14 15 16 9 10 11 12 VIDEO INPUT 3 4 AUDIO INPUT VIDEO OUTPUT LAN VGA IR EXT 12V VIDEO INPUT LAN RS 485 VGA 12V CAUTION RISK OF ELECTRIC SHOCK DO NOT OPEN HDMI 5 6 7 8 1 2 AUDIO OUTPUT 1 2 3 4 VIDEO INPUT AUDIO INPUT VIDEO OUTPUT 4 Channel DVR 8 Channel DVR 16 Channel DVR You need the USB mouse to go through the initial setup menus once the DVR is powered on ...

Страница 15: ... G 5 6 7 8 HDMI 5 6 7 8 1 2 AUDIO OUTPUT 1 2 3 4 13 14 15 16 9 10 11 12 VIDEO INPUT 3 4 AUDIO INPUT VIDEO OUTPUT LAN VGA IR EXT 12V LAN Internet RJ 45 cable Notebook PC Tablet PC Smart Phones 16 Channel DVR 4 Channel DVR 8 Channel DVR The network connection is necessary for accessing the DVR remotely via smart phone tablet PC or for saving images videos to the cloud storage Dropbox or Google Drive...

Страница 16: ... INPUT VIDEO OUTPUT RS 485 ALARM SENSOR G 1 2 3 4 G 5 6 7 8 HDMI 5 6 7 8 1 2 AUDIO OUTPUT 1 2 3 4 13 14 15 16 9 10 11 12 VIDEO INPUT 3 4 AUDIO INPUT VIDEO OUTPUT LAN VGA IR EXT 12V AUDIO OUTPUT 1 2 3 4 AUDIO INPUT 16 Channel DVR 4 Channel DVR 8 Channel DVR Connect the microphone s and or audio supported camera s if you want to listen to the audio sound from the cameras Connect speakers if you want...

Страница 17: ...15 16 9 10 11 12 VIDEO INPUT 3 4 AUDIO INPUT VIDEO OUTPUT LAN VGA IR EXT 12V RS 485 ALARM SENSOR G 1 2 3 4 G 5 6 7 8 Alarm device output Alarm out 7 Connect sensors up to 8 channels optional NOTE This feature is available only in 16 channel DVR RS 485 ALARM SENSOR G 1 2 3 4 G 5 6 7 8 HDMI 5 6 7 8 1 2 AUDIO OUTPUT 1 2 3 4 13 14 15 16 9 10 11 12 VIDEO INPUT 3 4 AUDIO INPUT VIDEO OUTPUT LAN VGA IR EX...

Страница 18: ...LAN VGA IR EXT 12V VIDEO INPUT LAN RS 485 VGA 12V CAUTION RISK OF ELECTRIC SHOCK DO NOT OPEN HDMI 5 6 7 8 1 2 AUDIO OUTPUT 1 2 3 4 VIDEO INPUT AUDIO INPUT VIDEO OUTPUT 12V B Plug in the power adapter to the power outlet A Connect the power adapter to the Power input on the rear of the DVR 4 Channel DVR 8 Channel DVR 16 Channel DVR C Switch on the DVR NOTE This applies only to 16 channel DVR After ...

Страница 19: ...llow you to choose how you want the DVR to operate All items on the wizard are also accessible via the DVR s Main Menu see Main Menu on page 53 Startup Wizard If you do not want to go through the Startup Wizard but access the Live Viewing screen immediately step 6 you can click Exit A confirmation message appears on the screen click OK If you want to disable the Startup Wizard after reboot click Y...

Страница 20: ...inished notification message to appear on the screen Click OK NOTE Next time you startup the DVR the recording from the cameras is performed automatically or based on a defined schedule and you do not need to reformat the HDD again unless there is a problem with the hard disk Overwrite Use this option to overwrite the old recordings on the HDD when the HDD is full For example if you choose the opt...

Страница 21: ...ion to apply the same schedule for Tuesday Friday Normal N Recording When the time slot is marked green it means the channel performs normal recording for that time slot If you do not want to record all 24 hours in a specified day click on the green slot to mark it No Record gray slot Motion M Recording When the time slot is marked yellow it means the channel records only when a motion is detected...

Страница 22: ... how you would like the time to appear on the screen The available options are 24 hour format or 12 hour format DST Configure the Daylight Saving Time if it is applicable in your region By default the DST is set Disable NTP Skip the NTP Network Time Protocol for the time being because it requires an active Internet connection By default this item is enabled It means that the time and date is updat...

Страница 23: ...for assistance on determining the IP address Subnet mask Gateway and DNS 1 2 server If your network type is DHCP your DVR will obtain the connection parameters like IP address Subnet Mask Gateway and DNS 1 2 automatically Client Port and HTTP Port For time being keep the default port values Client and HTTP ports are important to configure before accessing the DVR remotely from a PC via HTTP Interf...

Страница 24: ...ng After you complete Step 5 you should be able to see the Live Viewing screen For more information please see Understanding the Live Viewing Screen on page 26 NOTE The number of live views depend on your DVR type 4 channel 8 channel or 16 channel and how many cameras you have connected to the DVR 4 Channel DVR ...

Страница 25: ...ENGLISH Easy Link PRO Series Quick Setup Guide DVR User s Manual 25 8 Channel DVR 16 Channel DVR ...

Страница 26: ... Understanding the Live Viewing Screen First sceen you see after going through or skipping the Startup Wizard is the Live Viewing screen It is considered the main screen On this screen you see the live views from all connected cameras 4 Split Screen Live Viewing Screen 4 Cameras Connected ...

Страница 27: ...ENGLISH Easy Link PRO Series Understanding the Live Viewing Screen DVR User s Manual 27 9 Split Screen Live Viewing Screen 8 Cameras Connected 16 Split Screen Live Viewing Screen 14 Cameras Connected ...

Страница 28: ...not have any cameras connected are in the status Video Loss Live Viewing Screen Video Loss Full Screen Mode one channel in full screen You need to double click on a channel live view to see the channel in full screen If you want to exit the full screen mode double click again Live Viewing Screen Full Screen Mode ...

Страница 29: ...cted on that channel By default motion detection is activated for all cameras If you want to modify this setting see Alarm Motion on page 76 H If you see this icon on a live view it means the DVR cannot detect a HDD or the HDD is not formatted Please make sure you have installed a HDD into the DVR see Step 2 Install the Hard Disk Drive HDD on page 8 or see Device HDD on page 78 R M If you see this...

Страница 30: ...14 12 2 13 5 No Button Description 1 Main Menu This is the Main Menu where you can configure all the settings of the DVR 2 Lock Lock access to enter the OSD menu You need to type the user name and password before entering the OSD menu NOTE The default user name and password are admin and 123456 3 4 5 Screen View 4 split 9 split 16 split Depending on your DVR s model switch to a 4 split display 9 s...

Страница 31: ...ick the arrows see Pointer Pan to move the camera to the desired direction then click Set to set a specific preset point on a PTZ camera NOTE You can set up to 255 preset points for the DVR However the actual preset quantity varies depending on the PTZ camera performance Clear Click to delete the selected preset point Save Click to save changes Time Set the time how long the camera will pause at e...

Страница 32: ...TZ camera click To stop the Cruise mode click to stop the Cruise mode 8 Zoom To use this function you need to duble click on a channel to open the live view on a full screen mode Right click on Live Viewing screen and click on Zoom option Then zoom in the area Zoom area 9 Record Search Click to search for recorded videos to play back See more details on searching for recorded videos on Search Reco...

Страница 33: ... sequence You can set the sequence time in Display Output on page 56 12 13 PIP 1x1 PIP 1x2 PIP 1x1 Click to view one channel in full screen with another channel enclosed in a small window PIP 1x2 Click to view one channel in full screen with two other channels enclosed in small windows 14 Mute On Off Click to turn off audio click to turn on audio ...

Страница 34: ...en mode Drag an area line In motion mode allows to select the motion area In menu mode allows to adjust the values of sliders and scales Virtual Keyboard The virtual keyboard automatically appears on the screen if data entry is required Click to toggle the keyboard to upper case Click to enter the text Click to delete a character Typed characters are displayed here Locking the Screen The screen is...

Страница 35: ... the OSD menu 8 Audio Search In Playback mode press to turn the audio on or off Press to search for recorded video 9 Mute Press to turn mute on or off 10 REW Press to rewind during video playback 11 PLAY Press to play recorded video or enter the recording search menu 12 FWD Press to fast forward during video playback No Icon Description 13 REC Press to start manual recording 14 PAUSE FRAME Press t...

Страница 36: ...hut down the DVR open the Main Menu Advanced Maintain and click the corresponding button CAUTION To protect your data on the DVR always shut down the DVR using the Shut Down menu button Before reboot or shut down a Warning message appears on the screen to confirm your choice Click OK Warning Before Reboot Warning Before Shut Down ...

Страница 37: ...n on DVR NOTE Instead of searching for the KViewQR App on App Store iOS or Play Store Android you can use your smart phone tablet to scan in the QR code on top of the DVR for accessing the KViewQR App download page directly The following table describes the compatible devices and platforms Quick Reference Instead of searching for the KViewQR App you can use your smart phone tablet and simply scan ...

Страница 38: ...he DVR NOTE You may need to install a QR code scanner app on your smart phone tablet After scanning a link to the KViewQR application is displayed on the screen b Do the following to download the KViewQR application on your smart phone tablet 1 Tap Open URL in iOS or tap on the applicaiton link in Android 2 Tap on the application icon 3 Download the application iOS Android ...

Страница 39: ... QR code on top of the DVR The DVR identification page opens NOTE As an alternative you can identify the DVR by tapping on and search for local devices or tapping on and enter the DVR ID print on the label manually b Enter the user and password in the respective fields NOTE The default user name is admin and password is 123456 c Tap Save to save the settings The DVR will be listed on the KViewQR a...

Страница 40: ...ViewQR application main page Step 5 View the Live Screen Android a Tap on the DVR name to open the live screen NOTE Tap to edit the connection parameters view camera events captured snapshots delete the connection or configure push notifications Settings DVR name Tap Settings NOTE Push notification function helps you to keep current with the events that are detected by the camera s When an event o...

Страница 41: ...e live screen NOTE Tap to preview the channels access playback edit the connection parameters configure push notifications or exit the menu Tap Settings Settings DVR name NOTE Push notification function helps you to keep current with the events that are detected by the camera s When an event occurs or an intrusion is detected the DVR will automatically send out a push messages to your smart phone ...

Страница 42: ...ew Tap to access playback and gallery folders NOTE If you open the channel in full screen mode you can do any of the following Tap and tap mute listen or speak to activate the respective function NOTE SPEAK function is available for IP cameras only Tap to adjust the camera direction Tap to record a video manually Tap to capture a snapshot Tap to view the device information and configure the video ...

Страница 43: ... storage to upload the snapshots or videos Before setting up the cloud storage on the DVR you need to make sure your Dropbox account Google account is created and activated and your DVR is connected to the Internet see Network Network on page 69 Dropbox How to Create a Dropbox Account To create an account for accessing Dropbox service do the following If you are using a PC open the web browser and...

Страница 44: ... Select Dropbox from the list Drive Name Enter the cloud storage name for your DVR When linking the KGuard Cloud Uploader to your Dropbox the Drive Name will be used as the folder name where KGuard uploads the snapshots and or videos Cloud Version Current cloud storage service version Receiver Email Enter your e mail address that is associated with your Dropbox account The DVR will be sending the ...

Страница 45: ...to Dropbox When the day time slot is marked yellow it means the videos are uploaded to Dropbox when a motion is detected during the specified day hour NOTE You can only choose one channel where to upload videos In one hour the system uploads maximum 3 footages The maximum duration of each uploaded footage is 10 seconds After all settings are complete click Apply and then click Activate Cloud If yo...

Страница 46: ... Enable advanced e mail setup SSL Enable if your e mail server requires the SSL verification If you are not sure please consult your e mail service provider For example if you are using Gmail then this option should be enabled SMTP Port Enter the SMTP port of your e mail server For example if you are using Gmail the SMTP port is 465 SMTP Server Enter the SMTP server address of your e mail Sender E...

Страница 47: ... to scan in the QR code displayed on the activation notification message for completing the activation Please refer to For smart phone tablet users on page 48 Click OK to continue NOTE Please check e mail and click on Activate Cloud link within 3 minutes For PC users Follow the on screen instructions to complete the cloud account activation When the activation is complete a new folder is added to ...

Страница 48: ...oading KViewQR App on page 37 Then enter your Dropbox e mail address and password and click Sign In to activate the cloud storage Follow the on screen instructions to complete the cloud account activation When the activation is complete a new folder is added to your Dropbox folder list Please see the following image in the next step for reference To view the uploaded photos and or videos open the ...

Страница 49: ...le Drive How to Create a Google Account NOTE If you have already Google account please skip this section To create an account for accessing Google service do the following Open the web browser and navigate to https accounts google com SignUp and fill in the requested information ...

Страница 50: ...ce Cloud Storage Cloud Storage Allow cloud settings Server Type Select Google Drive from the list Drive Name Enter the cloud storage name for your DVR When linking the KGuard Cloud Uploader to your Google Drive the Drive Name will be used as the folder name where KGuard uploads the snapshots and or videos Cloud Version Current cloud storage service version Gmail Account Enter your Gmail account in...

Страница 51: ... Motion on page 76 Click Apply to save the settings Upload Video Enable and click Apply if you want to upload videos from the cameras when a motion is detected Click Setup to configure the video upload options Channel Select the channel where you want to upload the videos to Google Drive When the day time slot is marked yellow it means the videos are uploaded to Google Drive when a motion is detec...

Страница 52: ... a successful connection Check the Photos Videos on Google Drive To check the uploaded photos videos from the DVR on Google Drive do the following Open the web browser and navigate to https drive google com Log in to your Google account and review the uploaded photos videos from the DVR The connection between the DVR and Google Drive is established ...

Страница 53: ...ecording options for example resolution and setting up recording schedules for channels Search Search for recordings play the recording option events and logs by different types Network Configure the DVR s access parameters to the network define the parameters for example resolution for the remote stream configure e mail settings for receiving notifications and DDNS parameters Alarm Set the motion...

Страница 54: ...on Main Menu have a short explanation when you hover the cursor over the field Click Apply to save changes click Exit to close the menu or right click on the menu click Default to restore default values Click Copy To to copy the current settings to all channels or one specific channel ...

Страница 55: ...ess BRI Defines how bright the image appears on the display Contrast CON Increases the difference between the darkest black and the whitest white in the image Modify the contrast if the sections of the image grey out Hue Changes the color mix of the image Saturation SAT Alters how much color is displayed in the image The highest the saturation the brighter and vivid colors will appear to be Settin...

Страница 56: ...nterval in the sequence 4 split display Channel 1 Channel 2 Channel 3 Channel 4 SEQ Time Set how long you want the live view from a channel to be displayed in a sequence View Mode This option is available only if you have enabled View Setup Single is the default live mode It means that a live view from one channel is displayed in full screen mode If you want to see the live view from more than one...

Страница 57: ... restart after you change the resolution Init DEV This is the default video output The option is HDMI HDMI VGA monitor TV and VOUT BNC monitor TV To let the DVR to detect the video output select AUTO Transparency Set how you want the settings menu to be displayed To adjust the transparency click and slide the sliderbar The number next to the sliderbar shows the level of transparency Depending on t...

Страница 58: ...ne s Privacy Zone You need to enable the function in order to use it NOTE The privacy zone is valid only to the specific channel If you wish to copy the same settings to other channels use Copy function Area Setup Decide how many privacy areas you want to set The maximum number of areas is 4 If you want to define four privacy areas check all areas Area1 Area2 Area3 and Area4 Mask Area Click Setup ...

Страница 59: ...nd set the pre recording condition CH Select the channel to set its recording parameters Record If Record is enabled the video from the selected channel is recorded to the HDD Pre record You can set the recording only when an event is triggered With this feature the DVR starts the recording even before the event occurs to avoid missing important details ...

Страница 60: ...lot for Alarm recording 16 Channel Schedule By default the record mode for all connected channels is set to Normal It means the DVR will continuously record 24 hours a day to ensure that you will not miss any important happenings However the disadvantage is that the HDD space will become full very fast Channel Select the channel where you want to apply the schedule Week Select the day of the week ...

Страница 61: ...security DVRs providing high resolution images using advanced image sensors In comparison to D1 standard the 960H images are about 34 larger When you select the 960H mode the FPS frames per second value cannot exceed the total FPS NOTE It is recommended to use 600TVL or higher resolution cameras if recording resolution mode is set to 960H Resolution FPS These parameters define how large the record...

Страница 62: ...Record State table Replay Time Click on the Replay Time box to specify the beginning time of the footage you want to review in playback and click Play You can also click on the time slot in Record State table to initiate the playback NOTE The recordings that appear in red box indicate the alarm recordings while the recordings that appear in green box indicate normal recordings Date Time Alarm reco...

Страница 63: ...the time in Record State table you will be asked to choose the channel s to play simultaneously 4 Channel 8 Channel Check the channel s you want to see in playback and click Play If you choose only one channel then this channel is displayed on full screen If you choose 2 8 channels then the channels are displayed on a split screen ...

Страница 64: ...forward the playback If you want to specify the playback timeframe click the button and select among the following options 24 Hours 2 Hours 1 Hour 30 Minutes and Customized time frame To customize the time frame click icon and the icon turns red Click on the time bar where you desire to start and click on the time bar again where you desire to end To stop the video playback click X Playback time f...

Страница 65: ...to the USB port on the DVR search and playback the footage Double click to view the channel in full screen and while playing the video click the To stop trimming click the NOTE Trimming video does not alter video saved on your DVR s HDD It only determines the duration of a video being exported to the external storage device Example selection for trimming After you stop trimming you are asked to co...

Страница 66: ...t and click Apply NOTE If you choose H 264 format in order to play the backed up video on your PC you need to install a video player from the supplied CD If you choose AVI format you can use any video player to play the backed up video on your PC When the backup is complete click OK to close the Backup Status screen NOTE Do not remove the USB device while file transferring is in progress ...

Страница 67: ...ecording to search among All Normal or Alarm and click Search The recordings will be listed on the table BAK This is a checkbox for backing up the recording s The recording can be saved on an external disk therefore make sure you have connected an external USB storage into the USB port of the DVR Check the recording s you want to backup and click Backup button You are then prompted to choose the v...

Страница 68: ...ost recent events will be at the end of the list The Log will list all events that the DVR monitored Log Type Select the log type among All System Config Alarm Account Record or Storage Start Time End Time Specify the start and end date time of the logs you want to review and or save on an external USB storage device Click Search The logs will be listed on the table NOTE If you want to backup the ...

Страница 69: ...mail etc please complete the network settings The most common types are DHCP or Static Most probably your network type is DHCP unless the network is manually addressed usually called Static If you need an authentication user name and password to the Internet then choose PPPoE NOTE If you are not sure in your network type please contact your ISP Internet Service Provider DHCP Connection Static Conn...

Страница 70: ...P Address The IP address identifies the DVR in the network The IP address consists of four groups of numbers between 0 to 255 separated by periods For exapmle 010 000 100 187 If your network type is Static and you are not sure what the IP address is please ask your ISP Subnet Mask Subnet mask defines a range of IP addresses that can be used in a network If IP address is like a street where you liv...

Страница 71: ... that channel when connecting to the DVR remotely FPS Select how many image per second are transfered when viewing the channel remotely NOTE Making changes to the remote frame rate per second does not affect the DVR s recording frame rate Quality Select the video quality when viewing the channel remotely Decide this option upon the Internet speed in the location of the remote device Audio Check th...

Страница 72: ...he password of your e mail Receiver Email Enter the e mail address where you want to receive the event notifications from the DVR Interval Configure the length of the time interval between the notification e mails from DVR Please be noted that if you set the interval for example 1 minute have not configured the e mail event Schedule and your mailbox has a size limit then your mailbox may become fu...

Страница 73: ...ww kguard org DDNS Enable the DDNS service Server Select the preferred DDNS server The available options are KGUARD ORG recommended DYNDNS NO IP CHANGEIP DNSEXIT NOTE If you do not have a DDNS account yet you need to create one on the DDNS service provider s web page Host Name Enter the domain name you created on the DDNS service provider s web page For example mydvr4 kguard org This will be the a...

Страница 74: ...GLISH Easy Link PRO Series Operating the DVR 74 DVR User s Manual For applying the domain name on KGUARD ORG http www kguard org do the following Then provide a domain name for your DVR For example MyDVR4 ...

Страница 75: ...n the network through its domain name For example you assign the DVR a domain name mydvr4 kguard org and want to access the DVR remotely using the Web Client You need to open the web browser on your PC and instead of typing in the URL field the IP address of the DVR you can just type mydvr4 kguard org press Enter and the login page of the DVR opens Please make sure you have completed the Port Forw...

Страница 76: ...ent block for motion detection Setting Motion Area CH Select the channel you want to set the motion detection Enable Enable the motion detection for a channel Area Click Setup to define the motion area See above Sensitivity It is very important to set the motion detection on a suitable seinsitivity level To find the best sensitivity level test the feature For example see how the motion event is tr...

Страница 77: ...nels to record when the motion is detected Post Recording You can set how long after an event occurs that the DVR will continue to record The recommended recording length is 30 seconds but it can be set higher up to 5 minutes Other Alarm Settings 16 Channel only To configure what actions the DVR should do when sensors are triggered Alarm In Select which channels to respond when sensors are trigger...

Страница 78: ... select the HDD for formatting Check the Select check box A warning message appears on screen asking your confirmation to delete all data on the disk after formatting Click OK Wait until the HDD is formatted For example formatting a 500GB HDD will take about 1 2 minutes When the formatting is complete a notification appears on the screen Click OK Overwrite Use this option to overwrite the old reco...

Страница 79: ...vel of your PTZ capable camera DataBit StopBit The information between the DVR and PTZ capable camera is sent in individual packages The DataBit indicates the number of bits sent while the EndBit indicates the end of the package and the beginning of the next information package The available parameters for DataBit are the following 8 7 6 5 The available parameters for the StopBit are 1 or 2 Parity...

Страница 80: ...oogle Drive from the list Drive Name Enter the cloud storage name for your DVR When linking the KGuard Cloud Uploader to your Google Drive the Drive Name will be used as the folder name where KGuard uploads the snapshots and or videos Cloud Version Current cloud storage service version Gmail Account Enter your Gmail account in the format username gmail com For example kguard gmail com Gmail Passwo...

Страница 81: ...m Motion on page 76 Click Apply to save the settings Upload Video Enable and click Apply if you want to upload videos from the cameras when a motion is detected Click Setup to configure the video upload options Channel Select one channel where you want to upload the videos to Google Drive When the day time slot is marked yellow it means the videos are uploaded to Google Drive only when a motion is...

Страница 82: ...Name will be used as the folder name where KGuard uploads the snapshots and or videos Cloud Version Current cloud storage service version Receiver Email Enter your e mail address that is associated with your Dropbox account The DVR will be sending the activation e mail to this e mail address for asking your acceptance to link the DVR to the Dropbox Click Apply to save the settings Then continue co...

Страница 83: ...he videos to Dropbox When the day time slot is marked yellow it means the videos are uploaded to Dropbox when a motion is detected during the specified day hour NOTE You can only choose one channel where to upload videos In one hour the system uploads maximum 3 footages The maximum duration of each uploaded footage is 10 seconds Click Apply to save the settings Click Activate Cloud to let the DVR ...

Страница 84: ...u are using Gmail then this option should be enabled SMTP Port Enter the SMTP port of your e mail server For example if you are using Gmail the SMTP port is 465 SMTP Server Enter the SMTP server address of your e mail Sender Email Enter the e mail address of your e mail This e mail address is used by the DVR only for sending you the activation e mail for asking your acceptance to link the DVR to t...

Страница 85: ... 11 19 2013 Time Format Define the format of the time For example if you keep the default 24Hour and the current time is 5 29 54 PM the time appears on the footages as 17 29 54 DST Stands for Daylight Savings Time Make sure if in your country the DST is observer or not Typically the clocks are adjusted forward one hour near the start of spring and are adjusted backward in autumn Although NTP Netwo...

Страница 86: ...ze the time set on DVR with a remote time server on Internet When you have finished with the settings click Apply Language The language of the menus alerts and other communications on DVR Video Format Here you can choose the video format The available options are NTSC and PAL NTSC is used in Japan Canada US PAL is used in Western Europe and Australia If the DVR s picture is flickering or has only ...

Страница 87: ...s admin and the password is 123456 We suggest you change the password to protect your privacy SEL Check this checkbox to customize the user account and click Edit When the modifications are done click Apply System Info QR Code In this menu you can review all the technical information concerning your DVR NOTE If you need to scan the QR code of the DVR but the sticker with the code on top of the dev...

Страница 88: ...ll settings and data are refreshed from the system which optimizes the DVR performance To disable this function set the setting to Disable Reboot Please note that It is recommended to reboot the DVR at least once a week The system supports three types of auto maintenance schedules Options are a Every week Reboots the DVR on a weekly basis In Reboot select Every week and specify the day of the week...

Страница 89: ...ng process plug the USB flash drive to the USB port of the DVR and click the Update button NOTE Do not remove the USB flash drive turn off the power or unplug from the power supply while updating Load Default Select this option if you wish to retrieve the default factory default settings When the option menu appears on the screen check the respective setting option box that you want to restore and...

Страница 90: ...ng message appears asking for your confirmation to reboot Click OK Shut Down To maintain the integrity of the video recording and configuration settings select this option to power off the DVR properly Load Settings Select this option to import the settings that you have saved earlier using the Save Settings function The settings file should be saved to the root directory of the USB device After y...

Страница 91: ...ideo recording settings network configurations and etc to the USB device To save your current configuration settings plug the USB flash drive to the USB port of the device and click Save Settings The settings are saved to the root directory of the USB device When exporting the parameters is complete you will see the following message on the screen ...

Страница 92: ...ble Click to enable the monitoring of the event Buzzer You can set a buzzer sound if a disk becomes full disk is in error state or a connection to the camera is lost The available time period for the buzzer sound is from 10 seconds to 60 seconds For example if Disk Full event is triggered the buzzer will sound for 10 seconds please see the screenshot above If you do not want to associate a buzzer ...

Страница 93: ...time you reboot the DVR the IP address changes In this case ask if your ISP can provide you a static IP address If not then configure the DDNS service See the network settings in Network Network on page 69 and Network DDNS on page 73 Also please make sure the UPnP is configured in the DVR and router or the manual port forwarding is completed in the router Logging In To access the DVR remotely from...

Страница 94: ...layback Allows you to search playback and download recorded videos Remote Setting Allows you to configure the DVR remotely Local Setting Allows you to specify the local disk drive location to save recorded videos captured screen shots and downloaded videos Logout Click to logout from the Web Client 2 Channel Controls Lists all channels that can be connected to the DVR The icons of each channel are...

Страница 95: ...iewing 3 Previous Click to view the previous channels 4 Next Click to view the next channels 5 Full Screen Click to view the channels in full screen mode 6 Stretch Click to stretch the screen Click it again to return to the original proportions 7 Display Hide Screen Modes Click to display or hide the screen mode icons 8 Screen Mode Icons Click a screen mode icon to switch the screen display 9 PTZ ...

Страница 96: ...and capture screen shots of a channel Use the Channel Controls to manage individual channels and the Display Controls to manage all the channels at the same time Viewing or Hiding Channels Click the view icon next to a channel to show or hide the channel display The view icon indicates the current status The channel is displayed on the screen The channel is not displayed on the screen To display o...

Страница 97: ...Snapshots Click the snapshot icon on the Channel Controls to take a snapshot of the current screen Snapshots are saved in a local directory path See Local Settings on page 100 After taking a snapshot a message appears on the screen to indicate where the snapshot is saved Example as below ...

Страница 98: ...ider to adjust speed 3 Zoom Click the icons to adjust the zoom setting 4 Focus Click the icons to adjust the focus setting 5 Iris Click the icons to adjust the iris setting 6 Cruise Click to start cruise Click to stop cruise 7 Hue Click on the bars to adjust the hue setting 8 Brightness Click on the bars to adjust the brightness setting 9 Preset Set the preset point then click to go to the preset ...

Страница 99: ...ic item please refer to Main Menu on page 53 To find more information on Playback please see Search Record Search on page 62 NOTE You can look for recorded files stored on the HDD inside the DVR and save the result to the local directory on your PC To configure the local directory please see Local Settings on page 100 Web Client Playback To find more information on configuring the Remote Setting p...

Страница 100: ...click the Local Setting tab in Web Client interface A menu opens Click to select the path You can also configure the File type among avi or 264 H 264 format and set the interval length of manual recording in minutes The file type and interval settings are for saving the manual recordings on PC Web Client Local Setting Click Save to save the modifications Logging Off If you want to log off click th...

Страница 101: ...e DVR sensor Aim the remote control at a proper distance Check the remote control batteries Question The DVR does not connect to my Dropbox account or Google Drive Answer Dropbox and Google Drive Make sure you have installed a hard drive in the DVR see Step 2 Install the Hard Disk Drive HDD on page 8 formatted the hard drive see Device HDD on page 78 MakesureyourDVRhasanaccesstotheInternet WANport...

Страница 102: ...re configurations Question I cannot access the web client Answer Check if the network cable is properly connected to the DVR Check if the UPnP function is enabled in router and DVR or if the router does not support UPnP then make sure the port forwarding is completed Check if the network settings are properly configured See Network Network on page 69 Ensure that you have Internet Explorer 6 or abo...

Страница 103: ...0 480fps CIF 360 240 240fps HD1 720x240 240fps D1 720x480 PAL 100fps CIF 360 288 100fps HD1 720x288 100fps D1 720x576 200fps CIF 360 288 200fps HD1 720x288 200fps D1 720x576 400fps CIF 360 288 192fps HD1 720x288 192fps D1 720x576 960H NTSC 120fps WCIF 480 240 120fps WHD1 960 240 120fps WD1 960 480 240fps WCIF 480 240 88fps WHD1 960 240 88fps WD1 960 480 480fps WCIF 480 240 176fps WHD1 960 240 176f...

Страница 104: ...ard Fast Rewind Slow Motion Zoom General PTZ Control RS485 Built In supports PELCO P PELCO D Sensor Alarm I O Port No Yes IR Extender Port No Yes Backup Method HDD USB Network Power Supply 12V 2A Operating Temperature W O HDD 10 to 50 14 F to 122 F Storage Temperature 20 to 70 4 F to 158 F Working Humidity 10 90 Dimension LxWxH in mm 250 x 230 x 45 300 x 220 x 50 1 Trademarks are properties of the...

Страница 105: ...O LTD Address 4F No 113 Jian 2nd Road Jhonghe District New Taipei City 23585 Taiwan TEL 886 2 8228 6080 FAX 886 2 8221 6857 Email support kguardsecurity com USA Technical Support Contact TEL 1 866 978 4888 Email usservice kguardsecurity com Customer Support ...

Отзывы: