11
Getting ready
Place the micro au IC card on the tray with
its IC surface face up and insert into the end
• Note the orientation of the notch.
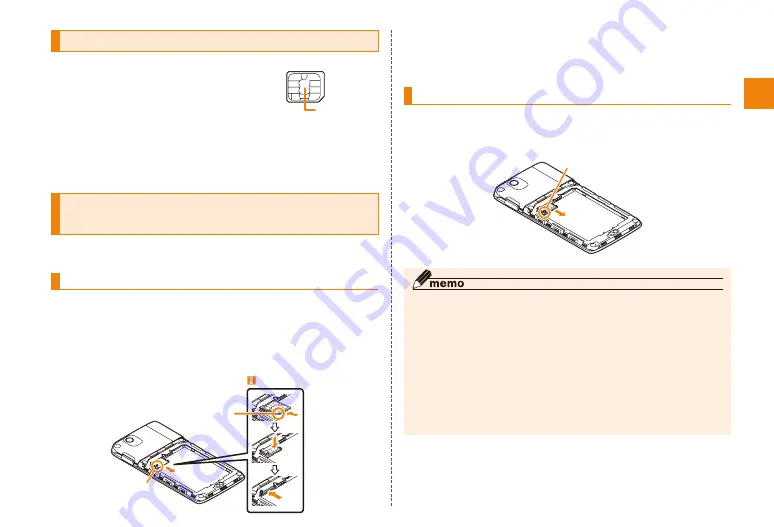
Removing the micro au IC card
Pull out the tray hooking the tab with your
finger straight to remove micro au IC card
Tab
◎ Note the following points, which may cause malfunction or
damage, when handling the micro au IC card.
• Do not touch the IC (metal) part of the micro au IC card or the
IC card terminal inside the IS12F.
• Insert the micro au IC card in the correct direction.
• Do not use excessive force to attach or remove the micro au
IC card.
◎ An error message is displayed if the micro au IC card is not
attached correctly or if there is a problem with the micro au IC
card.
◎ Do not lose the micro au IC card after it has been removed.
micro au IC card
On your micro au IC card, personal
information such as cell phone number
is recorded. If your micro au IC card is
not inserted correctly, operations such
as making/receiving calls and sending/receiving mail are
not available.
The IS12F supports only micro au IC card. An au IC card
used in an au cell phone or au smartphone cannot be used
in the IS12F.
Attaching/removing the micro au IC
card
• Before attaching/removing the micro au IC card, first turn
the IS12F off, and remove the battery pack.
Attaching the micro au IC card
Pull the tray straight hooking the tab with
your finger
• micro au IC card tray is designed not to be removed. Pull
out the tray until the pullout position mentioned when pull it
out. Do not pull it by force. Doing so may damage the tray.
Tab
Notch
IC(metal)part
micro au IC card


