background image

27

Installation and 
operating instructions

Aufstellen und
Bedienungshinweise

Montaje e
instrucciones operativas

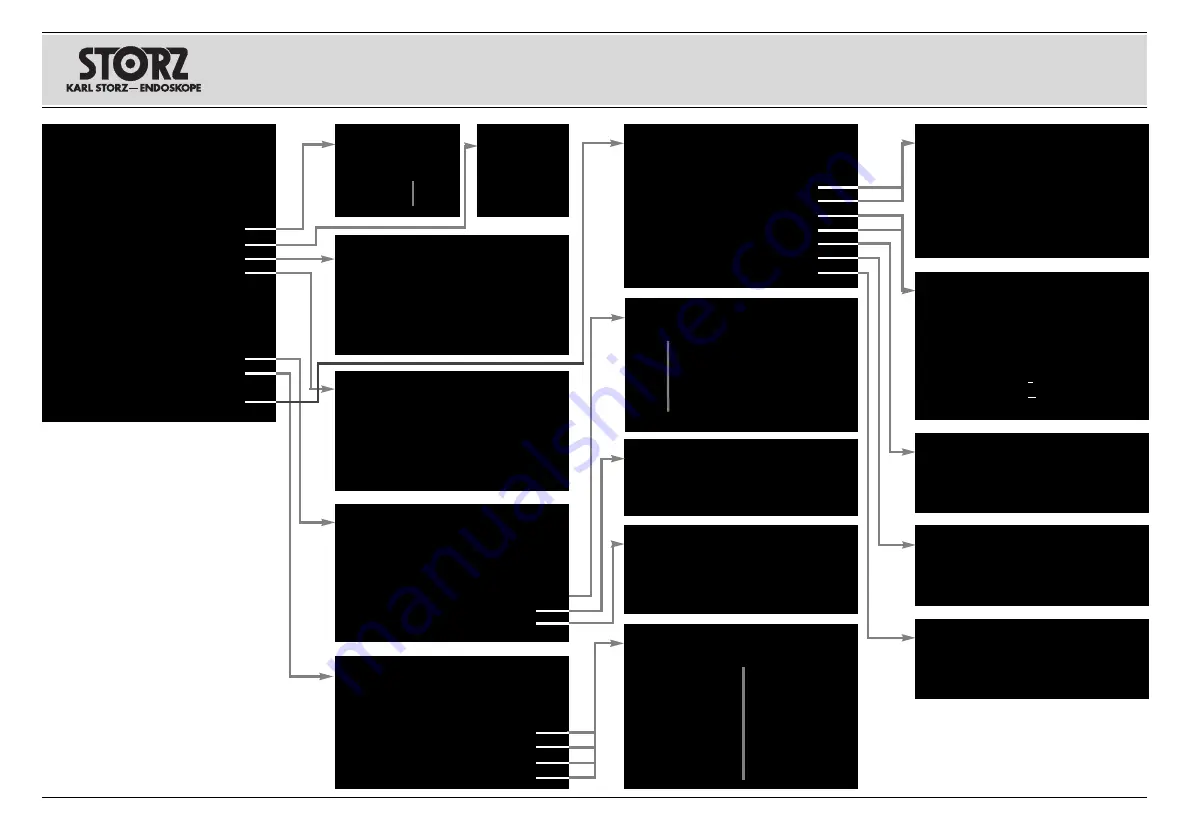
Menú del usuario

Selec. de pág. de info paciente: 

1

6

2

7

3

8

4

9

5

10

Sinopsis de funciones

<Nada>

Diafragma

Balance de

DV

blancos

Congelación

Accessorio 1

Balance de

Accessorio 2

blancos doble

Zoom

Patrón de Prueba

Brillo

Instalación

Realce

Instalación

Guardar y salir
Pantalla
Teclado
Configuración de Acc 1
Configuración de Acc 2
Botones Secundarios
Texto de DV
Formato de imagen

Pantalla / Teclado

English
Espanol
Francais
Italiano
Portugues
Deutsch

Menú del usuario

Salir
Balance de Blancos
Accesorio 1
Accesorio 2
Zoom (Nada)
Brillo (Medio)
Realce (Bajo)
Diafragma (Automático)
DV (Detener)/Grabar
Congelación (...de imagen)
Enc/(Apag)
Balance de blancos doble (1)/2
Patrón de prueba Enc/(Apag)
Información del paciente ...
Programar los botones del
cabezal
Instalación ...

Zoom 

Nada
1.25x
1.5x

Botones Secundarios

Enc
Apag

Configuración de Acc 1 / 2

No Texto
Accesorio 1 / 2
Pedal (1) / Videograb. (2)
Impresora
Accesor. 1 – Imagen fija /
Accesor. 2 – Video

Modificar info del paciente

Siguiente
Previo
Salir

Realce

Apag
Bajo
Alto
Filtro A fibroskop.
Filtro B fibroskop.

Brillo

Bajo
Medio
Alto

Información del paciente

Salir
Pantalla de info del paciente
Enc/(Apag)
Selec. de pág. de info paciente
Borrar todas las páginas 
Modificar info del paciente

Formato de imagen

PAL
NTSC

Texto de DV

Enc
Apag

Borrar todas las páginas de 
información del paciente? 

S/N

1.75x
2x

Diafragma

Automático
1/50

1/1000

1/125

1/2000

1/250

1/4000

1/500

1/10000

Programar los botones del 
cabezal 

Guardar y salir 
Botón azul principal
Botón azul secundario
Botón plateado primario
Botón plateado secundario

Содержание 202130 20

Страница 1: ...TELECAM SL II TELECAM SL II TELECAM SL II 202130 20 202130 20 202130 20 ...

Страница 2: ......

Страница 3: ...Gebrauchsanweisung Instruction Manual Manual de instrucciones TELECAM SL II TELECAM SL II TELECAM SL II 202130 20 202130 20 202130 20 ...

Страница 4: ...ión puesta en funcionamiento y manipulación de la unidad de control de la cámara CCU TELECAM SL II Recomendamos su lectura detenida y colocación en un lugar visible cerca no al aparato para facilitar la consulta Procure mantener el Manual de instrucciones dentro de la funda de plástico que se adjunta para evitar su deterioro Allgemeiner Warnhinweis Benutzer von KARL STORZ Geräten sollten sorg fält...

Страница 5: ...ezal de la cámara Parfocal Zoom esterilizable con vapor 202120 31 202121 31 PAL NTSC 20212032 202121 32 PAL NTSC Kamerakopf TELECAM B Camera head TELECAM B Cabezal de la cámara TELECAM B 202120 34 202121 34 PAL NTSC Kamerakopf TELECAM C Camera head TELECAM C Cabezal de la cámara TELECAM C 202620 30 202621 30 PAL NTSC Kamerakopf DCI II Camera head DCI II Cabezal de la cámara DCI II o w r i q w e r ...

Страница 6: ...eptacle Potential equalization connector Power fuse holder q Grasping mechanism w Focusing ring e Focal length adjuster zoom r User control buttons t Fixation clamp TELECAM B camera head y Eyepiece TELECAM B camera head u C mount connection i Antifog port o Snap in DCI coupling mechanism Q Interruptor de la red W Tecla para el balance automático del blanco E Cajón para las instrucciones de uso res...

Страница 7: ...amera Video input Video output White balance DANGER Risk of explosion if used in the presence of flammable anesthetics CAUTION To reduce the risk of electrical shock do not remove cover Refer servicing to qualified service personnel Do not store liquids on or above the unit Keep out of reach of patients Antes de la puesta en marcha lea el Manual de instrucciones Conectado Desconectado Conexión equ...

Страница 8: ...Color video monitor Environmental protection use period of 50 years China RoHS Formatted in italics Signifies camera default Continuación de la tabla Salida Entrada Monitor de vídeo a color Tiempo de vida útil inocua para el medio ambiente de 50 años directiva RoHS china Formato en Cursiva Preajuste de la cámara Symbolerläuterungen Symbols employed Explicación de los símbolos ...

Страница 9: ...Conexión a la red de alimentación 12 Conexión del monitor 12 Conexión del interruptor de pedal 12 Conexión accesorio s p control remoto 13 Indicaciones para la conexión de accesorios 13 Conexión del teclado 14 Conexión del cabezal de la cámara 14 Conexión de la CCU 14 Conexión del endoscopio y del cable de luz 15 Cabezales de la cámara TELECAM SL II 15 Conexión de un endoscopio 15 Conexión de un c...

Страница 10: ...ructions non autoclavable camera heads 40 Sterilization instructions autoclavable camera heads 45 Use of sterile covers 46 References for cleaning and sterilization 46 Maintenance 47 Servicing and repair 47 Repair program 48 Limitation of liability 49 Manufacturer s warranty 49 Technical description 50 Troubleshooting 50 Technical data 53 Technical documentation 55 Wiring diagram 57 Block diagram ...

Страница 11: ...i che Funktionen auf dem neuesten Stand der Technik Hierzu zählen u a Über Kamerakopftasten oder Tastatur zugängliche Kamerafunktionen für alle Fachgebiete Individuelle Anpassung der Kamera durch Pro grammierung der beiden Kamerakopftasten für vier Funktionen Bessere Bildqualität und weniger Bildrauschen durch volldigitale CCU Elektronik Verbesserung von Kontrast und Bildschärfe durch digitale Bil...

Страница 12: ... precautions must be followed to avoid possible damage to the unit Note A Note indicates special information about operating the unit Definiciones Cuidado Este término llama la atención sobre una situación de peligro para el paciente o para el médico No observar este aviso podría conllevar lesiones para el paciente o para el médico Advertencia Este término llama la aten ción sobre determinadas med...

Страница 13: ... There is a risk of explosion Warning Danger of electric shock Do not open the unit Refer servicing only to qualified person nel Any opening of the unit by unauthorized per sons voids the guarantee The only exception to this are activities described in this instruction manual Warning Grounding reliability can only be achieved when the equipment is connected to a properly installed Hospital Only or...

Страница 14: ...ent to the signal input part or signal output part configures a medical system and is therefore responsible for ensuring that the system complies with the requirements of the system standard IEC 60601 1 1 If in doubt consult the technical service department or your local representative Warning To avoid burns during endoscopic procedures operators must use caution when employing non BF CF type equi...

Страница 15: ...ransurethal resection of the prostate It has been recorded that hydrogen can accumulate in the bladder above the irrigant solution Dissipate any flammable gasses in the colon bladder or other body cavities prior to use of high frequency sur gical equipment Warning When using the camera system in a surgical discipline employing a laser caution should be taken to prevent eye damage to the operator T...

Страница 16: ...ith accessories wearing parts and disposable items which are designated by KARL STORZ as suitable for the camera or the safe use of which is proven For safety reasons do not perform unauthorized con versions or modifications to the camera Empleo previsto La CCU para TELECAM SL II es una cámara de vídeo que se conecta a un endoscopio rígido o flexible y que ha sido diseñada para su aplica ción en i...

Страница 17: ...como peligrosas por este moti vo Esto es válido también para productos quími cos fácilmente inflamables y explosivos tales como p ej productos para desinfección de la piel y desinfectantes rápidos para superficies Sicherheitshinweise 60 Sicherheitsmaßnahmen beim Einsatz des Gerätes Der Anwender hat sich vor der Anwendung des Gerätes von der Funktionssicherheit und dem ordnungsgemäßen Zustand des G...

Страница 18: ...ype dependent upon set Instruction Manual 96206079D Equipo básico CCU para TELECAM SL II PAL NTSC 202130 20 Cable de conexión S Video 547 S Cable de conexión BNC 536 MK Cable de conexión para control de accesorios 2x 202210 70 Cable DV 200400 82 Cable de red 400 A 240V Intl 400 B 110V U S Teclado 202001 30S el tipo depende del set Manual de instrucciones 96206079D Cabezales compatibles de la cámar...

Страница 19: ... Warnung Sie ist nicht für den Betrieb in explosionsgefährdeten Bereichen bestimmt Bei Verwendung von explosi ven Narkosegasen darf das Gerät nicht in der dargestellten Gefahrenzone betrie ben werden Installing the TELECAM SL II Note The TELECAM SL II CCU may be used only in medical rooms with electrical installations conforming to the applicable national state and local electrical regulations War...

Страница 20: ...nstecken Zusätzlich ist im Benut zermenü siehe Übersicht S 25 Zubehör 1 auf Fusspedal zu programmieren Funktion auslösen Durch Drücken des Fußschalters wird das Video bild Eingefroren Für Livebild Kopftasten Fuß schalter drücken erscheint auf dem Monitor Durch nochmaliges Drücken des Fußschalters wird das Livebild wieder angezeigt Hinweis Die Umschaltung zwischen Standbild und Livebild kann auch d...

Страница 21: ...em auf der Frontseite des Monitors befindlichen Signal Eingangswahlschalter kann nun zwischen Live Bild Direktverbindung und Kontrolle der Zusatz geräte hin und hergeschaltet werden Instructions on connecting accessory devices Optimal image quality is achieved when the cam era signal is transmitted to the monitor directly without any detour Documentation equipment such as printers or video recorde...

Страница 22: ...wering up the CCU Switch on the camera control unit Q and the video monitor Each time the CCU is switched on color bars will appear on the video test screen for about 2 sec onds If the camera head is not plugged into the CCU correctly and completely the color bars will remain on the monitor The color bars will remain visible until the camera head connector is properly and completely inserted into ...

Страница 23: ...kraft selbsttätig Vorsicht Ein zusätzliches Festdrehen des äußeren Rings zur weiteren Fixierung des Okulars ist nicht erforderlich Dies kann u U zu einer Beschädigung der Instrumentenkupplung führen TELECAM SL II camera heads Your TELECAM SL II CCU can be equipped with any of the following camera heads TELECAM Parfocal Zoom camera head TELECAM Parfocal Zoom camera head AUTOCLAVE TELECAM B camera h...

Страница 24: ...hemical residue on the light cable and on the light entrance of the endoscope to burn This can damage the light fibers and have a detrimental effect on the lighting power and the picture quality Cabezal de cámara TELECAM Parfocal Zoom Ajuste de la distancia focal La distancia focal puede ajustarse mediante el anillo azul de zoom e Nota Para obtener un rendimiento máximo de la luz mantenga limpias ...

Страница 25: ...ossible to position the beamsplit ter in any other direction angle and by turning the CCD sensor to always see the correctly aligned image on the monitor If required the camera can also be firmly attached to the eyepiece by activating the fixation clamp t TELECAM C C mount camera head Connecting an adaptor lens The TELECAM C camera head requires a lens Screw the lens onto the camera head in a cloc...

Страница 26: ...Para retirar el cable de luz extraiga el cable de luz del cabezal de la cámara DCI Nota Para obtener un rendimiento máximo de la luz mantenga limpias las superficies de entrada y salida de luz del cable de luz y del endoscopio Limpie estas superficies con una torunda de al godón embebida en solución de limpieza y repa se a continuación con una torunda de algodón embebida en alcohol isopropílico al...

Страница 27: ...ones abarcan la com pensación automática del brillo del contraste de la intensidad del color y de las características de los matices Si su monitor posee este tipo de fun ciones automáticas de ajuste proceda de acuer do con las indicaciones del Manual de instruc ciones respectivo Adjusting the video monitor using the integral color test pattern generator These adjustments can be performed only if t...

Страница 28: ...bstand zwischen Endo skop und der weißen Oberfläche verringern und Weißabgleich erneut durchführen Weißabgleich Fehlgeschlagen zu Hell Weist darauf hin dass das Sichtfeld zu hell ist In diesem Fall den Abstand zwischen Endoskop und der weißen Oberfläche vergrößern und den Weißabgleich erneut durchführen Weißabgleich Fehlgeschlagen Farbe Weist darauf hin dass die Farbtemperatur außerhalb des Regelb...

Страница 29: ...ally controls the level of contrast and image sharpness with the settings Off Low and High Special filters may also be available with certain camera heads to sharpen fiberoptic endoscopic images Shutter This camera features a patented auto exposure mode which selects exposure automat ically depending on the available light Manual shutter speeds from 1 60 to 1 10 000 second can also be selected Cau...

Страница 30: ... Press the head button assigned to Light mode selection blue button Light 1 Setting or Light 2 Setting will appear on screen To activate the white balance mode press the sil ver head button White balance will appear After white balance is completed repeat the procedure to perform white balance on the other light source 3 The white balance has been successfully per formed when White balance O K app...

Страница 31: ... disappear with the highlighted setting saved Programming the camera head buttons The TELECAM SL II camera head buttons are initially programmed as follows Blue Button 1 Primary short press Accessory 1 Secondary 2 second press Brightness Silver Button 2 Primary short press Accessory 2 Secondary 2 second press Enhancement These camera head buttons can be re pro grammed to any of the following funct...

Страница 32: ... open the menu press ENTER on the key board The menu will appear as shown below left Use the or keys to highlight the desired option Press ENTER to select Either the function will be performed as in the case of White Balance or Freeze or a menu will be opened with the current setting highlighted as in the case of Zoom or Shutter Use the or keys to highlight the desired setting then press ENTER to ...

Страница 33: ... Standbild Ein Aus Zwei Weißabgleich 1 2 Testbild Ein Aus Patientendaten Kopftasten programmieren Einstellungen Zoom Deaktiviert 1 25x 1 5x Sekundärfunktionstasten Ein Aus Einstellung Zubeh 1 2 Kein Text Zubehör 1 2 Fusspedal 1 Videorek 2 Drucker Zubeh 1 Standbild Zubeh 2 Video Patienteninformationen bearbeiten Weiter Zurück Beenden Kontrastanhebung Aus Niedrig Hoch Fiberskop Filter A Fiberskop Fi...

Страница 34: ...o DV Stop Record Freeze On Off Dual White Balance 1 2 Color Bars On Off Patient Information Program Head Buttons Setup Zoom None 1 25x 1 5x Secondary Buttons On Off Acc 1 2 Configuration No Text Accessory 1 2 Footswitch 1 VCR 2 Printer Acc 1 Still Acc 2 Video Edit Patient Information Next Previous Exit Enhancement Off Low High Fiberscope Filter A Fiberscope Filter B Brightness Low Medium High Pati...

Страница 35: ...en Enc Apag Balance de blancos doble 1 2 Patrón de prueba Enc Apag Información del paciente Programar los botones del cabezal Instalación Zoom Nada 1 25x 1 5x Botones Secundarios Enc Apag Configuración de Acc 1 2 No Texto Accesorio 1 2 Pedal 1 Videograb 2 Impresora Accesor 1 Imagen fija Accesor 2 Video Modificar info del paciente Siguiente Previo Salir Realce Apag Bajo Alto Filtro A fibroskop Filt...

Страница 36: ...ert allows text to be inserted indicated by a flashing underscore cursor Note When the cursor reaches the last character of the last line it will remain in the same position Select Next see below to insert additional text or keys Moves cursor between line 1 line 2 and the menu below At the bottom of the Edit Patient Information screen the following options are available Next goes to next page Prev...

Страница 37: ...igned to accessory 2 is pressed Options include No Text Accessory 2 VCR Printer Acc 2 Video Secondary Buttons Enables ON or disables OFF the functioning of the secondary camera head buttons secondary buttons are activated when the camera head is held down for 2 sec onds DV Text Text on DV output can be turned ON or OFF Imager Format The CCU is compatible with PAL and NTSC camera heads With this op...

Страница 38: ...wer fuse holder on both sides with a small screwdriver or other suitable tool Insert new fuses of the appropriate rating Caution Only use fuses of the correct rating 100 240 V앑 Power fuse 2 x T 1 6 AL250V Refit the power fuse holder Reconnect the power cord Test the camera system for proper operation Cambio de fusibles Desconecte la CCU y desenchufe la conexión a la red Advertencia Utilice únicame...

Страница 39: ...se camera failure Caution Heat from the light source can cause chemical residue on the light cable and on the light entrance of the endoscope to burn This can damage the light fibers and have a detrimental effect on the lighting power and the picture quality Care and handling To maximize the life of your camera please follow the guidelines given below for proper handling and care of the camera hea...

Страница 40: ...m STERIS bzw STERRAD Verfahren nach den Angaben des Herstellers Um den Kartenstecker vor Beschädigungen zu schützen DIE SCHUTZKAPPE DES KAMERA KOPFSTECKERS NUR ZUM GEBRAUCH ABNEHMEN EL CABEZAL DE LA CÁMARA NO DEBE ELE VARSE NUNCA SUSPENDIDO DEL CABLE La unidad hay que tomarla siempre por el cabezal de la cámara y a continuación tomar el cable con el enchufe El cable contiene conductores electrónic...

Страница 41: ... PAL NTSC TELECAM C Kamerakopf TELECAM C camera head Cabezal de la cámara TELECAM C 202301 45 202301 41 202000 42 202000 43 C Mount Objektiv C mount lens Objetivo C mount f 12 25 30 38 mm 202620 30 202621 30 PAL NTSC DCI Kamerakopf DCI camera head Cabezal de la cámara DCI Für Reinigung und Desinfektion die Liste der freigegebenen Chemikalien beachten Hinweis Aufgrund von möglichen kosmetischen Ver...

Страница 42: ...ientos de preparación validados Cuidado El usuario deberá validar cual quier procedimiento que difiera de los parámetros recomendados de limpieza y desinfección esterilización Warnung Die nachfolgend aufgeführten Verfahren garantieren allein noch keine Dekontamination oder Sterilität Diese lässt sich nur erzielen wenn vom Personal nach anerkannten Verfahren zur Desin fektion und Sterilisierung vor...

Страница 43: ...izada Para el enjuague enjuague final des pués del período de aplicación es necesario utili zar agua microbiológicamente pura esterilizada Manuelle Aufbereitung Warnung Bei allen Reinigungs und Desinfektionsarbeiten an kontaminierten Instrumenten sind die örtlichen Richtlini en der Berufsgenossenschaft und gleich rangiger Organisationen zu beachten Reinigung der Kamerakontrolleinheit Vorsicht Vor ...

Страница 44: ...n a suitable basin with disinfectant con centration and exposure time according to manufacturer s instructions making sure that they are completely free of air bubbles Use plastic basins so as to avoid scratching the instruments and to prevent electrolytic corrosion After exposure rinse with microbiologically pure sterile water Use unsoiled sterile water for each rinse Rinse the camera head and le...

Страница 45: ... should be returned to KARL STORZ for repair 9 Before sterilization coil the camera head cable into loops at least 15 cm in diameter Do not kink or twist the cable We recommend using the camera tray 39301 ACT autoclavable sterilization container Note To ensure the longest possible camera life we recommend using sterile covers 8 Después de la preparación inspeccione el cabezal de la cámara y o el o...

Страница 46: ...is safer A cleaning agent disinfectant approved by KARL STORZ must be used for machine prepara tion see Appendix pages 62 63 Note Due to the possible cosmetic changes to the camera head coating the use of enzymatic neutral cleaners is recommended Warning Only KARL STORZ camera heads which are designated as auto clavable can be prepared in devices for semi or fully automatic cleaning and disinfecti...

Страница 47: ... of the cleaner disinfector Use the rinsing program for endoscopic instruments according to the manufactur er s instructions Caution Once the program has ended the camera heads are subject to a high degree of corrosion due to the ambient conditions in the cleaning machine Preferably remove the camera heads from the cleaner disinfector immediately after the program has finished Caution Following ma...

Страница 48: ...d unit as described in the preparation section of this instruction man ual Place the camera head unit in a steriliza tion tray Do not place any instruments on top of the camera 2 All sterilization cycles must include a precon ditioning cycle Temperature 54 2 C 130 5 F Time 30 minutes Gassterilisation mit Ethylenoxid EtO 1 Die Kamerakopf Einheit reinigen wie im Auf bereitungsabschnitt dieser Gebrau...

Страница 49: ... 23 de junio 1978 para residuos de la esterilización EtO Oxido de etileno 25 ppm 250 ppm Clorhidrina de etileno 25 ppm 250 ppm Etilenoglicol 250 ppm 5000 ppm para instrumentos en contacto con sangre para instrumentos en contacto con piel y mucosa Sterilisation mit dem System STERRAD 100S Beim Sterilisationssystem STERRAD 100S wer den die Synergien von Wasserstoffperoxid und Niedrigtemperatur Gaspl...

Страница 50: ...die Wand des Sterilisators berühren 3 Die Taste START drücken Die Tür schließt sich automatisch und der voreingestellte automatische Zyklus startet Der Zyklus dauert ca 75 Minuten 4 Nach Abschluss des Zyklus die Taste OPEN DOOR TÜR ÖFFNEN drücken und die Kamerakopf Einheit entnehmen Sie ist sofort einsatzbereit 5 Detaillierte Anweisungen entnehmen Sie bitte der Gebrauchsanweisung des Sterilisation...

Страница 51: ...tem nicht für Geräte verwen den die nicht in Flüssigkeit eingetaucht werden dürfen Warnung Nach Beendigung eines Zyklus immer überprüfen dass der Steri lisationsbehälter leer ist Wenn der Sterili sationsbehälter nicht leer ist gilt die Ladung nicht als steril Warnung Bei Abbruch eines Sterilisati onszyklus sind die Geräte nicht ordnungs gemäß sterilisiert und oder gespült 1 Darauf achten dass alle...

Страница 52: ... Deckel nicht mit Gewalt schließen Wenn er sich nicht leicht schließen lässt den Deckel öffnen und die Lage des Anlagenfachs und behälters sowie der Absaugvorrichtung überprüfen 10 Die Taste START drücken Der Sterilisations zyklus dauert ca 30 Minuten 11 Nach Abschluss des Sterilisationszyklus ertö nen 5 kurze Töne und die Anzeige für den Abschluss des Zyklus leuchtet 12 Den leeren Sterilisationsm...

Страница 53: ...por vapor Procedimiento por gravitación Temperatura 121 122 C Tiempo de aplicación 30 minutos Procedimiento por gravitación esterilización relámpago Temperatura 134 C 3 C Tiempo de aplicación 10 minutos Procedimiento de prevacío Temperatura 134 C 3 C Tiempo de aplicación mín 4 minutos 3 Coloque los cestos en el esterilizador de modo tal que queden asegurados una ade cuada circulación y penetración...

Страница 54: ... estériles siga las instrucciones suministradas por el fabri cante de las mismas Literatur zum Thema Reinigung und Sterilisation Gruendemann B J and Meeker M H Alexan der s Care of the Patient in Surgery 7th edition The C V Mosby Company St Louis Mo 1983 Association for the Advancement of Medical Instrumentation Designing Testing and Labe ling Reusable Medical Devices for Reproces sing in Health C...

Страница 55: ... la seguridad y la longevidad del aparato EI servi cio de mantenimiento puede usted solicitarlo de su concesionario local o del fabricante Independientemente de las disposiciones lega les locales acerca de prevención de riesgos o de intervalos de control técnico de aparatos médi cos recomendamos que se realice por lo menos una vez al año un servicio de mantenimiento control de seguridad y funciona...

Страница 56: ...ied out by KARL STORZ or by experts authorized by KARL STORZ will invalidate all guarantee rights KARL STORZ gives no guaran tee on the correct functioning of equipment or instruments which have been repaired by unauthorized third parties Observaciones importantes Con el fin de prevenir infecciones rechazamos estrictamente la recepción de envíos de produc tos sanitarios contaminados Los productos ...

Страница 57: ...sabilidad en rela ción con la seguridad de su funcionamiento Cualquier manipulación no autorizada rescindirá la garantía Garantie Für die Dauer von zwei Jahren ab Übergabe an den Endkunden leisten wir unentgeltlich Ersatz für nachweisbar fehlerhaftes Material oder man gelhafte Verarbeitung Transportkosten und Versandrisiko können dabei nicht übernommen werden Im übrigen gilt die in unseren Allge m...

Страница 58: ...erficies de entrada y salida de luz en el endoscopio el cable de luz y el cabezal de cámara estén siem pre limpias a fin de obtener la mejor transmisión posible de la luz Descripción deI error No se puede conectar el sistema de cámara Causas posibles No hay corriente Fusible de la red defectuoso El cable de la red no está correctamente conec tado al enchufe del aparato Solución Verifique si hay co...

Страница 59: ... verschmutzt Abhilfe Mit Wattetupfer und Alkohollösung reinigen Symptom Blurred picture streaks smears etc Possible causes Optics or lens of the endoscope or camera soiled Camera head connector soiled Remedy Clean with cotton swab and alcohol solution Descripción deI error Imagen borrosa rayas fallos y similares Causas posibles Optica u objetivo sucios del endoscopio o la cámara Enchufe sucio del ...

Страница 60: ...dy Separate the camera head cable and HF cable If it is desired to minimize cable clutter in the sterile field clip the camera head cable and the HF cable together at one single point versus wrapping around each other Separate the camera control box and the HF unit Plug the camera control box and the HF unit into different power circuits Descripción deI error Interferencias en la imagen de vídeo a...

Страница 61: ...punkte 437 664 gesamt 379 392 gesamt Auflösung horizontal PAL NTSC 450 Zeilen 450 Zeilen Signal Rauschabstand PAL NTSC 50 dB 52 dB Min Empfindlichkeit 3 lux f1 4 Interne Linse Optisches Parfocal Zoom Brennweite der Linse 25 50 mm Instrumentenschnittstelle Nach DIN 58105 Standard Abmessungen Länge 114 mm Durchmesser 28 43 mm Gewicht 178 g Datos técnicos CCU para TELECAM SL II 202130 20 en combinaci...

Страница 62: ... 5 mm Klinke Lagerung Umgebungstemperatur 10 C 60 C 14 F 140 F Feuchtigkeit 20 bis 95 nicht kondensierend Luftdruck 50 kPa bis 106 kPa Betriebstemperatur 0 C 45 C 32 F 131 F Netzsicherungen 2x T1 6 AL250V Stromversorgung 100 120 V앑 bzw 200 240 V앑 50 60 Hz Abmessungen B x H x T 305 x 88 x 254 mm 12 0 x 3 5 x 10 0 in Gewicht 2 7 kg 6 0 lb Datos técnicos para CCU Regulación automática de la exposició...

Страница 63: ...e man ufacturer for their use in repairing those compo nents of the unit that have been designated as reparable by their respective manufacturers Supply of such technical documentation relating to the unit shall not be construed as constituting manufacturer s authorization of user s personnel regardless of their levels of technical training to open or repair the unit Explicitly exempted herefrom a...

Страница 64: ...decompile or disassemble the Software or in any way modify the same The Customer has no right to create derivatives of the software and the Customer may not copy deci pher or re create the source code of the Software 69g paragraph 2 of the Copyright remains unaffected by this This refers to German Copyright Law 5 Any modification or enhancement of the Software by the Customer in violation of this ...

Страница 65: ...ón Technische Beschreibung Anschlussübersicht Technical description Wiring diagram MONITOR TELECAM SL II CCU DRUCKER PRINTER IMPRESORA 1 2 ACC S VIDEO DV COMP VIDEO T1 6A 250V TASTATUR KEYBOARD TECLADO KEYBOARD z B i e p e KARL STORZ AIDA DVD ...

Страница 66: ...pply Image Processing Video Encoder DV Encoder Microprocessor Update Port Keyboard Port AC Inlet Frame Buffer Application Memory System Bus Camera Head Universal AC Power Power Isolation AC Switch Voltage Regulation Head Clock DV Interface Acc Port Motherboard CCD Driver YC Output DV Output ATE Keyboard Mains Power Comp Out YC Output Accessories Switch WB Button WB Button RTC ID ROM Control I 2 C ...

Страница 67: ...30 mm 20200042 Desgleichen f 25 mm Same f 25 mm Idem f 25 mm 20230141 Desgleichen f 12 mm Same f 12 mm Idem f 12 mm 20230145 Kamerakopf DCI II PAL Camera head DCI II PAL Cabezal de cámara DCI II PAL 20262030 Desgleichen NTSC Same NTSC Idem NTSC 20262130 TELECAM SL II Kamerakontrolleinheit TELECAM SL II Camera Control Unit Unidad de control de la cámara TELECAM SL II 20213020 Schutzhülle für Kamera...

Страница 68: ... Kolposkop f 85 mm zur Verwendung microscope or colposcope f 85 mm colposcopio ZEISS f 85 mm para emplear con mit optischem Teiler 301513 und for use with beamsplitter 301513 and divisor de imágenes 301513 o adaptador C Mount Adapter 2010 Z C mount adaptor 2010 Z C Mount 2010 Z Optischer Teiler 50 50 zur Verwendung mit Beamsplitter 50 50 for use with ZEISS Divisor de imágenes 50 50 para emplear co...

Страница 69: ...C Euro Scart video out Adaptador BNC Euro Scart video out 490 VA Adapter BNC Euro Scart Video in Adaptor BNC Euro Scart video in Adaptador BNC Euro Scart video in 536 MJ Adapter BNC 8 pol VTR Video in Adaptor BNC 8 pin VTR video in Adaptador BNC 8 polos VTR video in 536 ML Adapter BNC Cinch Video out Adaptor BNC Cinch video out Adaptador BNC Cinch video out 536 MM Adapter Cinch BNC Video in Adapto...

Страница 70: ...la superficie de piezas de aluminio incluso recubiertas piezas de plástico y uniones soldadas y puede afectar a la duración de la vida útil de los instrumentos Con endoscopios flexibles sólo se debe insertar el mango de inspección y no la carcasa ni el asidero Typ 1 Reiniger 2 Desinfektionsmittel 3 geeignet für Ultraschallbäder A nicht geeignet für flexible Endoskope gemäß Herstellerangaben A nur ...

Страница 71: ...guientes productos para limpieza y desinfección mecánicas están autorizados en lo referente a compatibilidad de materiales 63 Anhang Reinigungs und Desinfektionsmittel Appendix Cleaning agents and disinfectants Anexo Productos de limpieza y desinfección Typ 1 Reiniger 2 Desinfektionsmittel 3 geeignet für Ultraschallbäder 4 Neutralisator 5 Klarspüler A nicht geeignet für flexible Endoskope gemäß He...

Страница 72: ...ntial in determining the suitability of the equipment or system for the electromagnetic environment of use and in man aging the electromagnetic environment of use to permit the equipment or system to perform its intended use without disturbing other equipment and systems or non medical electrical equip ment If this equipment does cause harmful inter ference with other devices the user is encour ag...

Страница 73: ...y be necessary to take adequate miti gation measures such as re orienting relocating or shielding the TELECAM SL II model 202130 20 or filtering the connection to the public mains network WARNING The use of portable and mobile RF equipment may have an impact on this and other pieces of medical equipment WARNING The use of cables other than those specified in the KARL STORZ instruction manual may r...

Страница 74: ... No Connection of S video signals BNC to BNC Yes 1 8 No Connection of composite video signals 1395 Firewire Yes 4 5 No Connection of DV Signals AC Power Cord No 3 No Power supply Tabelle 200 Leitungen mit der die Übereinstimmung mit der EN IEC 60601 1 2 nachgewiesen wurde Typ Schirm Länge m Ferrite Verwendung S Video Y C Ja 1 8 Nein Verbindung von S Video Signalen BNC nach BNC Ja 1 8 Nein Verbindu...

Страница 75: ...elbar an ein öffentliches Versorgungsnetz angeschlossen sind das auch Gebäude versorgt die zu Wohnzwecken benutzt werden Table 201 Guidance and manufacturer s declaration electromagnetic emissions TELECAM SL II model 202130 20 is intended for use in the electromagnetic environment specified below The customer or user of the TELECAM SL II model 202130 20 should ensure that it is used in such an env...

Страница 76: ...on muy bajas y no es probable que causen cualquier interferencia en los equipos electrónicos en las proximidades Emisiones de RF Norma CISPR 11 Está conforme con la clase A Emisiones de armónicos Norma CEI 61000 3 2 Está conforme con la clase A Fluctuaciones de tensión flickers Norma CEI 61000 3 3 Cumple La TELECAM SL II modelo 202130 20 es adecuada para usarse en todos los establecimientos difere...

Страница 77: ...ität der Versorgungsspannung sollte der einer typischen Geschäfts oder Krankenhausumgebung entsprechen Spannungseinbrüche Kurzzeitunterbrechungen und Schwankungen der Versorgungsspannung nach IEC 61000 4 11 5 UT 95 Einbruch der U T für 1 2 Periode 40 UT 60 Einbruch der U T für 5 Perioden 70 UT 30 Einbruch der U T für 25 Perioden 5 UT 95 Einbruch der U T für 5 Sekunden Stimmt überein 5 UT 95 Einbru...

Страница 78: ...ical commercial or hospital environment Voltage dips short interruptions and voltage variations on power supply input lines IEC 61000 4 11 5 UT 95 dip in UT for 0 5 cycle 40 UT 60 dip in UT for 5 cycles 70 UT 30 dip in UT for 25 cycles 5 UT 95 dip in UT for 5 sec Complies 5 UT 95 dip in UT for 0 5 cycle Complies 40 UT 60 dip in UT for 5 cycles Complies 70 UT 30 dip in UT for 25 cycles Complies 5 U...

Страница 79: ... entorno comercial típico o la de un hospital Caídas de tensión interrupciones y variaciones de tensión en las líneas de entrada de alimentación Norma CEI 61000 4 11 5 UT caída 95 en UT para 1 2 ciclo 40 UT caída 60 en UT para 5 ciclos 70 UT caída 30 en UT para 25 ciclos 5 UT caída 95 en UT para 5 segundos Cumple 5 UT caída 95 en UT para 1 2 ciclo Cumple 40 UT caída 60 en UT para 5 ciclos Cumple 7...

Страница 80: ... Frequenzen gemäß einer Untersuchung vor Ort a geringer als der Übereinstimmungspegel sein b In der Umgebung von Geräten die das folgende Bildzeichen tragen sind Störungen möglich Anmerkung Diese Leitlinien mögen nicht in allen Fällen anwendbar sein Die Ausbreitung elektromagnetischer Größen wird durch Absorptionen und Reflexionen der Gebäude Gegenstände und Menschen beeinflusst a Die Feldstärke s...

Страница 81: ...ngths from fixed RF transmitters as determined by an electromagnetic site surveya should be less than the compliance level in each frequency range b Interference may occur in the vicinity of equipment marked with the following symbol Note These guidelines may not apply in all situations Electromagnetic propagation is affected by absorption and reflection by structures objects and people a Field st...

Страница 82: ...un estudio electromagnético del lugara deberían estar por debajo del nivel de conformidad en cada rango de frecuenciab La interferencia puede ocurrir en la vecindad del equipo marcado con el siguiente símbolo Nota Estas directrices no se pueden aplicar en todas las situaciones La propagación electromagnética se afecta por la absorción y reflexión desde estructuras objetos y personas a Las intensid...

Страница 83: ...150 kHz bis 80 MHz P d 3 5 3 80 MHz bis 800 MHz P d 3 5 3 800 MHz bis 2 5 GHz P d 3 7 0 01 0 12 0 12 0 23 0 1 0 38 0 38 0 73 1 1 2 1 2 2 3 10 3 8 3 8 7 3 100 12 12 23 Für Sender deren maximale Nennleistung in obiger Tabelle nicht angegeben ist kann der empfohlene Schutzabstand d in Metern m unter Verwendung der Gleichung ermittelt werden die zur jeweiligen Spalte gehört wobei P die maximale Nennle...

Страница 84: ...output power of transmitter W 150 kHz to 80 MHz P d 3 5 3 80 MHz to 800 MHz P d 3 5 3 800 MHz to 2 5 GHz P d 3 7 0 01 0 12 0 12 0 23 0 1 0 38 0 38 0 73 1 1 2 1 2 2 3 10 3 8 3 8 7 3 100 12 12 23 For transmitters rated at a maximum output power not listed above the recommended separation distance d in meters m can be estimated using the equation applicable to the frequency of the transmitter where P...

Страница 85: ...encia de salida asignada al transmisor W 150 kHz a 80 MHz P d 3 5 3 80 MHz a 800 MHz P d 3 5 3 800 MHz a 2 5 GHz P d 3 7 0 01 0 12 0 12 0 23 0 1 0 38 0 38 0 73 1 1 2 1 2 2 3 10 3 8 3 8 7 3 100 12 12 23 Para los transmisores asignados con una potencia máxima de salida no listados arriba la distancia de separación recomendada d en metros m se puede determinar usando la ecuación aplicable a la frecue...

Страница 86: ......

Страница 87: ...78503 Tuttlingen Germany For a period of two years after delivery to the end user we shall replace free of charge equipment that can be proven to have defects in material or workman ship In doing so we cannot accept to bear the cost of transportation or the risk of shipment The warranty referred to in our Standard Conditions of Business shall apply To be completed by the supplier importer Company ...

Страница 88: ...eräte Besitzer auszufüllen Absender Firmenstempel Anwendungsgebiet Geräte Typ Serien Nr Kauf Dat Unterschrift Datum Bitte ausreichend frankieren ANTWORTKARTE KARL STORZ GmbH Co KG Postfach 230 78503 Tuttlingen To be filled out by instrument owner Return address company stamp Field of application Type of instrument Serial no Purchase date Signature Date Please attach sufficient postage REPLY CARD K...

Страница 89: ......

Страница 90: ...or Industrial Endoscopy KARL STORZ Endoscopia ROMANIA srl Str Prof Dr Anton Colorian nr 74 Sector 4 041393 Bukarest Romania Phone 40 0 31 4250800 Fax 40 0 31 4250801 E Mail office karlstorz ro TOV KARL STORZ Ukraine 18b Geroev Stallingrada avenu 04210 Kiev Ukraine Phone 380 44 42668 14 15 19 20 Fax 380 44 42668 14 OOO KARL STORZ Endoskopy WOSTOK Derbenyevskaya nab 7 building 4 115114 Moscow Russia...

Страница 91: ......

Страница 92: ...KARL STORZ GmbH Co KG Mittelstraße 8 78532 Tuttlingen Postfach 230 78503 Tuttlingen Germany Telefon 49 0 7461 708 0 Telefax 49 0 7461 708 105 E Mail info karlstorz de Web www karlstorz com ...

Отзывы: