


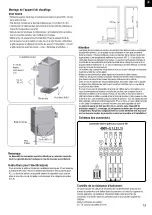


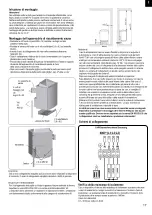


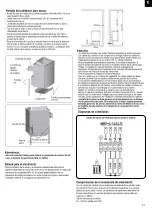


Oven type
Connection
rating in
kW
Connection
rating in
kW
Minimum cross-sections mm
2
(copper cable)
9kW oven connect to 400 V AC 3N
Mains cable from
mains to control
unit
Oven connection cable
from control unit to oven
(silicon)
Fuse in A
4,5 kW
4,5
< 7
5x2,5
5x1,5
16
9,0 kW
9,0
6-14
5x2,5
5x1,5
16
10
Position the sauna stones on the stone grid
Sauna stones are a natural product. We recommend that you clean the stones
with clean water before placing them on the stove. Do not use stones unless
they are designed for use in a sauna. Use a maximum of 12 kg of stones.
Important. Position the stones loosely and remove any stones that are too
small. If the stones are packed too tightly they will affect the air circulation and
will result in the sauna stove and cabin walls overheating and a
fi
re risk.
Do not use the stove without stones.
Only use stones that are marked as sauna stones in shops. Warranty claims
will not be accepted if stones other than those designed for use in saunas are
used or for claims resulting from
fi
lling of the stone chambers incorrectly. Turn
the stones at least once per year, remove any stones that are too small and
remove all stone dust and stone splinters. We recommend that you replace the
stones every two years.
Important.
If you cover the stove and
fi
ll the stone container incorrectly the unit may
cause a
fi
re. Do not use the stove without sauna stones.
Cleaning and care
Switch off the stove and allow it to cool before you clean it.
Do not use scouring cleaning products to clean the stove.
Liquids
The sauna stove is suitable for sauna liquids.
Please read the following carefully:
• Only use water that meets the quality requirements for domestic water.
• Water that contains high levels of lime or iron will leave residue on the
stones and metal in the water tank.
• To prevent scalds caused by rising steam whilst pouring liquid over the
stones, liquids should always be poured from the side using a ladle.
• Dripping water may cause permanent marks on the cabin
fl
oor.
• Pour small amounts of liquid on to the stones; if you pour too much liquid on
to them you may suffer scalds.
• Use as much liquid as you are comfortable with, but do not exceed a volume
of 15 g/m³ of cabin volume.
• The liquid should be poured straight on to the stones in the stove and must
be spread evenly over all the stones.
• If you use liquid concentrates (for example essential oils), follow the
instructions for use provided by the manufacturer.
• Using excessive concentrations of these products may result in explosions.
• Do not use mixtures of alcoholic drinks or other additives not recommended
for use in saunas as they pose a risk of
fi
re, explosion and may be harmful.
• The warranty will be voided if you fail to follow these instructions.
Important.
Liquids may cause marks on metal surfaces and sauna stones.
Sauna liquids with citrus fragrance may cause rust patches as a result of their
acid content.
In this case you should only use products in the diluted form speci
fi
ed by the
manufacturer.
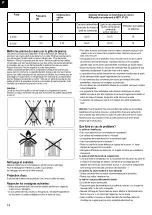
Troubleshooting
The stove will not heat up
• Have you activated all the necessary switches?
• Has the fuse in the domestic installation tripped?
• Have you set the temperature controller correctly?
• Have you pre-set the time switch?
• Defective sauna control unit (sensor breaker, see operating manual
for the control unit).
• RCCB trips – see the section entitled “Testing the insulation resistance”
The stove causes “cracking noises”
• The case parts and heating elements expand when the stove is heating up or
operating. The heating elements may move the sauna stones and cause
noises. Cracking noises are normal and are not grounds for complaint.
•
Sauna stones split and cause an odor
• Use only sauna stones recommended by the manufacturer.
• Sauna stones are too old; replace them.
The cabin does not get hot enough
• The sauna stove is too small
• Excessive temperature loss from the sauna cabin, for example due to poor or
lack of sealing.
• Incorrect display on the sauna thermometer. Mount the thermometer higher
and at a distance of approx. 3 cm from the sauna wall.
• Have a defective heating element (heating element does not glow) checked
and measured by an electrician.
GB
Anleitung_ Saunaofen_37.468.25.indd 10
Anleitung_ Saunaofen_37.468.25.indd 10
13.05.20 16:59
13.05.20 16:59
Содержание Sauna 280
Страница 1: ...Sauna 280...
Страница 5: ...Sauna 280 1 4xM 4xM DET 1 2xDET A 1600 2100 mm mm DET 1...
Страница 6: ...Sauna 280 2 I 1x DET 2 II 2 3a 3b 4 x DET 3a 4 x DET 3b 2x M X Z W Y 100 600 mm mm...
Страница 7: ...Sauna 280 3 I II 16x M...
Страница 8: ...Sauna 280 90 2x DET P 3A Bohren Sie 4 L cher in DET 2 10 mm...
Страница 9: ...4 II I 3x I 3x I 4a 4b 4e 4f R ckwand Vorderwand R ckwand Vorderwand SAUNA 280...
Страница 11: ...6 I II 11x DET 3b 10x DET 3a 8x DET 3a 8x DET 3b 16xH 16xH 20xH Siehe Seite 6A SAUNA 280...
Страница 15: ...Sauna 280 9 2xDET F 1xDET G 1xDET F 3x K 3x K 3x K 3x K...
Страница 16: ...Sauna 280 10 4x DET 7 12x H 575 I II 2xDET 8...
Страница 17: ...Sauna 280 4xDET 9 4x H Bitte bohren Sie 4mm L cher vor dem festschrauben 4x H 11 4x H 770...
Страница 21: ...Sauna 280 15 4x M 3x H 2xDET 19 2xDET 18 2x M 3x H...
Страница 22: ...Sauna 280 16 I 10x H mm mm 2xDET 20 II 14xDET 21 28x H III Entfernen DET A...
Страница 76: ...32...
Страница 84: ...ISC GmbH Art Nr 086 50 009 23 11011 Stand 05 2020...
Страница 90: ...6 D 6 0 Wandmontage Steuerger t 2 St ck Schrauben 4 x 25 mm 1 St ck Schraube 4 x 25 mm...
Страница 91: ...7 D 7 0 Steuerger te Ausf hrungen 50 50 70...
Страница 98: ...14 D Einstellung Beleuchtung 50 70 50 70 050...
Страница 99: ...15 D Einstellung Start Stop und Taste gleichzeitig mit Zeige und Mittelfinger bet tigen 50 70 50 70...
Страница 100: ...16 D Einstellung Temperatur 50 70 50 70...
Страница 101: ...17 D Einstellung Feuchte 50 70 50 70...
Страница 102: ...18 D 50 70...
Страница 117: ...33 GB Adjusting the lighting 50 70 50 70 050...
Страница 121: ...37 50 70 GB When a function is active the LED will be illuminated When a function is inactive the LED will be dark...
Страница 136: ...52 50 70 50 70 050 F R glage de l clairage...
Страница 140: ...56 50 70 F Si une fonction est active la LED est allum e Si une fonction est inactive la LED est teinte...
Страница 155: ...71 50 70 50 70 050 I Regolazione dell illuminazione...
Страница 159: ...75 50 70 I Se una funzione attiva il LED illuminato Il LED spento se una funzione non attiva...
Страница 174: ...90 50 70 50 70 050 Regulaci n de la iluminaci n E...
Страница 178: ...94 50 70 Si una funci n est activa se enciende el LED Si una funci n est inactiva el LED est oscuro E...
Страница 190: ...106 NL Verlichting Licht Netaansluiting Kachelaansluiting Voeler 1 Voeler 2 9 2 Sauna Control FIN P P aansluitschema...
Страница 191: ...107 NL Verlichting Licht Netaansluiting Kachelaansluiting Voeler 1 Voeler 2 9 3 Sauna Control BIO P P aansluitschema...
Страница 193: ...109 D 50 70 50 70 050 NL Instelling verlichting...
Страница 197: ...113 D 50 70 NL Als een functie actief is dan brandt de LED Als een functie niet actief is dan is de LED donker...
Страница 209: ...125 CZ 9 2 Sauna Control FIN P P sch ma zapojen Osv tlen sv tlo S ov p pojka P pojka kamen idlo 1 idlo 2...
Страница 210: ...126 CZ 9 3 Sauna Control BIO P P sch ma zapojen Osv tlen sv tlo S ov p pojka P pojka kamen idlo 1 idlo 2...
Страница 212: ...128 50 70 50 70 050 CZ Nastaven osv tlen...
Страница 221: ...137 D 13 1 St ckliste Sauna Control FIN Sauna Control FIN Artikelnummer 37 470 01 I Nr 18012...
Страница 223: ...139 D 13 3 St ckliste Sauna Control BIO Sauna Control BIO Artikelnummer 37 470 11 I Nr 18012...
Страница 224: ...140 13 4 Explosionszeichnung Sauna Control FIN P P Sauna Control FIN P P Art Nr 37 470 02 I Nr 19011...
Страница 226: ...142 13 6 Explosionszeichnung Sauna Control BIO P P Sauna Control BIO P P Art Nr 37 470 12 I Nr 19011...
Страница 232: ...148 CZ...
Страница 238: ...154 D Stand 03 2019...