


31
1. Guide
6. Backup
B
ackup
30
1. Guide
6. Backup
B
ackup
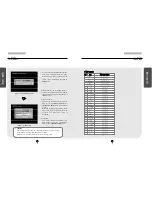
[Figure 6-14. Entering IP]
[Figure 6-15. Entering password]
[Network Drive IP] and [Network Password]
�
To enter the Network Drive IP address and Network password, use the mouse or the
directional keys and Enter button to select the numbers and letters. Press [OK] button to apply
the selected IP address and password.
�
It is possible to print out the recorded image using the printer that supports PostScript. Choose
the camera to print out while playing back the recorded and press [OK].
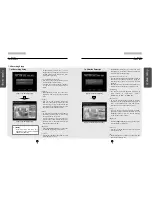
If you click [Backup] button in the search screen below image will appear.
[Connecting]
�
Press the [Connect] button to connect the
system to the receiving PC or fileserver.
Once connected, you will be able to select
Network Drive path.
�
Depending on the connection status, the
system will display either “Connect”,
“Disconnect”, or “Connect fail” message.
[Figure 6-16. Remote drive setup]
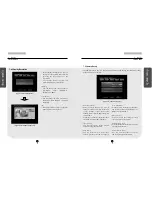
6.3 Printing Still Image
[Figure 6-17. Search Backup (DW-716)]
[Figure 6-18. Local Printer Selection]
①
[Save image]
�
Select BMP or JPEG to print out in still image.
�
Backup method can be selected by moving
mouse pointer over backup mode menu and
rolling wheel or using directional keys in the
DVR.
②
[Start Time] and [End Time]
�
Time of the paused image will be shown.
�
When Still Image mode is selected, [Start
Time] and [End Time] will indicate the time
when the selected frame is recorded. [Input]
button will be disabled.
③
[Select Media]
�
Use the mouse or the directional keys on the
system to print a still image and then click left
mouse button
or press Enter
�
Select Local Printer
④
[Camera]
�
Select the camera number that contains the
recording you wish to save.
�
When printing out in BMP or JPEG only
selected cameras during playback will be
activated.
[Local Drive-Local Printer]
�
Use the mouse wheel or the jog/shuttle on
the system to select Local Printer and press
[OK] button.
1
2
3
4


