


5
1. Guide
1. System Overview
Sy
st
em
Ov
ervi
ew
4
1. Guide
1. System Overview
Sy
st
em
Ov
ervi
ew
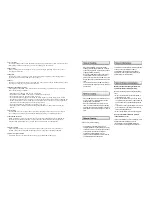
⑤
[CD-RW Open]
• Press button to open CD-RW.
⑥
[Camera/Number keys]
• In Surveillance mode, press for full
screen display of that camera.
• In Search mode, press for full screen
display of that camera recording during
playback.
• Press the keys to enter correct numeric
password when accessing Setup or
Search modes.
⑦
[Auto]
• Press to begin automatic channel
sequence either in full or multi screen
modes.
⑧
[Split screen buttons]
• In Surveillance or Search modes, press
to select 4-splitscreen
, 9-splitscreen
or 16-splitscreen (DW-716).
⑨
[Menu]
• Press to access Setup mode.
⑩
[Search]
• Press to access Search mode.
⑪
[Search mode control Keys]
• In Search mode, use these keys to view
the recording from either the first or last
recorded image, to play the recording
either forwards or backwards, to pause
viewing the recording.
⑫
[USB Port]
• You can connect a portable disk drive to
USB port to save backup of recorded
video.
• You can update your system software
with an upgrade package through the
USB port.
• A standard HP PostScript computer
printer can be connected to USB port of
DW-709/716 to print out any still image.
�
Removable Disk support
⑬
[POWER LED]
• When power switch is on, the LED gives
green light.
①
[Power Connector]
•Power cable input, 110V ~ 220V, for system
main power Supply.
②
[Camera Video Input BNC]
•16 BNCs for DW-716 and 9BNCs for DW-
709.
③
[Loop Through Output]
•Video output ports for camera loop through
to view image to another monitor or device.
•The system supports both NTSC and PAL.
1.2 Rear panel
[Caution]
�
Be careful of electrocution. Please
read [Safety Warnings and Cautions]
[Caution]
�
Dependant on the grounding status of
the power supply electric current that
can cause an electric shock may flow
in the video line (coaxial cable). Turn
off the system before connecting the
video line to the BNC port.
☞
[Note]
Removable Disk
�
The table below lists compatible USB
disks. If you want to use other removable
disk, it should be compatible with Linux
2.4.0 or over. Other USB disk may not
work properly.
�
It is recommended that you confirm
through the manufacturer the Linux
compatibility of the removal disk you wish
to purchase.
No.
Name
Company
USB Version
1
AnyDrive
AL-tech
Ver 1.1
2
Unidrive
KMIT
Ver 1.1
3
Nexdrive
JUNGSOFT
Ver 1.1
4
SHELLGINO N4
SHELLGINO
Ver 1.1
5
TRANSCEND JF A 128M
Transcend
Ver 1.1
The following describes keys and ports on the rear part of the system and their functions
(DW-716) :
[Figure 1-2. System rear view]
1
14
7
9 15
11
8
12
13
6
4
5
16
1
2
3
10


