background image

- 31 -

active  window  can  be  changed  by  pressing

  button.  The  status  info  OSD  belongs  to

active window. The place of the status OSDs

are same for both windows.
By pressing 

"P+"

 or 

"-P"

 button or directly en-

tering the channel number, you can watch the

channel you want at the active window.
Press the 

$9

 button to select the source for

active window.
Press 

"MENU"

 button to see the main menu

in PIP mode. Items change due to the case

whether the active window is PIP window or

main  window.
You can see the available sources in source

menu.

Press  the 

  button  again  to  exit  the  PIP

mode.

Freeze Picture

You can freeze the picture on the screen by

pressing the 

OK 

button. At 

PIP

 layouts; only

the DTV picture can be frozen.

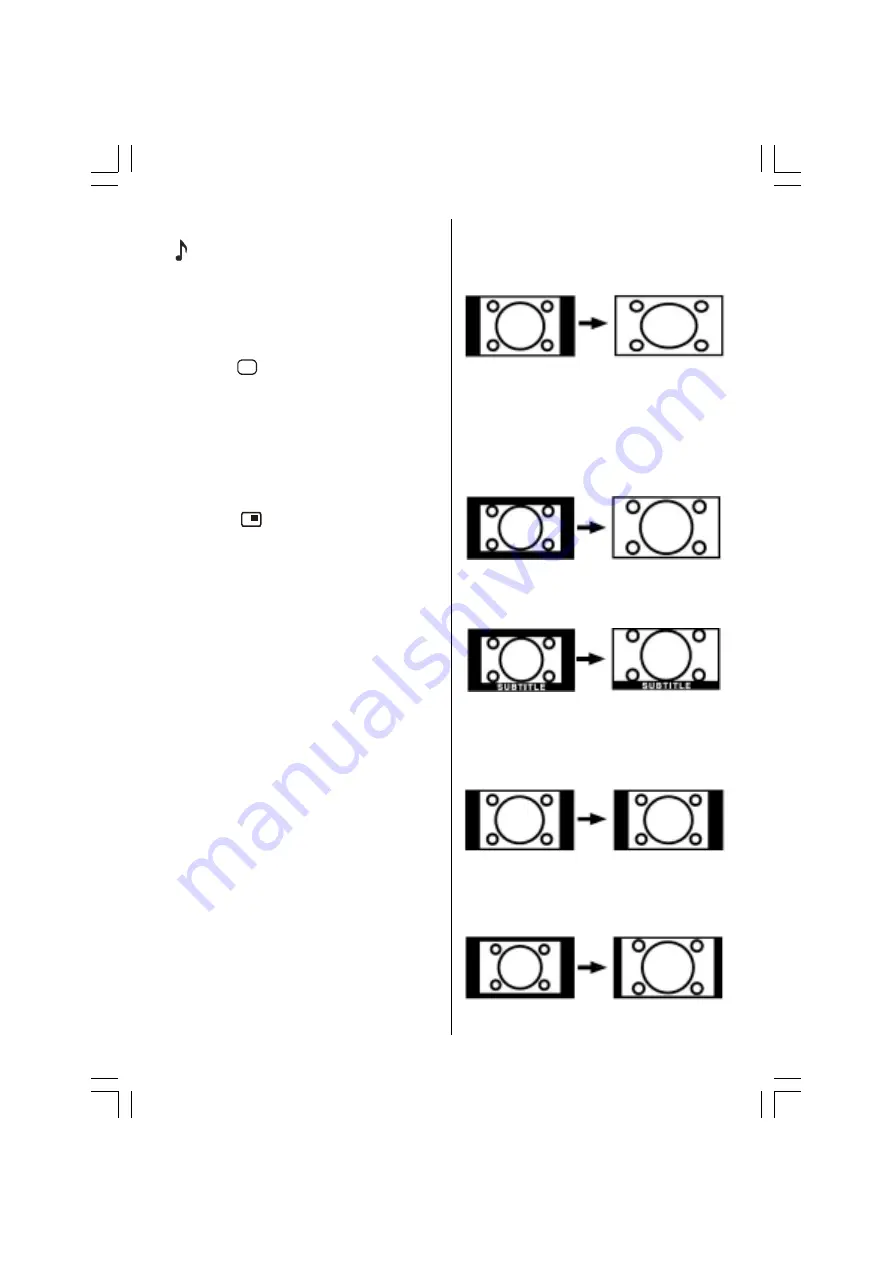
Zoom Modes

Zoom mode can be changed by pressing the

ZOOM

 button. You can change the screen size

according to the picture aspect ratio. Select

the  optimum  one  from  the  following 

ZOOM

modes.
Factory setting for this TV set is PANORAMIC

mode. To change the picture aspect ratio, pls

read  the following paragraphs.

Note:

 You  can  only  choose  4:3  and  FULL  in  PC

mode.

Auto:

When a 

WSS (Wide Screen Signalling)

 sig-

nal, which shows the aspect ratio of the pic-

ture, is included in the broadcast signal or the

signal from an external device, the TV auto-

matically changes the 

ZOOM

 mode accord-

ing to the 

WSS

 signal.

• When the 

AUTO

 mode does not function cor-

rectly due to poor 

WSS

 signal quality or when

you want to change the 

ZOOM

 mode, change

to another 

ZOOM

 mode manually.

Full:

This uniformly stretches the left and right sides

of a normal picture (4:3 aspect ratio) to fill the

wide TV screen.

• For 16:9 aspect ratio pictures that have been

squeezed into a normal picture (4:3 aspect

ratio), use the 

Full

 mode to restore the pic-

ture to its original shape.

16:9 Zoom:

This zooms up the wide picture (16:9 aspect

ratio) to the full screen.

16:9 Zoom Subtitle:

This zooms up the wide picture (16:9 aspect

ratio) with subtitles to the full screen.

“Default Zoom” Modes:

Regular

Use to view a normal picture (4:3 aspect ratio)

as this is its original shape.

14:9 Zoom:

This zooms up the wide picture (14:9 aspect

ratio)  to  the  upper  and  lower  limits  of  the

screen.

01-ENG-(LT-32DF7BC)-32775-17MB15-C1897S UK-PEU IDTV-OEM-(ECO-PIP)-10044394-50093075.p65

30.10.2006, 13:38

31

Содержание LT-32DF7BC

Страница 1: ... INTÉGRÉE MANUEL D INSTRUCTIONS FRANÇAIS INSTRUCTIONS ENGLISH LT 32DF7BC INTEGRATED DIGITAL LCD PANEL TV Digital ideo roadcasting V B D V B Trade Mark of the DVB Digital Video Broadcasting Project 1991 to 1996 Number 4276 INTEGRIERTES DIGITALES LCD TV GERÄT BEDINUNGSANLEITUNG DEUTSCH TV CON PANEL LCD DIGITAL INTEGRADO MANUAL DE INSTRUCCIONES CASTELLANO TV LCD NUMÉRIQUE INTÉGRÉE MANUEL D INSTRUCTIO...

Страница 2: ...m Modes 31 Analogue Teletext 32 To operate Teletext 32 To select a page of Teletext 32 To Select Index Page 32 Searching for a teletext page while watching TV 32 To Select Double Height Text 32 To Reveal concealed Information 32 To Stop Automatic Page Change 32 To Select a Subcode Page 33 To exit Teletext 33 Fastext and Toptext 33 Connect Peripheral Equipment 33 Via The Scart 33 Via Aerial Input 3...

Страница 3: ...rheating these open ings must not be blocked or covered in any way 6 Heat and Flames The set should not be placed near to naked flames and sources of intense heat such as an electric heater Ensure that no naked flame sources such as lighted candles are placed on top of the set 7 Lightning In case of storm and lightning or when going on holiday disconnect the power cord from the wall outlet 8 Repla...

Страница 4: ...our product DO NOT LEAVEYOURTVATSTAND BYOR OPERATING WHEN YOU LEAVE YOUR HOUSE 6XUHO FRQQHFW WKH JURXQG ZLUH Be sure to ground the connection properly Connect the ground terminal of TV with the ground terminal provided at the power outlet using the enclosed power cord If theprovided plug does not fit your outlet consult an electrician for replacement of the obsolete outlet 01 ENG LT 32DF7BC 32775 ...

Страница 5: ...r cord into the rear side of the TV securely and then plug the larger end of power cord into an AC outlet Make enough room for inserting and removing the power plug Place the TV as close to the outlet as possible The Main power supply for this TV is controlled by inserting or removing the power plug or pushing the main power button on the rear side of of the TV 01 ENG LT 32DF7BC 32775 17MB15 C1897...

Страница 6: ...nd are available for this television or and angled bracket which enables the TV to be wall mounted The LCD display panels are manufactured using an extremely high level of precision technol ogy however sometimes some parts of the screen may be missing picture elements or have luminous spots This is not a sign of a malfunction Make sure the TV is located in a position where it cannot be pushed or h...

Страница 7: ...ng normal operation or misuse of the product WARNING NEVER LEAVE A STATIONARY IMAGE ON THE SCREEN If stationary images generated by TELETEXT CHANNELIDENTIFICATION LOGOS COM PUTER DISPLAYS VIDEO GAMES ON SCREEN MENUS etc are left on the TV screen for any length of time they could be come permanently ingrained If you use your television to display completely still images or moving pictures which hav...

Страница 8: ...ht button BACK Back button Volume buttons GUIDE button TV RADIO No Function SUBTITLE button I II Audio Language PC Control buttons Hyper Sound On Off button ZOOM Zoom button buttons IDTV VCR DVD Teletext Control buttons P buttons Cursor Down button Teletext button Cursor Left button TV DTV button Information Button T V Link in Program Menu Mute button 01 ENG LT 32DF7BC 32775 17MB15 C1897S UK PEU I...

Страница 9: ...tal Audio Out PC Input Component Video YPbPr Inputs Component Audio Inputs EXT 3 HDMI Input EXT 5 Scart Socket 1 EXT 1 Scart Socket 2 EXT 2 Antenna PC Audio Input CI Common Interface Slot PeripheralEquipmentConnections EXT 4 01 ENG LT 32DF7BC 32775 17MB15 C1897S UK PEU IDTV OEM ECO PIP 10044394 50093075 p65 30 10 2006 13 38 8 ...

Страница 10: ...ll programmes can be named Forward or backward automatic tuning Sleep timer Child Lock Automatic sound mute when no transmission NTSC Playback AV in and S Video in are available It has D SUB15pins connector for external devices such as computer It has PIP functions AVL Automatic Volume Limiting When no valid signal is detected after 5 minutes the TV switches itself automatically to stand by mode P...

Страница 11: ...the batteries with the correct type Do not combine a used old battery or a new one or mixed battery types Remove dead batteries immediately to prevent acid from leaking into the battery compartment Step 3 Removing the terminal cover There are connection terminals and a card socket behind the covers of the rear of the TV Remove the cover before connecting an antenna VCR DVD and other devices Remove...

Страница 12: ...ove the stand Step 4 Connecting an aerial VCR and mains Please read the user manual of each device before connecting to ensure a correct setup It is necessary to connect aerial to watch TV Please see Peripheral Equipment Connections section for connections to other devices 5 RQQHFW WKH DHULDO 0DLQ SRZHU EXWWRQ 01 ENG LT 32DF7BC 32775 17MB15 C1897S UK PEU IDTV OEM ECO PIP 10044394 50093075 p65 30 1...

Страница 13: ...repeated names This is because the receiver may detect and store some channels includ ing those it cannot receive clearly from adja cent areas alongside the strong channels from a transmitter nearby This is not a problem and the weaker channels can be deleted from the receiver later as described in Edit PR List section When an indoor antenna is used and if it requires 5 volts to be powered set ant...

Страница 14: ...R in the following T V LINK section T V LINK When a T V LINK compatible VCR connected to the EXT 2 terminal on the TV it is easier to set up the VCR and to view videos T V LINK uses the following features To use T V LINK functions A T V LINK compatible VCR means a JVC video cassette recorder with the T V LINK logo or with one of the following logos For details see your VCR instruction manual Q LIN...

Страница 15: ...n VCR image view When the VCR starts playing the TV automati cally turns on and images from EXT 1 and EXT 2 appear on the screen This function does not happen if your TV s main power is turned off Set your TV s main power to on StandBy Mode BasicOperations You can operate your TV using both the re mote control and TV buttons Operation with the buttons on the TV Volume Setting Press button to decre...

Страница 16: ...SCART cable and powered on then the IDTV will automatically switch to EXT mode The IDTV will switch to the last watched mode TV or DIGITAL TV if DVD player is switched off or TV DTV button is pressed EVERYDAY OPERATION While using the IDTV to the full there are great many buttons to use in different situations Many of the menu screens displayed by the IDTV have reminders as to which button do what...

Страница 17: ...t the reminder so that you will not miss the programme you want to watch 1 Press or buttons to choose the channel 2 Press the Red and Green buttons to change the time andYellow and Blue but tons to change the date 3 Press or buttons and then or buttons to choose the programme you want to watch 4 Press the OK button The reminder icon will be displayed on the right side of the chosen programme name ...

Страница 18: ...timer recording the VCR and TV must be connected correctly For details see T V LINK section When you have a T V LINK compatible VCR connected to Ext 2 all you need to do is set the TV timer settings and the programme will be recorded By using Direct Rec of the T V LINK func tion the Direct Rec commands are sent from the TV to the VCR to automatically start and end the recording It is not necessary...

Страница 19: ... input position moves Press the button Mode Use the buttons to choose the timer mode Once Daily Weekly and then press the OK button 4 Prepare your VCR for recording When recording on a T V LINK compatible VCR 1 Insert the videotape for recording into the VCR and set the recording mode 2 Make sure the VCR is ready to receive Di rect Rec commands from the TV 3 Make sure VCR timer settings do not coi...

Страница 20: ...BTITLE GUIDE BACK number buttons dur ing recording a message appears ask ing if you want to stop recording or not Press OK button to stop recording or BLUE button to continue recording Cancelling the timer setting Display the TIMER MENU and press the buttons to choose which timer setting to cancel Press the buttons so that Inactive appears in the Mode column Reactivating the cancelled timer settin...

Страница 21: ... see Setting the favourite channels on page 22 Off The Edit PR List Favourites settings are dis abled When the button is pressed all the channels registered in the Edit PR List can be chosen Antenna Power When antenna power option is set as 5 volts 5V will be transmitted to the antenna output This feature enables the use of active anten nas Note Antenna power should be OFF when standard antenna is...

Страница 22: ...word 4 Input the new PIN code password again in the Confirm box Pin code is changed appears Your newly chosen PIN code is now set You will now need to use the PIN code password you choose Here to lock or to unlock the Edit PR List s Lock Edit PR List Choose Edit PR List and press the OK but ton EDIT PR LIST appears GLW 1XPEHU The Edit PR List can be used to do the follow ing delete registered chan...

Страница 23: ...ow appears 3 Press the buttons and choose a character press the buttons to move the cursor and edit the name and then press the OK button The edited channel appears in the Edit PR List Locking a channel When there is a channel you do not want your children to watch you can lock the channel 1 Press the buttons and choose Lock on the bar at the bottom of the screen 2 Press the buttons and choose the...

Страница 24: ...he receiver can search for channels auto matically searching all the broadcast frequen cies for free to air channels To performAutomatic search SelectAutomatic Search with the or buttons and press OK A warning message is displayed 6WDUW DXWRPDWLF VHDUFK XUUHQW 35 OLVW ZLOO EH UHSODFHG HV 1R This starts the automatic tuning process and searches through all the available broadcast frequencies for fr...

Страница 25: ...iew the pay channels of the Digi tal Terrestrial broadcasting Obtain the Conditional Access Module CAM and the Viewing card by subscribing to a pay channel company then insert those to the Tele vision using the following procedure 1 Switch off the TV and unplug from the mains 2 Insert the CAM then Viewing Card to the slot that is located in the terminal cover at the left hand side of the TV from f...

Страница 26: ...gnal By pressing a b button select Hue Press button to increase hue level Press _ button to decrease hue level Hue level can be adjusted between 31 and 31 Colour Temp By pressing a bbutton select Colour Temp Press _ button to choose one of these op tions Cool Normal and Warm Noise Reduction This item is used to reduce the image noise and improve the picture quality at weak sig nals By pressing a b...

Страница 27: ...e a more spatial effect Pressing _ button will turn this feature on or off Feature menu By pressing _ button select the third icon Feature menu appears on the screen 785 6OHHS 7LPHU KLOG RFN DQJXDJH W 2XW HIDXOW RRP 2II 2II QJOLVK 79 3DQRUDPLF OXH DFN 2Q Sleep Timer By pressing a b button select Sleep Timer The timer can be programmed between Off and 2 hours in steps of 10 minutes by press ing _ b...

Страница 28: ...HDUFK HFRGHU 7 9 5 6WRUH 2II 167 Program By pressing a b button select Program Press _ button to select the program num ber You can also enter a number via digit but tons on the remote control There are 100 pro gram storage between 0 and 99 Band Band can be selected either C or S by press ing _ button Channel Channel can be changed by _ button or Digit Buttons Colour System By pressing a b button ...

Страница 29: ...t the other letters By pressing the RED button you can store the name Insert Select the programme which you want to in sert by navigation buttons Press the GREEN button By navigation buttons move the se lected programme to the decided programme space and press the GREEN button again Delete To delete a programme press the YELLOW button Pressing the YELLOW button again erases the selected programme ...

Страница 30: ...ng _ button select the first icon PC Picture Position menu appears on the screen RUL 3RVLWLRQ 9HU 3RVLWLRQ RW ORFN ORFN 3KDVH 3 3 785 326 7 21 N 9 XWRSRVLWLRQ Autoposition If you shift the picture horizontally or vertically to an unwanted position use this item to put the picture into correct place automatically Select Autoposition item by using a b buttons Press or OK button Warning Auto position...

Страница 31: ... at Sound menu starting section Source Menu By pressing _ button select the fourth icon Source menu appears on the screen In source menu highlight a source by press ing a b button and switch to that mode by pressing _ or OK button Sound in PC mode Connect the PC sAudio output to the TV s PC Audio In socket with an audio cable OtherFeatures TV Status Programme Number Programme Name and Zoom Mode ar...

Страница 32: ...ou can only choose 4 3 and FULL in PC mode Auto When a WSS Wide Screen Signalling sig nal which shows the aspect ratio of the pic ture is included in the broadcast signal or the signal from an external device the TV auto matically changes the ZOOM mode accord ing to the WSS signal When the AUTO mode does not function cor rectly due to poor WSS signal quality or when you want to change the ZOOM mod...

Страница 33: ... at a time Press button to move the Teletext screen backward one page at a time To Select Index Page To select the page number of the index gen erally page 100 press button Searching for a teletext page while watching TV In the Teletext mode pressing button will switch the screen to the TV mode In the TV mode enter a page number using digit buttons As you enter last digit of page num ber sign will...

Страница 34: ...n status row If Toptext transmission is not present status row will not appear In Toptext mode the or com mands will request the next or previous page respectively IfToptext transmission is not avail able in case of operation of these commands wraparound occurs For example page 100 appears to be one greater than page 199 ConnectPeripheral Equipment There is a wide range of audio and video equip me...

Страница 35: ...als Store the test sig nal under programme number 0 Replace the aerial cable in the aerial socket of your video recorder once you have stored the test signal Camera And Camcorder To Connect ToAV Input Connect your camera or camcorder to AV EXT 4 input at the right side of the TV Connect your equipment to the TV via VIDEO yellow AUDIO R red and AUDIO L white inputs You must connect the jacks to the...

Страница 36: ...ial socket Is the aerial cable damaged Are suitable plugs used to connect the aerial If you are in doubt consult your dealer No Picture could mean that your TV is not re ceiving a transmission Have you selected the correct button on the remote control Try once more Sound You can not hear any sound Did you perhaps interrupt the sound pressing the button Sound is coming from only one of the speak er...

Страница 37: ...RECEIVER VIDEO HEADPHONE AUDIO AntennaConnections 9 8 DQWHQQD 9 DQWHQQD 5RXQG RKP FRD LDO FDEOH 5RXQG RKP FRD LDO FDEOH ODW RKP WZLQ OHDG FDEOH 5HDU RI 79 5HDU RI 79 2XWGRRU QWHQQD RQQHFWLRQV 01 ENG LT 32DF7BC 32775 17MB15 C1897S UK PEU IDTV OEM ECO PIP 10044394 50093075 p65 30 10 2006 13 38 36 ...

Страница 38: ... a horizontal sync frequency range of 30 69 KHz The following table is an illustration of some of the typical video display modes 0RGH 5HVROXWLRQ UHTXHQF RUL RQWDO 9HUWLFDO RU N 9HU 2QO DYDLODEOH LQ XOO DQG 3 3 PRGHV QRW LQ PRGH 01 ENG LT 32DF7BC 32775 17MB15 C1897S UK PEU IDTV OEM ECO PIP 10044394 50093075 p65 30 10 2006 13 38 37 ...

Страница 39: ...ideo and Audio L R outputs are available T V LINK functions are available EXT 3Terminal RCA connectors x 5 rear side of the cabinet Component video Pr Pb Y inputs and Audio L R inputs are available 625i 625p 525i 525p 750p 1125i signals are available EXT 4Terminal RCA connectors x 3 right side of the cabinet S VIDEO connector x 1 right side of the cabinet Video input S VIDEO Y C input and Audio L ...

Отзывы: