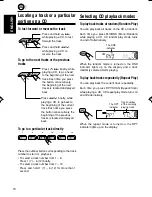
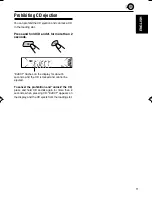
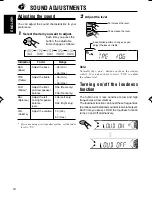
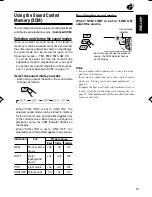
background image

ENGLISH

ELECTRICAL CONNECTIONS

To prevent short circuits, we recommend that you disconnect the
battery’s negative terminal and make all electrical connections
before installing the unit. If you are not sure how to install this unit
correctly, have it installed by a qualified technician.

Note:

This unit is designed to operate only on 

12 V DC, NEGATIVE

ground electrical systems

. If your vehicle does not have this

system, a voltage inverter is required, which can be purchased at
JVC car audio dealers.

• Replace the fuse with one of the specified rating. If the fuse

blows frequently, consult your JVC car audio dealer.

• If noise is a problem...

This unit incorporates a noise filter in the power circuit. However,
with some vehicles, clicking or other unwanted noise may occur.
If this happens, connect the unit’s 

rear ground terminal

 (See

connection diagram below.) to the car’s chassis using shorter
and thicker cords, such as copper braiding or gauge wire. If noise
still persists, consult your JVC car audio dealer.

• Maximum input of the speakers should be more than 40 W at

the rear and 40 W at the front, with an impedance of 

 to 8 

Be sure to ground this unit to the car’s chassis.

• The heat sink becomes very hot after use. Be careful not to touch

it when removing this unit.

FRANÇAIS

RACCORDEMENTS ELECTRIQUES

Pour  éviter tout court-circuit, nous vous recommandons de
débrancher la borne négative de la batterie et d’effectuer tous les
raccordements électriques avant d’installer l’appareil. Si l'on n’est
pas sûr de pouvoir installer correctement cet appareil, le faire
installer par un technicien qualifié.

Remarque:

Cet appareil est conçu pour fonctionner sur des sources de courant
continu de 

12 V à masse NEGATIVE

 seulement. Si votre véhicule

n’offre pas ce type d’alimentation, il vous faut un convertisseur de
tension, que vous pouvez acheter chez un revendeur d’autoradios
JVC.

Remplacer le fusible par un de la valeur précisée. Si le fusible
saute souvent, consulter votre revendeur d’autoradios JVC.

Si le bruit est un problème...
Cet appareil incorpore un filtre de bruit dans le circuit
d’alimentation. Cependant, avec certains véhicules, quelques
claquements ou autres bruits non désirés risquent de se produire.
Si cela arrive, raccorder la 

borne de masse arrière

 de l’appareil

au châssis de la voiture (voir le schéma de raccordement ci-
dessous) en utilisant des cordons les plus gros et les plus courts
possibles telle qu'une barre de cuivre ou une tresse. Si le bruit
persiste, consulter votre revendeur d’autoradios JVC.

La puissance admissible des haut-parleurs doit être supérieure
à 40 W à l’arrière et à 40 W l’avant, avec une impédance de 

à 8 

• S'assurer de raccorder la mise à la masse de cet appareil

au châssis de la voiture.

Le radiateur devient très chaud après usage. Faire attention de
ne pas le toucher en retirant cet appareil.

ESPAÑOL

CONEXIONES ELECTRICAS

Para evitar cortocircuitos, recomendamos que desconecte el
terminal negativo de la batería y que efectúe todas las conexiones
eléctricas antes de instalar la unidad. Si usted no está seguro de
cómo instalar correctamente la unidad, hágala instalar por un
técnico cualificado.

Nota:

Esta unidad está diseñada para funcionar con 

12 V de CC, con

sistemas eléctricos de masa NEGATIVA

 solamente. Si su

vehículo no posee este sistema, será necesario un inversor de
tensión, que puede ser adquirido en los concesionarios de JVC
de equipos de audio para automóviles.

• Reemplace el fusible por uno con la corriente especificada. Si

el fusible se quemase frecuentemente consulte con su
concesionario de JVC de equipos de audio para automóviles.

• Si el ruido fuese un problema...

Esta unidad tiene un filtro de ruido en el circuito de alimentación.
Sin embargo, en algunos vehículos, pueden producirse
chasquidos u otros ruidos indeseados. En tal caso conecte el

terminal de tierra posterior

 (Ver diagrama de conexión abajo.)

del receptor al chasis del automóvil, utilizando cordones más
gruesos y cortos tales como alambre de cobre trenzado o de
grueso calibre. Si el ruido persiste, consulte a su concesionario
de JVC de equipos de audio para automóvil.

• La entrada máxima de los altavoces traseros debe ser mayor

de 40 W y la de los delanteros de 40 W, con una impedancia de

 a 8 

Asegúrese de conectar esta unidad a tierra en el chasis del
automóvil.

• El sumidero térmico estará muy caliente después del uso.

Asegúrese de no tocarlo al desmontar esta unidad.

Heat sink

Sumidero térmico

Dissipateur de chaleur


A  

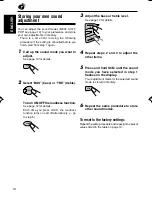
Typical Connections / Conexiones típicas / Raccordements typiques

Before connecting:

 Check the wiring in the vehicle carefully not

to fail in connecting this unit. Incorrect connection may cause a
serious damage to this unit.

1

Connect the colored leads of the power cord to the car battery,
speakers and automatic antenna (if any) in the following
sequence.

1

Black: ground

2

Yellow: to car battery (constant 12V)

3

Red: to an accessory terminal

4

Blue with white stripe: to automatic antenna (200mA
max.)

5

Others: to speakers

2

Connect the antenna cord.

3

Finally connect the wiring harness to the unit.

Antes de la conexión:

 Verifique atentamente el conexionado

del vehículo para no cometer errores al conectar esta unidad.
Una conexión incorrecta podría producir daños graves en la
unidad.

1

Conecte los conductores de color del cable de alimentación
a la batería del automóvil, altavoces y antena automática (si
la hubiere) en la secuencia siguiente.

1

 Negro: a tierra.

2

 Amarillo: a la batería del automóvil (12V constantes)

3

 Rojo: a un terminal de accesorio

4

Azul con rayas blancas: a la antena automática (200mA
máx.)

5

Otros: a los altavoces

2

Conecte el cable de antena.

3

Por último, conecte a la unidad el cableado preformado.

Avant de commencer la connexion: 

vérifiez attentivement le

câblage du véhicule pour ne pas connecter incorrectement cet
appareil. Une connexion incorrecte peut endommager
sérieusement l’appareil.

1

Connectez les fils de couleur du cordon d’alimentation à la
batterie de la voiture, aux enceintes et à l’antenne automatique
(s’il y en a une) dans l’ordre suivant.

1

Noir: a la masse

2

Jaune:  a la batterie de la voiture (12V constant)

3

Rouge: à la prise accessoire

4

Bleu à bandes blanches: à l’antenne automatique (200mA
max.)

5

Autres: aux enceintes

2

Connectez le cordon d’antenne.

3

Finalement, connectez le faisceau de fils à l’appareil.

3

4

5

2

1

10

2

1

3

White

Blanco

Blanc

Gray

Gris

Gris

Green

Verde

Vert

Purple

Púrpura

Violet

*1: Before checking the operation of this unit prior to installation,

this lead must be connected, otherwise power cannot be turned
on.

*1: Antes de comprobar el funcionamiento de esta unidad previa

a de la instalación, es necesario conectar este cable, de lo
contrario no se podrá conectar la alimentación.

*1: Pour vérifier le fonctionnement de cet appareil avant

installation, ce fil doit être raccordé, sinon l’appareil ne peut
pas être mis sous tension.

To antenna

A la antena

A l'antenne

Left speaker (front)

Altavoz izquierdo (frontal)

Haut-parleur gauche (avant)

Right speaker (front)

Altavoz derecho (frontal)

Haut-parleur droit (avant)

Left speaker (rear)

Altavoz izquierdo (trasero)

Haut-parleur gauche (arrière)

Right speaker (rear)

Altavoz derecho (trasero)

Haut-parleur droit (arrière)

Black

Negro

Noire

10A fuse

Fusible de 10A

Fusible 10A

Antenna terminal

Terminal de la antena

Borne de l’antenne

Fuse block

bloque de fusibles

porte-fusible

To metallic body or chassis of the car

A un cuerpo metálico o chasis del
automóvil

Vers corps métallique ou châssis du
véhicule

*

*

Ignition switch

Interruptor de encendido

Interrupteur d'allumage

Not supplied with this unit.

No suministrado con esta unidad.

Non fourni avec cet appareil.

*

To a live terminal in the fuse block connecting to the car battery
(bypassing the ignition swich).

A A un terminal activo del bloque de fusibles conectado a la
batería del automóvil (desviando el interruptor de encendido)

A une borne sous tension du porte-fusible connectée à la batterie
de la voiture (en dérivant l’interrupteur d’allumage)

Yellow*

1

Amarillo*

1

Jaune*

1

Red

Rojo

Rouge

Blue with white stripe

Azul con rayas blancas

Bleu avec bande blanche

To automatic antenna if any

A la antena automática si la hubiere

Vers borne d’antenne automatique s'il y en a une

To an accessory terminal in the fuse block

A un terminal accesorio del bloque de fusibles

Vers borne accessoire du porte-fusible

Rear ground terminal

Terminal de tierra posterior

Borne arrière de masse

White with black stripe

Blanco con rayas negras

Blanc avec bande noire

Gray with black stripe

Gris con rayas negras

Gris avec bande noire

Green with black stripe

Verde con rayas negras

Vert avec bande noire

Purple with black stripe

Púrpura con rayas negras

Violet avec bande noire

Instal.EN.SP.FR.KD-S50[J]/6th

10/1/01, 12:47 PM

3

Содержание KD-S50

Страница 1: ...etain this information for future reference Model No Serial No For installation and connections refer to the separate manual Para la instalación y las conexiones refiérase al manual separado Pour l installation et les raccordements se référer au manuel séparé COMPACT DIGITAL AUDIO RECEPTEUR CD KD S50 RECEPTOR CON CD KD S50 CD RECEIVER KD S50 ENGLISH ESPAÑOL FRANÇAIS KD S50 KD S50 160W ...

Страница 2: ...a circuit different from that to which the receiver is connected Consult the dealer or an experienced radio TV technician for help IMPORTANT FOR LASER PRODUCTS Precautions 1 CLASS 1 LASER PRODUCT 2 DANGER Invisible laser radiation when open and interlock failed or defeated Avoid direct exposure to beam 3 CAUTION Do not open the top cover There are no user serviceable parts inside Leave all servici...

Страница 3: ...CD playback modes 10 Prohibiting CD ejection 11 SOUND ADJUSTMENTS 12 Adjusting the sound 12 Turning on off the loudness function 12 Using the Sound Control Memory SCM 13 Storing your own sound adjustments 14 OTHER MAIN FUNCTIONS 15 Setting the clock 15 To cancel advanced SCM 15 Selecting the level display 16 Detaching the control panel 17 MAINTENANCE 18 Handling CDs 18 TROUBLESHOOTING 19 SPECIFICA...

Страница 4: ...play button r RPT repeat button SCAN button t SCM sound control memory button y control panel release button Display window u Volume or audio level indicator Equalization Pattern indicator i Tuner reception indicators MO monaural ST stereo o RND random indicator RPT repeat indicator a SCM indicator s LOUD indicator d Sound mode indicators BEAT SOFT POP f CD indicator g Band indicators FM1 FM2 FM3 ...

Страница 5: ...peration When you select a source in step 2 below the power automatically comes on You do not have to press this button to turn on the power 2 Select the source 3 Adjust the volume BASIC OPERATIONS C D A M F M Volume level indicator see page 16 Volume level appears To increase the volume To decrease the volume To operate the tuner FM or AM see pages 6 8 To operate the CD see pages 9 11 CAUTION on ...

Страница 6: ...searching stops A M F M AM FM1 FM2 FM3 selected band appears Volume level indicator see page 16 Press to search stations of higher frequencies Press 4 to search stations of lower frequencies To stop searching before a station is received press the same button you have pressed for searching Searching a station manually Manual search 1 Select the band FM 1 3 AM Note This receiver has three FM bands ...

Страница 7: ... FM stations SSM Strong station Sequential Memory Manual preset of both FM and AM stations FM station automatic preset SSM You can preset 6 local FM stations in each FM band FM1 FM2 and FM3 1 Select the band FM1 3 you want to store FM stations into Each time you press the button the FM band changes as follows 2 Press and hold both buttons for more than 2 seconds Local FM stations with the stronges...

Страница 8: ...ned frequency number flashes on the display and you can check what program is now being broadcasted If you want to listen to that program press the same button again to stop scanning Press to tune stations of higher frequencies Press 4 to tune stations of lower frequencies P1 flashes for a few seconds Notes A previously preset station is erased when a new station is stored in the same preset numbe...

Страница 9: ...he CD automatically ejects from the loading slot The source changes to the tuner you will hear the last received station If you change the source to AM FM the CD play also stops without ejecting the CD this time Notes If the ejected disc is not removed for about 15 seconds the disc is automatically inserted again into the loading slot to protect it from dust CD play will not start this time You ca...

Страница 10: ...ly while playing a CD to go back to the beginning of the current track Each time you press the button consecutively the beginning of the previous tracks is located and played back Selecting CD playback modes To play back tracks at random Random Play You can play back all tracks on the CD at random Each time you press MO RND Mono Random while playing a CD CD random play mode turns on and off altern...

Страница 11: ...hold CD and 0 for more than 2 seconds EJECT flashes on the display for about 5 seconds and the CD is locked and cannot be ejected To cancel the prohibition and unlock the CD press and hold CD and 0 again for more than 2 seconds when pressing CD EJECT appears on the display and the CD ejects from the loading slot C D ...

Страница 12: ...e R06 Right only level VOL Adjust the volume 00 min Volume 50 max If you are using a two speaker system set the fader level to 00 2 Adjust the level Note Normally the and buttons works as the volume control So you do not have to select VOL to adjust the volume level Turning on off the loudness function The human ear is less sensitive to low and high frequencies at low volumes The loudness function...

Страница 13: ...y A sound mode can be stored for each of the following sources FM1 FM2 FM3 AM CD If you do not want to store the sound mode separately for each playback source but want to use the same sound mode for all the sources see To cancel Advanced SCM on page 15 Select the sound mode you want Each time you press the button the sound mode changes as follows When SCM LINK is set to LINK ON the selected sound...

Страница 14: ... OFF the loudness function See page 12 for details Each time you press LOUD the loudness function turns on and off alternatively go to step 5 SCM 3 Adjust the bass or treble level See page 12 for details 4 Repeat steps 2 and 3 to adjust the other items 5 Press and hold SCM until the sound mode you have selected in step 1 flashes on the display Your adjustment made for the selected sound mode is st...

Страница 15: ...follows To Cancel Advanced SCM You can cancel the Advanced SCM Sound Control Memory and unlink the sound modes and the playback sources When shipped from the factory a different sound mode can be stored in memory for each source so that you can change the sound modes simply by changing the sources LINK ON Advanced SCM different SCM for different sources LINK OFF Conventional SCM one SCM for all so...

Страница 16: ... is selected VOL 1 Shows the volume level indicator and the equalization pattern indicator VOL 2 Alternates VOL 1 setting and illumination display OFF Erase the volume level indicator and the equalization pattern indicator 1 Press and hold SEL for more than 2 seconds CLOCK H CLOCK M SCM LINK or LEVEL appears on the display 2 Select LEVEL if not shown on the display CLOCK H CLOCK M SCM LINK or LEVE...

Страница 17: ...ntrol panel when leaving the car When detaching or attaching the control panel be careful not to damage the connectors on the back of the control panel and on the panel holder How to detach the control panel Before detaching the control panel be sure to turn off the power 1 Unlock the control panel 2 Lift and pull the control panel out of the unit How to attach the control panel 1 Insert the left ...

Страница 18: ... CD and leave the unit turned on for a few hours until the moisture evaporates When playing a CD R Recordable You can playback your original CD Rs on this receiver Before playing back CD Rs read their instructions or cautions carefully Some CD Rs recorded on CD recorders may not be played back on this receiver because of their disc characteristics and of the following reasons Discs are dirty or sc...

Страница 19: ...oading slot Insert it correctly Adjust it to the optimum level Check the cords and connections Store stations manually Connect the antenna firmly Press and 0 at the same time for more than 2 seconds Be careful not to drop CD when it is ejected Press and SEL at the same time for more than 2 seconds to reset the unit The clock setting and preset stations stored in memory are erased See page 2 Causes...

Страница 20: ...B Frequency Response 40 Hz to 15 000 Hz Stereo Separation 35 dB Capture Ratio 1 5 dB AM Tuner Sensitivity 20 µV Selectivity 35 dB CD PLAYER SECTION Type Compact disc player Signal Detection System Non contact optical pickup semiconductor laser Number of channels 2 channels stereo Frequency Response 5 Hz to 20 000 Hz Dynamic Range 96 dB Signal to Noise Ratio 98 dB Wow and Flutter Less than measurab...

Страница 21: ...UBLE with operation Please reset your unit Refer to page of How to Reset Still having trouble USA ONLY Call 1 800 252 5722 http www jvcservice com We can help you http www jvcmobile com Visit us on line for Technical Support Customer Satisfaction Survey US RESIDENTS ONLY ...

Страница 22: ...bonnes pattes pour maintenir fermement le manchon en place comme montré 5 Monter le boulon de montage sur l arrière du corps de l appareil puis passer l amortisseur en caoutchouc sur l extrémité du boulon 6 Réalisez les connexions électriques expliquées au dos de cette page 7 Faire glisser l appareil dans le manchon jusqu à ce qu il soit verrouillé 8 Attachez la plaque d ajustage de façon que la p...

Страница 23: ... la sección trasera 1 Extraiga el panel de control 2 Retire la placa de guarnición 3 Inserte las 2 manijas entre las ranuras como se muestra Luego separe gentilmente las manijas y extraiga la unidad Asegúrese de conservar las manijas después de instalarlo Retrait de l appareil Avant de retirer l appareil libérer la section arrière 1 Retirer le panneau de commande 2 Retirer la plaque d assemblage 3...

Страница 24: ... a 8 Ω Asegúrese de conectar esta unidad a tierra en el chasis del automóvil El sumidero térmico estará muy caliente después del uso Asegúrese de no tocarlo al desmontar esta unidad Heat sink Sumidero térmico Dissipateur de chaleur A Typical Connections Conexiones típicas Raccordements typiques Before connecting Check the wiring in the vehicle carefully not to fail in connecting this unit Incorrec...

Страница 25: ... cover the terminals of the UNUSED leads with insulating tape Para evitar cortocircuitos cubra los cables NO UTILIZADOS con cinta aislante Pour éviter les court circuits couvrir les bornes des fils qui ne sont PAS utilisés avec de la bande isolante Solder the core wires to connect them securely Suelde los alambres de alma para conectarlos con firmeza Souder les âmes desfils pour les raccorder entr...

Отзывы: