background image

44

 EN

A

M

PL

AY

/PC

OFF CAMER

A

5S

DS

C

DS

CPLA

Y

PAUSE

4

P. AE / EFFECT

SLOW 4X

1

SLOW 10X

2

B/W

STROBE

TWILIGHT

SEPIA

MONOTONE

CLASSIC FILM

SEL.

OFF

4

FLASH ADJ

P. AE

/ EFFECT

END

TO MODE MENU

0

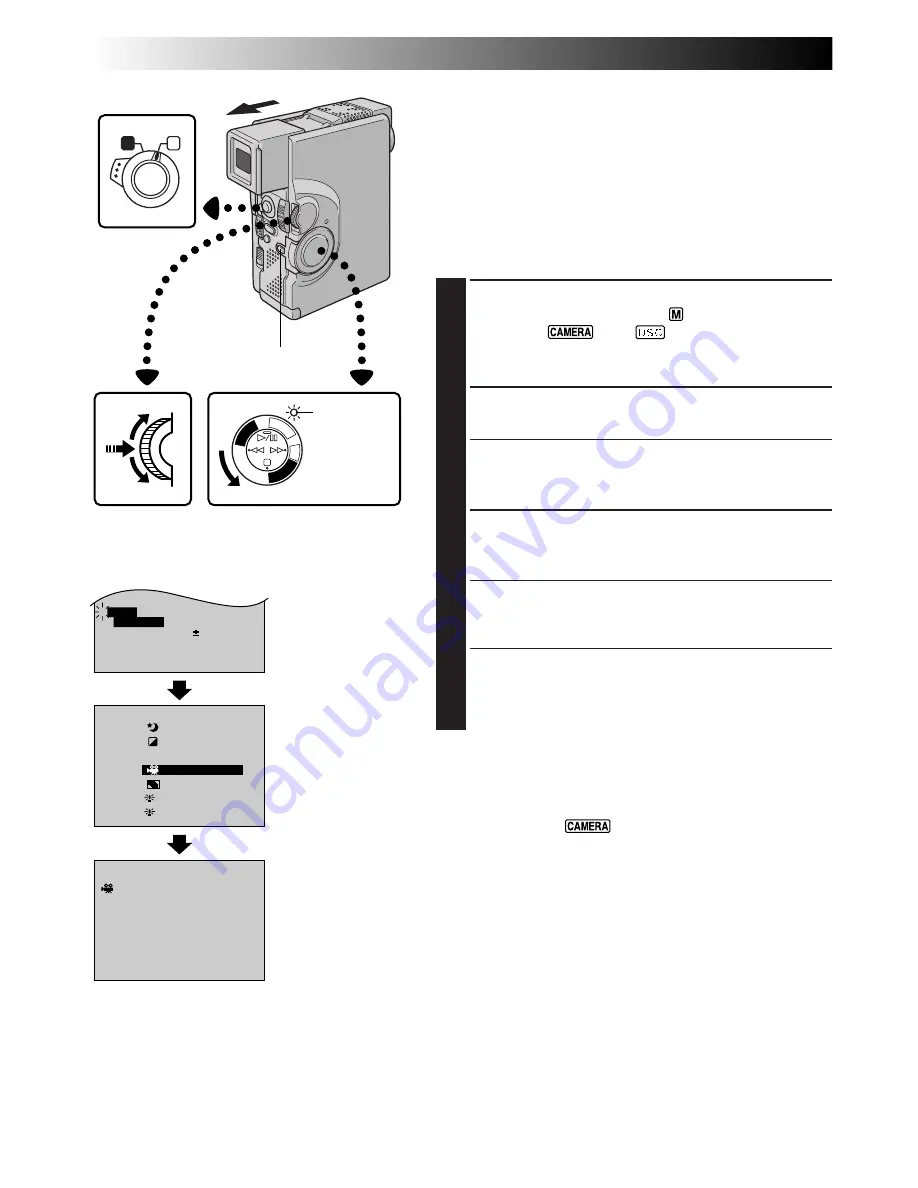
Programme AE With Special Effects

IMPORTANT:

If certain Fades or Wipes (

Z

 pg. 43) are activated, some

modes of Programme AE with special effects cannot be
used. If you select a mode that is unusable in the current
situation, the mode's symbol blinks.

You can choose any one of the effects from the P.AE/
EFFECT Menu.

1

SELECT OPERATION MODE

Set the Operation Switch to “

”. Then set the Power

Switch to “

” or “

” while pressing down

the Lock Button. Pull out the viewfinder fully or open
the LCD monitor fully.

2

ACCESS RECORDING MENU

Press MENU/SET. The Recording Menu appears.

3

ACCESS “P.AE/EFFECT” SELECT MENU

Rotate MENU/SET to move the highlight bar to “P.AE/
EFFECT”, then press it.

4

SELECT MODE

Move the highlight bar to the desired mode by
rotating MENU/SET, then press it.

•The P.AE/EFFECT Menu disappears and the selected

mode is activated. The symbol of the selected mode
appears.

5

DISABLE MODE

To turn off the selected mode, re-access the P.AE/
EFFECT Menu and move the highlight bar to “OFF”
by rotating MENU/SET. Then press it.

NOTES:

Programme AE with special effects can be changed
during recording or during Record-Standby.

The following modes are available only when the Power
Switch is set to “

”: “CLASSIC FILM”, “STROBE”

and “VIDEO ECHO”.

Display

Recording Menu

P.AE/EFFECT Menu

The indicator for the selected mode appears, and the
selected mode is engaged.

MENU/SET Dial

Power Switch

Lock Button

Power lamp

Operation Switch

RECORDING

  Advanced Features For Video And D.S.C. (cont.)

Содержание GR-DVX7

Страница 1: ... VIDEO CAMERA LYT0399 001A INSTRUCTIONS ENGLISH EN GR DVX7 Please visit our CyberCam Homepage on the World Wide Web and answer our Consumer Survey in English only http www jvc victor co jp english index e html ...

Страница 2: ...ith Maxell Panasonic Matsushita Electric Sanyo or Sony CR2025 use of another battery may present a risk of fire or explosion n Dispose of used battery promptly n Keep away from children n Do not disassemble and do not dispose of in fire CAUTIONS n To prevent shock do not open the cabinet No user serviceable parts inside Refer servicing to qualified personnel n When you are not using the AC Power A...

Страница 3: ... unlevel surfaces It could tip over causing serious damage to the camcorder CAUTION Attaching the camcorder to the Docking Station with cables Audio Video S Video Editing DC etc connected then leaving it on top of the TV is not recommended as tripping on the cables will cause the camcorder to fall resulting in damage n This camcorder is designed exclusively for the digital video cassette and Multi...

Страница 4: ...cer Picture Navigator for Windows Picture Navigator for Macintosh Presto Mr Photo PhotoAlbum ImageFolio Lithium Battery CR2025 for remote control unit Cleaning Cloth PC Connection Cable Editing Cable MultiMediaCard PROVIDED ACCESSORIES Audio Video A V Cable mini plug to RCA plug Audio Video A V Cable RCA plug to RCA plug S Video Cable Core Filter x 3 for optional DV cable headphones and microphone...

Страница 5: ...rt and Tracking Information Area Insert editing and post recording editing tracking signals are recorded here 1 Sub Code Area The Time Code and Date Time data are written here separate from the video data This enables you to display the date and time during playback even if they weren t displayed while recording 2 Video Area The digital video signal is recorded here Lens Mic A D conversion Chromat...

Страница 6: ...icture Quality Mode Setting 15 Tripod Mounting 16 Operation Mode 17 RECORDING 18 51 Basic Recording For Video 18 Basic Recording For Digital Still Camera D S C 22 Basic Recording For Video And D S C 24 Advanced Features For Video And D S C 26 PLAYBACK 52 73 Basic Playback For Video 52 Advanced Features For Video 54 Basic Playback For D S C 56 Advanced Features For D S C 57 Advanced Features For Vi...

Страница 7: ... To A MultiMediaCard 77 Copying Images Using Infrared Communication IrTran P 78 USING THE REMOTE CONTROL UNIT 80 90 Random Assemble Editing 84 For More Accurate Editing 88 Audio Dubbing 90 ADDITIONAL INFORMATION 91 Initializing A MultiMediaCard 91 TROUBLESHOOTING 92 97 USER MAINTENANCE 98 INDEX 99 106 Docking Station 99 Controls Connectors And Indicators 100 Indications 102 Terms 106 CAUTIONS 107 ...

Страница 8: ...and charging stops Since the AC Power Adapter Charger processes electricity internally it becomes warm during use Be sure to use it only in well ventilated areas When charging the battery pack for the first time or after a long storage period the charger indicator may not light In this case remove the battery pack from the AC Power Adapter Charger then try charging again If the battery operation t...

Страница 9: ...BATTERY PACK 1 ATTACH BATTERY PACK Insert the terminal end 1 of the battery pack into the battery pack mount then firmly push the end 2 of the battery pack in the direction of the arrow until it locks into place as shown in the illustration If the battery pack is attached in the wrong position a malfunction may occur To Detach The Battery Pack while sliding down BATT RELEASE detach it NOTES Contin...

Страница 10: ...amcorder inside a bag etc the grip belt s metal buckle may damage the camcorder It is recommended that you place it inside the Velcro strip Viewfinder Adjustment 1 SELECT OPERATION MODE Set the Power Switch to or 5S while pressing down the Lock Button 2 POSITION VIEWFINDER Pull out the viewfinder fully The power lamp comes on and the camcorder is turned on 3 ADJUST DIOPTRE Slide the Dioptre Adjust...

Страница 11: ...ur and minute Press MENU SET twice when the highlight bar is set to RETURN to exit Regarding Built in Clock s Rechargeable Lithium Battery To store the date time in memory the clock s rechargeable lithium battery is integrated in the camcorder While the camcorder is connected to an AC outlet using the AC Power Adapter Charger or while the battery pack attached to the camcorder continues to supply ...

Страница 12: ...te holder does not open close the cassette cover and try again If the cassette holder still does not open turn the camcorder off then on again If the tape does not load properly open the cassette cover fully and remove the cassette A few minutes later insert it again When the camcorder is suddenly moved from a cold place to a warm environment wait a short time before opening the cover Closing the ...

Страница 13: ... The Recording Menu appears 3 ACCESS MODE MENU Move the highlight bar to TO MODE MENU by rotating MENU SET Press it and the Mode Menu appears 4 SET RECORDING MODE First move the highlight bar to REC MODE by rotating MENU SET Press it and the parameter SP or LP is highlighted Select SP or LP by rotating MENU SET Press it twice to exit from the Recording Menu Audio Dubbing is impossible on a tape re...

Страница 14: ...le with this camcorder Before purchasing a MultiMediaCard consult its manufacturer or dealer Unloading A MultiMediaCard The MultiMediaCard retains images in its memory even after it has been removed from the camcorder 1 CONFIRM POWER OFF STATUS Make sure the camcorder s power is off 2 OPEN THE CARD COVER 3 REMOVE THE MULTIMEDIACARD Press EJECT The MultiMediaCard is disengaged from the camcorder 4 ...

Страница 15: ... Open the LCD monitor fully or pull out the view finder fully 2 ACCESS RECORDING MENU Press MENU SET The Recording Menu appears 3 ACCESS MODE MENU Move the highlight bar to TO MODE MENU by rotating MENU SET Press it and the Mode Menu appears 4 SET PICTURE QUALITY MODE First move the highlight bar to QUALITY by rotating MENU SET Press it and the parameter FINE STANDARD or ECONOMY is high lighted Se...

Страница 16: ...legs fully to stabilise the camcorder To prevent damage to the unit caused by falling over do not use a small sized tripod Tripod Mounting 1 ALIGN AND TIGHTEN Align the screw on the tripod with the camera s mounting socket Then tighten the screw GETTING STARTED cont ...

Страница 17: ... in Manual mode However Focus and Exposure are the same as in the Full Auto mode and it is not possible to change menu settings using the MENU SET Dial Suitable for standard recording in the MultiMediaCard Allows you to play back a recording on the tape or to transfer a still image recorded on the tape or in the MultiMediaCard to a computer Allows you to display an image stored in the MultiMediaCa...

Страница 18: ...matically Wait until it recedes completely before closing the cassette cover Shooting While Watching The Viewfinder 2 ENTER RECORD STANDBY MODE Make sure the LCD monitor is closed and locked Set the Operation Switch to or Then set the Power Switch to while pressing down the Lock Button Pull out the viewfinder fully The lens cover opens the power lamp lights and the camcorder enters the Record Stan...

Страница 19: ...used TAPE END appears when the tape reaches its end and the power goes off automatically if left in this condition for 5 minutes TAPE END also appears when a cassette whose tape is already at its end is loaded If the Record Standby mode continues for 5 minutes the camcorder s power shuts off automatically To turn the camcorder on again push back and pull out the viewfinder again or close and re op...

Страница 20: ...d upon it 3 START SHOOTING Tilt the LCD monitor upward downward for best viewability Z pg 21 and press START STOP appears in the LCD monitor while recording is in progress 4 STOP RECORDING Press START STOP again to stop recording The camcorder re enters the Record Standby mode NOTES When you use the LCD monitor outdoors in direct sunlight the LCD monitor may be difficult to see If this happens we ...

Страница 21: ...h on 2 START RECORDING Point the lens toward the subject yourself when self recording and start recording During Interface Shooting the Tape Running indicator and warning indications Z pg 102 105 are the only ones that are shown they appear reversed in the display as they would when viewing a mirror but are not reversed in the recording NOTE The tape remaining indicator does not appear during inte...

Страница 22: ...mong the 5 snapshot modes available Z pg 23 by pressing SNAPSHOT MODE Press SNAPSHOT MODE as many times as necessary until the desired snapshot mode indicator is dis played SNAPSHOT RECORDING 1 TAKE SNAPSHOT Press PHOTO SNAPSHOT The image is recorded in the MultiMediaCard When the flash ready indicator is displayed the flash fires Power Switch Flash During snapshot Power lamp Operation Switch PHOT...

Страница 23: ...e disabled during Snapshot recording In such a case the icon blinks If shooting is not performed for approx 5 minutes when the Power Switch is set to and power is supplied from the battery pack the camcorder shuts off automati cally to save power To perform shooting again close the LCD monitor and re open it When using the viewfinder push back it in and pull it out again Motor Drive Mode Z pg 30 i...

Страница 24: ...s Z pg 47 then zoom in or out in Record mode In Full Auto mode when the Operation Switch is set to zoom magnification of up to 40X is possible In Manual mode when the Operation Switch is set to zooming is possible to a maximum of 100X or can be switched to 10X magnification offered by optical zoom Zoom magnification of over 10X is done through Digital image processing and is therefore called Digit...

Страница 25: ...r shuts off during shooting When a tape is removed and re inserted during shooting When shooting using a partially recorded tape When shooting on a blank portion located partway through the tape When shooting again after already shooting a scene and opening closing the cassette cover Recording From The Middle Of A Tape 1 Play back a tape to find the spot at which you want to start recording then e...

Страница 26: ...MODE MENU Move the highlight bar to TO MODE MENU by rotating MENU SET Press it and the Mode Menu appears 4 ACCESS DATE TIME MENU Move the highlight bar to TO DATE TIME MENU by rotating MENU SET Press it and the Date Time Menu appears 5 SELECT FUNCTION Move the highlight bar to DISPLAY by rotating MENU SET then press it 6 SET FUNCTION PARAMETERS Cycle through the available settings of the selected ...

Страница 27: ...nd stop when the one you want is displayed OFF To make the indications disappear ON To make the indications appear Then press it and the highlight bar automatically moves to RETURN 7 CLOSE RECORDING MENU Press MENU SET twice Selection is complete and the menu disappears NOTES It is impossible to make the tape running indicator 444 and warnings etc disappear from the LCD monitor or the viewfinder F...

Страница 28: ...pressing START STOP in step 2 press SNAPSHOT MODE as many times as necessary until the desired snapshot indicator is displayed then press PHOTO SNAPSHOT The camcorder records a 5 second still Z pg 30 When SCENE is set to ANIM Z pg 34 39 this function is not available NOTES When SCENE is set to ANIM in the System Menu the 5 second recording mode is not available Anima tion recording of a 1 3 second...

Страница 29: ...u appears 4 SET SELF TIMER Move the highlight bar to SELF TIMER by rotating MENU SET Press it and the parameter is highlighted Rotate MENU SET until ON appears Press it twice to exit from the Recording Menu 5 ENGAGE SELF TIMER MODE Press START STOP After 15 seconds the beep sounds and video recording starts To stop Self Timer recording press START STOP again The camcorder re enters Record Standby ...

Страница 30: ...APSHOT Press PHOTO SNAPSHOT If you press during Record Standby PHOTO appears and a still image will be recorded for approx 6 seconds then the camcorder re enters the Record Standby mode If you press during Recording PHOTO appears and a still image will be recorded for approx 5 seconds then the normal recording resumes When the flash ready indicator is displayed the flash fires Motor Drive Mode Kee...

Страница 31: ...s not loaded the message COPYING FAILED appears and still images are recorded only onto the tape If PHOTO SNAPSHOT is pressed during tape playback If a MultiMediaCard is not loaded The message COPYING FAILED will appear and a still image produced by the Snapshot mode will be displayed in the same manner as during recording If a MultiMediaCard is loaded A still image produced by the Snapshot mode w...

Страница 32: ...Eye reduction indicator lights then press PHOTO SNAPSHOT The flash fires twice The first flash is for reduction of the human eye s red reflection and the second flash is for the actual recording Flash Flash sensor Display Power lamp Operation Switch Recording Menu Lock Button NOTES Do not fire the flash at a person at short range In Multi Analyser 4 or Multi Analyser 9 the flash is disabled Z pg 2...

Страница 33: ...ng Menu appears 3 SELECT FUNCTION Rotate MENU SET to move the highlight bar to FLASH ADJ then press it The parameter blinks 4 ADJUST BRIGHTNESS OF FLASH Rotating MENU SET upward increases the number of the brightness adjustment and rotating MENU SET downward decreases it The adjustment range is from 3 to 3 5 ACTIVATE BRIGHTNESS OF FLASH Press MENU SET twice The flash brightness adjustment is compl...

Страница 34: ...g 41 P AE EFFECT Z pg 44 FLASH ADJ Z pg 33 and do each procedure from step 4 If you select TO MODE MENU the Mode Menu appears Go to step 5 5 SELECT FUNCTION PARAMETERS IN MODE MENU Rotate MENU SET to move the highlight bar to the desired function and press it If you select a function other than TO DATE TIME MENU or TO SYSTEM MENU each function s parameter starts blinking Rotate MENU SET until the ...

Страница 35: ...L A Y 6 REC MODE WIDE MODE OFF 40X SP ZOOM SELF TIMER GAIN UP DIS 4 TO DATE TIME MENU TO SYSTEM MENU END AGC OFF FLASH AUTO ON 6 DEC 25 98 30 REC MODE WIDE MODE OFF 40X SP ZOOM SELF TIMER GAIN UP DIS TO DATE TIME MENU TO SYSTEM MENU END AGC OFF FLASH AUTO 4 ON 6 DEC 25 98 30 QUALITY FINE 40X ZOOM SELF TIMER GAIN UP DIS TO DATE TIME MENU TO SYSTEM MENU END AGC OFF FLASH AUTO 4 ON 6 QUALITY FINE 40X...

Страница 36: ...o White Balance Adjustment and Manual White Balance Operation Z pg 50 51 Refer to Fade Wipe Effects Z pg 41 43 Refer to Program AE With Special Effects Z pg 44 45 Refer to Flash Brightness Adjustment Z pg 33 Refer to Mode Menu Explanations Z pg 37 Recording Menu Explanations FOCUS EXPOSURE W BALANCE P AE EFFECT FLASH ADJ FADER WIPE TO MODE MENU ...

Страница 37: ...ages zooming is possible from 10 times the optical zoom limit to a maximum of 40 times digital magnification Allows you to use the Digital Zoom By digitally processing and magnifying images zooming is possible from 10 times the optical zoom limit to a maximum of 100 times digital magnification To compensate for unstable images caused by camera shake particularly at high magnification NOTES Accurat...

Страница 38: ...ay from appearing on the connected TV screen Makes the camcorder s display appear on screen when the camcorder is connected to a TV Makes the date time settings appear in the camcorder Z pg 26 Keeps the date time settings from appearing in the camcorder Allows you to set the current date and time Z pg 11 OFF ON DATE TIME DISPLAY INDICATION ON OFF ON SCREEN ON OFF RECORDING Advanced Features For Vi...

Страница 39: ...ded on the tape Disengages the function which cuts down on noise created by wind Helps cut down on noise created by wind appears The quality of the sound will change This is normal Enables recording of stereo sound on four separate channels and is recommended for use when performing audio dubbing Enables recording of stereo sound on two separate channels This number is necessary when connecting th...

Страница 40: ...r Switch or 5S If you press MULTI SCREEN during Record Standby the screen will be divided into 9 quadrangles Press START STOP to start recording with 9 quadrangles Power Switch If you press MULTI SCREEN during Record Standby the screen will be divided into 9 quadrangles Press PHOTO SNAPSHOT to record with 9 quadrangles To Return To The Normal Screen press MULTI SCREEN again NOTES In the Multi Scre...

Страница 41: ... while pressing down the Lock Button Pull out the viewfinder fully or open the LCD monitor fully 2 ACCESS RECORDING MENU Press MENU SET The Recording Menu appears 3 ACCESS FADER WIPE MENU Rotate MENU SET to move the highlight bar to FADER WIPE then press it 4 SELECT EFFECT Rotate MENU SET to move the highlight bar to the desired function then press it The FADER WIPE Menu disappears and the effect ...

Страница 42: ...mode after performing a Picture Wipe Dissolve the point at which the scene ended is already stored in memory 6 START RECORDING If you start recording a new scene within 5 minutes of the end of the previous recording without having turned the camcorder s power off the previous scene wipes out revealing the new scene NOTES You can extend the length of a Fade or Wipe by pressing and holding START STO...

Страница 43: ...appears from left and right to cover the scene The scene wipes in from the bottom to the top of a black screen or wipes out from top to bottom leaving a black screen Wipe in toward the centre of a black screen from the top and bottom or wipe out from the centre toward the top and bottom leaving a black screen The new scene gradually appears as the old one gradually disappears The new scene wipes i...

Страница 44: ...SET The Recording Menu appears 3 ACCESS P AE EFFECT SELECT MENU Rotate MENU SET to move the highlight bar to P AE EFFECT then press it 4 SELECT MODE Move the highlight bar to the desired mode by rotating MENU SET then press it The P AE EFFECT Menu disappears and the selected mode is activated The symbol of the selected mode appears 5 DISABLE MODE To turn off the selected mode re access the P AE EF...

Страница 45: ...rrower 1 100 The shutter speed is fixed at 1 100th of a second The flickering that occurs when shooting under a fluorescent light or mercury vapour lamp is reduced 1 250 1 500 These settings allow fast moving images to be captured one frame at a time for vivid stable slow motion playback The faster the shutter speed the darker the picture becomes Use the shutter function under good lighting condi ...

Страница 46: ...te patterns or identical patterns that are regularly repeated When the scene is affected by sunbeams or light reflecting off the surface of a body of water When shooting a scene with a high contrast background The following low contrast warnings appear blinking and NOTES If the lens is smeared or blurred accurate focusing is not possible Keep the lens clean wiping with a piece of soft cloth if it ...

Страница 47: ...farther subject rotate MENU SET upward appears and blinks Go to step 6 To nearer subject rotate MENU SET downward appears and blinks Go to step 6 6 END ADJUSTMENT OF FOCUS Press MENU SET Focus adjustment is complete The indication changes from FOCUS to MANUAL If you want to reset the focus repeat from step 2 To Change To Auto Focus rotate MENU SET to display AUTO then press it in step 4 The manual...

Страница 48: ...lete The indication EXP changes to MANUAL and the highlight bar on the exposure control indicator goes out If you want to reset the exposure repeat step 2 To Return To Automatic Exposure Control rotate MENU SET to display AUTO then press it in step 4 The exposure control indicator disappears Or set the Operation Switch to NOTES After the Power Switch is set to OFF Exposure Control is reset to AUTO...

Страница 49: ...der then press and hold MENU SET for over 2 seconds The exposure control indicator and appear indicating that the iris is locked Press MENU SET The indication displayed in the upper left corner changes from EXP to MANUAL To Return To Automatic Iris Control rotate MENU SET to display AUTO then press it in step 4 The exposure control indicator and disappear Or set the Operation Switch to NOTE Iris l...

Страница 50: ...NCE ADJUST MENT The Recording Menu disappears W BAL appears in the upper left corner and the currently selected mode indication is also displayed 5 SET FUNCTION PARAMETERS Cycle through the available settings of the selected functions by rotating MENU SET and stop when the one you want is displayed AUTO The white balance is adjusted automati cally This is the factory preset position When shooting ...

Страница 51: ... indicator is displayed To Change The Tint For Recording in step 2 substitute coloured paper for white The white balance is adjusted based on the colour changing the tint Red paper deeper green blue paper orange yellow paper deeper purple NOTES In step 2 it may be difficult to focus on the white paper in some circumstances In such a case adjust focus manually Z pg 47 A subject can be shot under va...

Страница 52: ... Camcorder operation is the same as described in this section You can also view the playback picture on the LCD monitor with it flipped over and retracted LCD monitor viewfinder indications When power is supplied from the battery pack the battery pack remaining power indicator is displayed on the LCD monitor when it is turned on When power is supplied through the DC cord does not appear During Sto...

Страница 53: ... high speed search in either direction OPERATION 1 Press 3 to forward or press 2 to reverse during playback 2 To resume normal playback press 4 6 NOTES During playback press and hold 2 or 3 The search continues as long as you hold the button Once you release it normal playback resumes A slight mosaic effect appears on screen during Shuttle Search This is not a malfunction FEATURE Slow Motion Playb...

Страница 54: ...PERATION MODE Set the Power Switch to while pressing down the Lock Button Pull out the viewfinder fully or open the LCD monitor fully 2 ACCESS PLAYBACK MENU Press MENU SET The Playback Menu appears 3 SELECT FUNCTION Move the highlight bar to the desired function by rotating MENU SET Press it to activate 4 SET FUNCTION PARAMETERS Rotate MENU SET to cycle through the available settings for the selec...

Страница 55: ...enu and change the setting Z pg 54 OFF The Playback Sound Time Code and Date indications do not appear on the Playback Screen ON The Playback Sound Time Code and Date indications are displayed according to how TIME CODE and DISPLAY are set in the Playback Menu NOTE If INDICATION is set in the Date Time Menu INDICATION in the Playback Menu will also be set to the same setting Z pg 34 38 DEC 25 98 P...

Страница 56: ... Insert a MultiMediaCard then close the card cover 2 SELECT OPERATION MODE Set the Power Switch to while pressing down the Lock Button Open the LCD monitor fully or pull out the viewfinder fully A stored image is displayed 3 START AUTO PLAYBACK Press 4 6 If you press 2 during Auto Playback images are displayed in descending order If you press 3during Auto Playback images are displayed in ascending...

Страница 57: ...ch still image wipes in over the last one from the bottom of the screen to the top 1 SELECT OPERATION MODE Set the Power Switch to while pressing down the Lock Button Open the LCD monitor fully or pull out the viewfinder fully 2 ACCESS PLAYBACK MENU Press MENU SET The Playback Menu appears 3 START SLIDE SHOW Move the highlight bar to SLIDE SHOW by rotating MENU SET and press it The Slide Show star...

Страница 58: ... deleted from memory the remaining images are automatically moved up to fill any gaps in the numerical sequence Therefore the number of remaining images is 7 and the new index numbers range from 001 to 007 F S E Picture Quality mode Displays the Picture Quality mode of the stored image There are 3 modes available FINE STANDARD and ECONOMY in order of quality Protect icon When an image is protected...

Страница 59: ...er Switch to while pressing down the Lock Button Open the LCD monitor fully or pull out the viewfinder fully A stored image is displayed 2 ACCESS INDEX SCREEN Press MULTI SCREEN The INDEX Screen appears OR Select INDEX in the Playback Menu To access the Playback Menu press MENU SET 3 DISPLAY DESIRED IMAGE Rotate MENU SET to move the green frame to the desired image and press it The image selected ...

Страница 60: ...y image you like For details read your printer s instruc tion manual To create a Multi Image screen using the same image with a title frame first select the title frame referring to Superimposing A Title Frame Z pg 69 and then go to step 2 above If a title frame is superimposed over the playback picture before step 2 is performed above it will be impossible to set MULTI VIEW to SELECTED 4 TO CREAT...

Страница 61: ...election of an image rotate MENU SET to move the green frame to the desired image and press it The check mark disappears 6 CREATE MULTI IMAGE SCREEN Rotate MENU SET upward to select EXIT and press it The Multi Image screen of the selected images appears The selected images are displayed in numerical order from left to right and top to bottom If you exit before selecting all 4 images the Multi Imag...

Страница 62: ...e Playback Menu appears 3 SELECT FUNCTION Rotate MENU SET to move the highlight bar to PROTECT and press it The PROTECT Index Screen appears TO PROTECT AN IMAGE Before doing the following perform steps 1 through 3 above 4 SELECT IMAGE Rotate MENU SET to move the green frame to the desired image and press it A padlock mark appears on the selected image Repeat this procedure for all images you do no...

Страница 63: ...Rotate MENU SET to move the green frame to the desired image and press it The padlock mark located above the image disappears and the image is no longer protected Repeat this procedure for all images from which you wish to remove protection 5 END PROTECTION Rotate MENU SET upward to select EXIT and press it The normal playback screen appears Display MENU SET Dial PROTECT Index Screen Normal playba...

Страница 64: ... deselect an image press MENU SET again The disappears 6 END SELECTION Rotate MENU SET upward to select NEXT and press it The Deletion Confirmation Screen appears 7 DELETE IMAGE Rotate MENU SET to select EXECUTE and press it The selected images are deleted and the normal playback screen appears If you wish to cancel deletion rotate MENU SET to select CANCEL and press it P L A Y P C O F F C A M E R...

Страница 65: ...ECT MODE Rotate MENU SET to select ALL and press it The Deletion Confirmation Screen appears 5 DELETE IMAGES Rotate MENU SET to select EXECUTE and press it All the images are deleted If you wish to cancel deletion rotate MENU SET to select CANCEL and press it FILE DELETE Screen Normal playback Deletion Confirmation Screen Display MENU SET Dial ...

Страница 66: ...TED and press it The DELETE Index Screen appears 5 SELECT TITLE FRAME Rotate MENU SET to move the green frame to the desired title frame that you wish to delete and press it An appears above the selected title frame Repeat this procedure for all titles frames that you wish to delete To deselect a title frame press MENU SET again The disappears 6 END SELECTION Rotate MENU SET upward to select NEXT ...

Страница 67: ... MODE Rotate MENU SET to select ALL and press it The Deletion Confirmation Screen appears 5 DELETE TITLE FRAME Rotate MENU SET to select EXECUTE and press it All the titles frames are deleted If you wish to cancel deletion rotate MENU SET to select CANCEL and press it TITLE DELETE Screen Normal playback Deletion Confirmation Screen Display MENU SET Dial ...

Страница 68: ...68EN Types Of Titles Frames This camcorder has 12 preset titles frames stored in its memory as shown in the following illustration PLAYBACK Advanced Features For Video And D S C ...

Страница 69: ...the images will be recorded played back in the FULL mode regardless of the selected Snapshot mode Depending on the images you record or play back the title frame outline may become grainy or vague During title frame display it is not possible to change the Snapshot mode To Record An Image With A Title Frame You can also record an image with a title frame by performing the following procedure 1 Set...

Страница 70: ...w Knob Screw Stud Bottom of Docking Station Stud hole To IN To AV OUT Cable Adapter provided Set to CVBS Tripod mounting socket White to AUDIO L Red to AUDIO R Yellow Not connected To S VIDEO OUT S Video cable provided A V cable RCA plug to RCA plug provided Cable Adapter provided Set to Y C TV VCR Docking Station Attachment 1 Align the edge of the camcorder with the edge of the Docking Station 2 ...

Страница 71: ...corder without inserting a tape set the camcorder s Power Switch to 5S or then set your TV to the appropriate input mode Make sure you adjust the TV sound volume to its minimum level to avoid a sudden burst of sound when the camcorder is turned on If you have a TV or speakers that are not specially shielded do not place the speakers adjacent to the TV as interference will occur in the camcorder pl...

Страница 72: ... on pg 70 3 TURN ON POWER Turn the camcorder s Power Switch to while pressing down the Lock Button and turn on the PC NOTES It is recommended to use the AC Power Adapter Charger as the power supply instead of the battery pack Z pg 9 Never connect the PC connection cable and the DV cable simultaneously to the camcorder Connect only the cable you wish to use to the camcorder The date time informatio...

Страница 73: ...IF NECESSARY Connect the PC connection cable provided to the printer s PC connector and the PC s RS 232C connector 4 TURN ON POWER Turn the camcorder s Power Switch to while pressing down the Lock Button and turn on the other units NOTES It is recommended to use the AC Power Adapter Charger as the power supply instead of the battery pack Z pg 9 When using the camcorder for dubbing be sure to use i...

Страница 74: ...step 5 Before you start dubbing make sure that the indications do not appear on the connected TV If they do appear during dubbing they are being recorded onto the new tape To clear the Playback Sound Mode Display press DISPLAY on the RM V713U remote control provided Select DISPLAY and TIME CODE from the Playback Menu Z pg 54 to show or hide the Date Time and the Time Code on the recording To keep ...

Страница 75: ...begin recording NOTES It is recommended to use the AC Power Adapter Charger as the power supply instead of the battery pack Z pg 9 When using the camcorder for dubbing be sure to use it as a player The camcorder s DV connector is only for output If a blank portion or disturbed image is played back on the player during dubbing the dubbing may stop so that an unusual image is not dubbed Even though ...

Страница 76: ...fully or pull out the viewfinder fully 3 SELECT IMAGE TO BE DUBBED Perform Index Playback Z pg 59 Auto Playback Z pg 56 or press 2 or 3 to select the image you wish 4 START DUBBING Press PHOTO SNAPSHOT The message TO COPY TO TAPE PUSH SNAPSHOT is displayed for approx 5 seconds While the message is displayed press PHOTO SNAPSHOT again and the selected image is recorded on the tape for approx 5 seco...

Страница 77: ...nd the image you wish to dub press it again to engage Still Playback 4 SELECT SNAPSHOT MODE Press SNAPSHOT MODE to select the Snapshot mode to use for dubbing the image to the MultiMediaCard 5 START COPYING Press PHOTO SNAPSHOT The image is stored in the MultiMediaCard blinks during dubbing NOTES If PHOTO SNAPSHOT is pressed in step 5 when a MultiMediaCard is not loaded the message COPYING FAILED ...

Страница 78: ...CT OPERATION MODE For both receiving and transmitting camcorders Set the Power Switch to while pressing down the Lock Button Open the LCD monitor fully or pull out the viewfinder fully 3 ACCESS PLAYBACK MENU For both receiving and transmitting camcorders Press MENU SET The Playback Menu appears 4 SELECT FUNCTION For both receiving and transmitting camcorders Rotate MENU SET to move the highlight b...

Страница 79: ... when the message disappears NOTES Be sure to supply power from the AC Power Adapter Charger instead of the battery pack For transmitting camcorder Be sure to set IrTran P back to OFF when the transmission is finished An image with a title frame can also be transmitted If the message COMMUNICATION FAILED is displayed within approx 60 seconds after START STOP TRANS is pressed check the equipment or...

Страница 80: ... pressing the knob as shown 2 INSERT BATTERY IN HOLDER Insert the battery in the holder and be sure to have the mark visible 3 RE INSERT HOLDER Slide the holder back in until you hear a click Read the caution concerning lithium batteries Z pg 2 When using the remote control be sure to point it at the remote sensor The illustra tion shows the approximate transmitted beam effective area for indoor u...

Страница 81: ... set to the camera position 5S or Zoom in out Z pg 24 Transmits the beam signal Functions same as START STOP on the camcorder With the camcorder s Power Switch set to or Z pg 85 Zoom in out Z pg 82 Z pg 74 Z pg 82 Z pg 82 Z pg 82 Z pg 85 Rewind Reverse Shuttle Search on a tape Z pg 52 53 Displays previous image in a MultiMediaCard Z pg 56 Z pg 83 Z pg 83 Z pg 55 Z pg 84 Z pg 82 Z pg 90 Z pg 82 For...

Страница 82: ...the camcorder actually begins playback in slow motion During Slow Motion Playback there will be distur bances in video and the picture may seem unstable especially with steady images This is not a malfunc tion During Slow Motion Playback press PAUSE 6 to pause playback FEATURE Frame By Frame Playback PURPOSE To allow frame by frame search during video playback OPERATION 1 To change from normal to ...

Страница 83: ...T The PLAYBACK EFFECT Select Menu appears 3 Move the highlight bar to the desired effect by pressing EFFECT The selected function is activated and after 2 seconds the menu disappears n To deactivate the selected effect press EFFECT ON OFF on the remote control Pressing it again re activates the selected effect n To change the selected effect repeat from step 2 of the above OPERATION NOTES When som...

Страница 84: ... VCR and point the remote towards the VCR s infrared sensor Then referring to the VCR CODE LIST on the left press and hold MBR SET and press button A and then B The code is automatically set once you release MBR SET and the VCR s power comes on 2 OPERATE VCR Make sure the VCR s power is on Then while holding SHIFT press the button on the remote for the desired function The functions the remote can...

Страница 85: ... You can use the AV OUT connector on the camcorder for connection Before Random Assemble Editing make sure the indications do not appear on the TV monitor If they appear during Random Assemble Editing they will be recorded onto the new tape To clear the Playback Sound Mode Display press DISPLAY on the remote control Select DISPLAY and TIME CODE from the Playback Menu Z pg 54 to show or hide the Da...

Страница 86: ...NG THE REMOTE CONTROL UNIT cont PLAY R A EDIT ON OFF EFFECT Random Assemble Editing Menu Programme Power Switch Remote sensor CANCEL RM V713U provided EDIT IN OUT FADE WIPE NOTES When the source tape has more than 2 identical time codes Z pg 25 the camcorder may not find the Edit In point you chose and a malfunction may occur When choosing a scene set Edit In and Edit Out points so that there is a...

Страница 87: ... recording deck enters its Record Standby mode If you do not register an Edit Out point the tape will be dubbed all the way to the end automatically 1 14 STOP EDITING Engage the Stop modes for the camcorder and the VCR To make the R A Edit counter display disappear press R A EDIT ON OFF on the remote control NOTES Pressing R A EDIT ON OFF on the remote control clears all settings registered during...

Страница 88: ... PREPARE FOR R A EDIT Play back the tape in the camcorder then point the remote control at the camcorder s remote sensor and press R A EDIT ON OFF Random Assemble Editing Menu appears 2 CHOOSE A SCENE Perform Random Assemble Editing on Programme 1 only In order to check VCR and camcorder timing select the beginning of a scene transition as your Edit In point 3 PLAY BACK DUBBED SCENE If any images ...

Страница 89: ... The value for SYNCHRO is highlighted 6 INPUT CORRECTION DATA Based on the diagnostics performed Z pg 88 you can now increase the VCR s speed by rotating MENU SET upward You can also slow down the VCR s speed by rotating MENU SET downward The adjustment range is from 1 3 to 1 3 seconds in 0 1 second increments 7 CLOSE MENU Press MENU SET twice Now perform Random Assemble Editing beginning with ste...

Страница 90: ...ck press AUDIO MONITOR on the remote control If you dub onto a blank space on the tape the sound may be disrupted Make sure you only edit recorded areas If feedback or howling occurs during TV Playback move the camcorder s microphone away from the TV or turn down the TV s volume Sound is not heard from the speaker during Audio Dubbing To hear sound connect optional headphones to the AV OUT headpho...

Страница 91: ...ack Menu appears 3 SELECT FUNCTION Rotate MENU SET to move the highlight bar to FORMAT and press it The Format Confirmation Screen appears 4 INITIALIZE MULTIMEDIACARD Rotate MENU SET to move the highlight bar to EXECUTE and press it The MultiMediaCard is initialised If you wish to cancel initialization rotate MENU SET to select CANCEL and press it NOTES After initializing all images stored in the ...

Страница 92: ...Adapter Charger securely Z pg 9 Replace the dead battery with a fully charged one Z pg 8 9 Open the LCD monitor fully or pull out the viewfinder The LCD monitor turns on off when it is opened closed at approx 90 while the Power Switch is set to any position except OFF if the viewfinder is not fully pulled out 2 Connect the camcorder to an AC outlet using the AC Power Adapter Charger for over 24 ho...

Страница 93: ...m is selected The Video Echo mode is activated Picture Wipe or Dissolve are being used in a scene transition 5 Second recording was done with the Power Switch set to 5S and with 5SD selected in the System Menu 10 Disengage the Squeeze mode Z pg 37 11 Set FLASH to ON in the Mode Menu Z pg 32 It can take up to 10 seconds to charge the flash Disengage Multi Analyser 4 or Multi Analyser 9 Z pg 23 31 S...

Страница 94: ...es during 5 second recording mode Z pg 28 there is a delay of a fraction of a second between the previous record stop point and the Dissolve start point This is normal but this slight delay becomes especially noticeable when shooting fast moving subject or during rapid panning 17 Set the Operation Switch to and or set the Power Switch to or 18 Turn off Sepia and Monotone Z pg 44 19 Turn off Sepia ...

Страница 95: ...ot try to use the Video Echo mode during a Fade In or Fade Out or when Dissolve is activated during 5 second mode recording Z pg 44 45 24 If you want the lighting to look more natural set GAIN UP to AGC or OFF in the Mode Menu Z pg 34 39 25 Do not try to use the Classic Film or Strobe mode during a scene transition Z pg 44 45 26 Turn off Sepia or Monotone before setting White Balance Z pg 44 45 27...

Страница 96: ...nstantly on the LCD monitor or the viewfinder These spots are not recorded on the tape This is not due to any defect of the unit Effective dots more than 99 99 37 The optional headphones are not connected to the headphones connector The sound volume of the headphones connector was not adjusted appropriately The sound volume at this point is the same as the level it was adjusted to during playback ...

Страница 97: ...fter the indicator blinks the recording mode switches to SP and recording goes on 47 The viewfinder is pulled out The LCD monitor s brightness setting is too dark 48 This is not a malfunction 49 The DV cable was plugged unplugged with power turned on 41 Turn the speaker volume down Z pg 52 42 Wipe them gently with soft cloth Wiping strongly can cause damage 43 Check the section of the manual that ...

Страница 98: ...available soft cloth Be careful not to damage the monitor Close the LCD monitor 3 CLEAN LENS Blow it with a blower brush then wipe gently with lens cleaning paper 4 PULL OUT VIEWFINDER FULLY 5 CLEAN VIEWFINDER Slide the cover in the direction of the arrow 1 Insert a lens blower or a soft cloth into the gap at the bottom of the viewfinder and clean the interior of the viewfinder with it 2 6 PUSH VI...

Страница 99: ...tialise or run the software again Auto Shut Off If 5 minutes elapse in the Record Standby mode or in the Pause mode the camcorder s power shuts off automatically to conserve energy 2 PC Connector DIGITAL STILL Z pg 72 3 Edit Connector EDIT Z pg 85 Connect the editing cable when performing Random Assemble Editing Z pg 84 89 4 Stud Z pg 70 5 Screw Z pg 70 6 Multi Connector The Docking Station can be...

Страница 100: ...100EN INDEX Controls Connectors And Indicators 6 5 8 7 i y o 1 2 3 4 W I U 0 9 E T u r t p R w q e Q PLAY PCOFF C A M E R A 5 S D S C D S C P L A Y Y ...

Страница 101: ... Connector DV OUT i link Z pg 72 73 75 i Link refers to the IEEE1394 1995 industry specification and extensions thereof The logo is used for products compliant with the i Link standard Audio Video Output Connector AV OUT Z pg 70 Headphones Connector Z pg 90 q Multi Connector When attached to the Docking Station this part is connected Indicators w Tally Lamp Z pg 18 e Power Lamp Z pg 18 Other Parts...

Страница 102: ...r Z pg 39 0 Displays the selected Fade Wipe effect Z pg 41 Setting INDICATION to OFF in the Date Time Menu lets you remove indications marked with from the screen Z pg 27 No Function 1 Displays the Picture Quality mode of the stored image There are 3 modes available FINE STANDARD and ECONOMY in order of quality Z pg 15 22 2 Displays the number of images that have already been shot Z pg 22 3 Displa...

Страница 103: ... 32 6 Appears when the flash is ready A number appears next to the indication after adjusting the brightness of the flash Z pg 32 33 7 Appears when taking a Snapshot Z pg 22 30 8 Appears during Self Timer recording Z pg 29 9 Displays the brightness of the LCD monitor or the viewfinder Z pg 21 0 Displays the date time Z pg 11 38 Appears when the iris is locked Z pg 49 Appears when the focus is adju...

Страница 104: ... the LCD monitor or the viewfinder Z pg 21 VOLUME Displays the speaker or headphone volume Z pg 52 6 Displays the time code Z pg 55 WIDE PS HIGH SPEED 6e 25 12 99 16 40 TC VOLUME 6 SOUND1 32kHz LP 4 01 28 15 2 3 5 6 4 1 INDEX Indications cont LCD Monitor Viewfinder Indications During D S C Playback No Function 1 Displays the index number of the image file Z pg 56 2 Displays the total number of sto...

Страница 105: ...d and the previously set date time is erased Z pg 11 Appears when Audio Dubbing is unavailable Z pg 90 Appears when the MultiMediaCard s memory is full and shooting is not possible Displayed for approx 10 seconds when the Power Switch is set to or when a MultiMediaCard is not loaded Appears when there is a problem with a MultiMediaCard and its memory is corrupt Initialize the MultiMediaCard Z pg 9...

Страница 106: ...g 45 U Unload A Tape Z pg 12 V Video Echo Z pg 45 W White Balance Z pg 50 51 Wide Mode Z pg 37 Wind Cut Z pg 39 Wipe In Out Z pg 41 Z Zooming Z pg 24 A AC Power Adapter Charger Z pg 8 9 Animation Z pg 39 Audio Dubbing Z pg 90 Auto Focus Z pg 46 Auto Playback Z pg 56 Auto Shut off Z pg 19 52 99 B Back Light Compensation Z pg 48 Battery Low Z pg 105 Battery Pack Z pg 8 9 107 Beep Tally Z pg 39 Brigh...

Страница 107: ...attery pack or an optional battery pack be sure to read the following cautions 1 To avoid hazard do not burn do not short circuit the terminals do not modify or disassemble do not expose the battery to temperatures exceeding 60 C 140 F as this may cause the battery to overheat explode or catch fire use only specified chargers 2 To prevent damage and prolong service life do not subject to unnecessa...

Страница 108: ...tion keep the lens directed at extremely bright objects for long periods expose the lens to direct sunlight carry it by holding the LCD monitor or the viewfinder swing it excessively when using the hand strap or the grip swing the soft camera case excessively when the camcorder is inside it 5 Dirty heads can cause the following problems No picture during playback Blocks of noise appear during play...

Страница 109: ...Monaural For Digital Video Camera Format DV Format SD mode Signal format PAL Standard Video signal recording format Digital Component Recording Cassette Mini DV Cassette Tape Speed SP 18 8 mm s LP 12 5 mm s Maximum recording time SP 60 min LP 90 min using M DV60ME cassette For Digital Still Camera Storage media MultiMediaCard Compression system JPEG compatible Picture quality 3 modes FINE STANDARD...

Страница 110: ... mm W x 31 mm H x 55 mm D Weight Approx 90 g For Connectors S Video Y 1Vp p 75 Ω analogue output C 0 29 Vp p 75 Ω analogue output Video 1Vp p 75 Ω analogue output Audio 8 dBs 1 kΩ analogue output JLIP ø3 5 mm 4 pole mini head jack compatible with RC 5325 plug Editing ø3 5 mm 2 pole PC ø2 5 mm 3 pole External microphone input 68 dBs high impedance unbalanced with ø3 5 mm stereo E O E Design and spe...

Страница 111: ...EN111 MEMO ...

Страница 112: ...GR DVX7 COPYRIGHT 1999 VICTOR COMPANY OF JAPAN LTD EG Printed in Japan 0499HOV UN SN VICTOR COMPANY OF JAPAN LIMITED EN ...

Отзывы: