1-31
CA-MXS6MDR
SP-MXS6MD
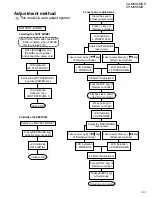
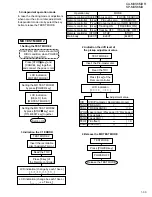
Adjustment method
MD TEST MODE 1
1.Setting the TEST MODE1
Press [STOP key] and
[CANCEL key] together,
and connect the power cord.
LCD indication
MD TEST MODE 1
Setting the MD TEST MODE1
by press [POWER key]
LCD indication
[HELLO] then
[MD TEST MODE 1]
Setting OK
Adjustment complete
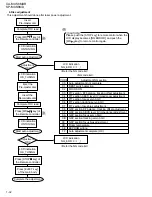
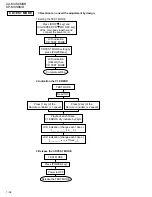
3.Laser power adjustment
Insert the sensor
of laser power meter
Press [ 2 key ] of
Remote controller
LCD indication
L.POWER PLAY
LCD indication
L.POWER UP
LCD indication
L.POWER DOWN
Adjust the PLAYBACK
laser power
Adjust the RECORDING
laser power
0.68mW Adjustment
2.Initialize the EEPROM
Setting the MD TEST MODE 1
Press [REC PAUSE key]
of the Remote controller
LCD indication
DATA INITIAL
Initialize OK
Laser power up by [ key]
of Remote controller
Laser power down by [ key]
of Remote controller
Laser power up by [ key]
of Remote controller
Laser power down by [ key]
of Remote controller
Press [ 4 key] of
Remote controller
LCD indication
L.POWER REC
LCD indication
L.POWER UP
LCD indication
L.POWER DOWN
Press [STOP key] of
Remote controller
6.23mW Adjustment
Press [STOP key] of
Remote controller
Press [EJECT key]
of main body
Playback laser power
adjustment complete
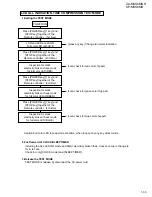
(CAUTION) MD mode should NO
DISC condition, when POWER
ON to not read TOC.
This model is auto adjust system.

