background image

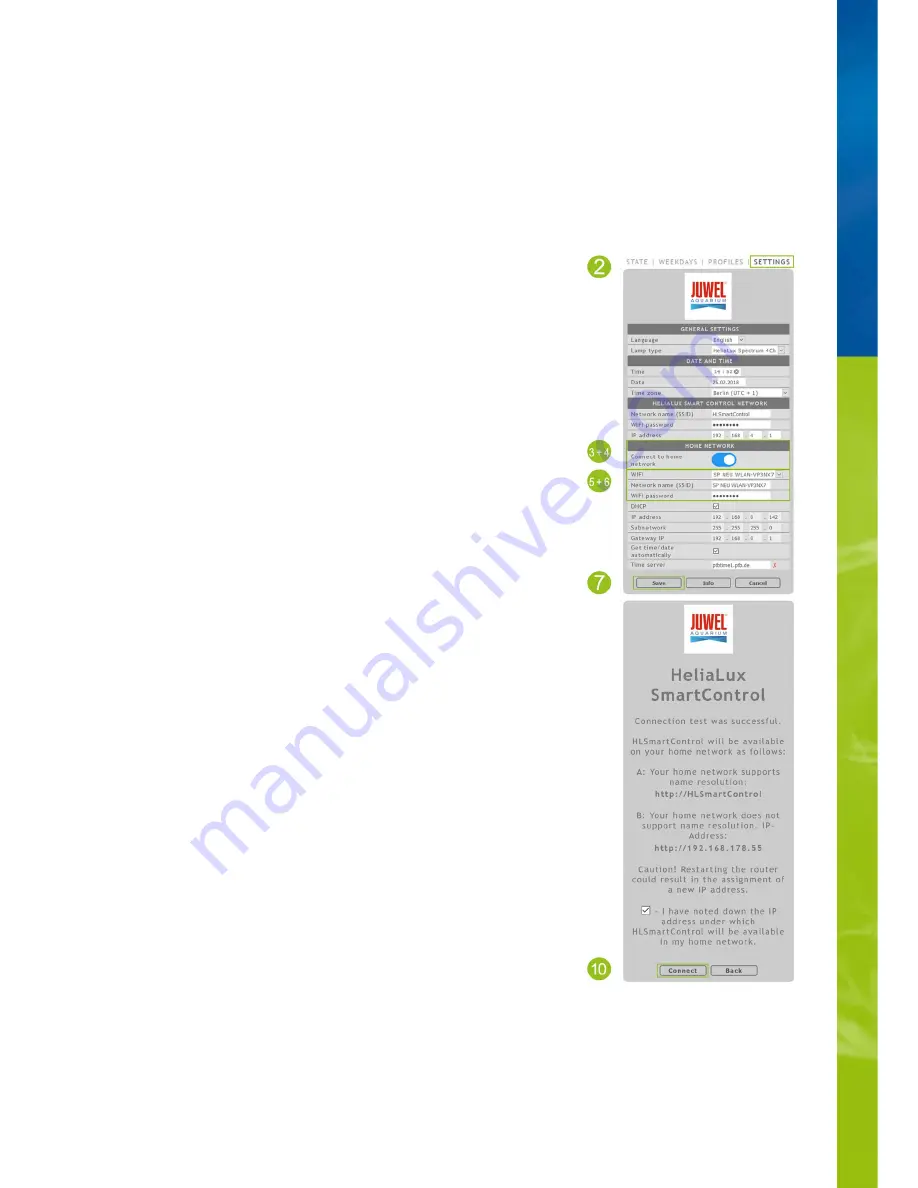
HeliaLux SmartControl in home networks

It is possible to connect the device to the home network for easy access to the  HeliaLux  SmartControl.  Manually connecting to the
HeliaLux SmartControl via Access Point Mode is no longer necessary with this type of connection.

The following additional options are available when your home network is connected to the Internet:

Establishing a connection to the home network

Automatically retrieving the date and time

Installing firmware updates

1. Connect to the HeliaLux SmartControl's user interface (see 'Establishing a connection
to the user interface using Access Point Mode').

2. Select the main 'Settings' menu item.

3. Navigate to the 'Home network' item.

4. Activate the 'Connect to home network' sliding controller. The search for available WiFi
networks will start.

5. Select the WiFi network to which you want to connect the HeliaLux SmartControl.

6. Enter the password for the selected WiFi network.

7. Confirm your setting by clicking the 'Save' button.

8.  Confirm  the  system  message  for  checking  the  WiFi  connection  by  clicking  the  'OK'
button. The HeliaLux SmartControl will now check the connection to your home network.

9.  Once  the  connection  has  been  checked,  reconnect  to  your  HeliaLux  SmartControl's
WiFi  network  and  then  enter  192.168.4.1  as  the  IP  address  in  your  Internet  browser's
address line to launch the user interface. You will then see the result of the connection
check.

10. The IP address at which you can access your SmartControl in your home network will
be  displayed  on  successful  conclusion  of  the  connection  check.  Make  a  note  of  this
address. Confirm that you have made a note of the IP address and then click the ‘Connect’
button to connect to your home network.

11.  Please  ensure  that  your  device  is  connected  to  your  home  network  when  the
connection has been established. You can then access your HeliaLux SmartControl's user
interface by entering the IP address that you noted in Step 10 in your Internet browser's
address line.

Info

The  blue  network  LED  on  your  device  will  flash  while  the  connection  to  your  home
network is being established. The blue network LED will light up continuously once the
connection has been successfully established.


14

Содержание HeliaLux SmartControl

Страница 1: ...INSTRUCTION MANUAL HeliaLux SmartControl www juwel aquarium com 1...

Страница 2: ...ut power in 802 11b mode The electrical devices may only be operated indoors In case of damage or malfunction never open the HeliaLux SmartControl or repair the power cable Always replace the entire d...

Страница 3: ...le to control the HeliaLux LED light unit with the optionally available splitter The optionally available splitter allows up to two HeliaLux lamps to be used with one SmartControl The HeliaLux SmartCo...

Страница 4: ...aLux SmartControl HeliaLux Spectrum Splitter 2x HeliaLux Spectrum 4 colours You will need the HeliaLux Spectrum Splitter part number to use two HeliaLux Spectrum with the HeliaLux SmartControl 48998 T...

Страница 5: ...to the screw connectors 2 Connect the plug of the power supply unit to the mains and switch the power supply unit on Version D HeliaLux SmartControl HeliaLux LED Splitter 2x HeliaLux LED 2 colours Yo...

Страница 6: ...fault setting for the Wi Fi network s name is HLSmartControl 3 Enter the Wi Fi password At delivery the password is password 4 Once the connection has been established successfully the HeliaLux SmartC...

Страница 7: ...Select the main Settings menu item 3 Navigate to the General settings item and select your con guration from the Lamp type selection list The following con gurations are available to choose from 4 Cl...

Страница 8: ...and date can be obtained automatically over the Internet The HeliaLux SmartControl must be connected to the home network and have access to the Internet to this end please refer to HeliaLux SmartCont...

Страница 9: ...signed to all 7 days in the HeliaLux SmartControl s factory settings This pro le may be changed at any time Please refer to Con guration of the Light Pro les to this end An individual target time alon...

Страница 10: ...o A lighting phase s start time is set automatically and corresponds to the previous lighting phase s de ned end time Example of the automatic start time of a lighting phase The rst phase of a pro le...

Страница 11: ...n select the desired target intensity for the added phase as described in Point 7 Editing light pro les Click the x button to remove an existing lighting phase 1 Connect to the HeliaLux SmartControl s...

Страница 12: ...ation of the time of day allows you to simulate the light pro le for the current day of the week in fast motion by moving the sliding controller Activating manual simulation of the time of day 1 Conne...

Страница 13: ...ol will by default remain active for 60 minutes and can be extended up to 24 hours when necessary if it is not deactivated The SmartControl will then switch back to automatic mode 4 Make the desired c...

Страница 14: ...ystem message for checking the WiFi connection by clicking the OK button The HeliaLux SmartControl will now check the connection to your home network 9 Once the connection has been checked reconnect t...

Страница 15: ...even after 30 seconds you can return your HeliaLux SmartControl to Access Point Mode using the following key combination and then repeating Steps 1 to 11 Press the Reboot button once then press the M...

Страница 16: ...Please refer to Assigning a static IP address in home networks to this end Please also make sure in this event that the selected IP address is supported by your network Many common routers support th...

Страница 17: ...may not contain any spaces special characters or umlauts 5 Create a new secure Wi Fi password for your HeliaLux SmartControl in the Wi Fi password input eld Info Secure passwords contain at least 8 c...

Страница 18: ...word to this end Please proceed as follows if you want to be able to launch the HeliaLux SmartControl using a static IP address that you have assigned Attention Only for experienced users We recommend...

Страница 19: ...r Internet browser s address bar Save the IP addresses for the respective HeliaLux SmartControl as favourites in your end device This will help you access the user interface more quickly and more comf...

Страница 20: ...Control s user interface Please refer to Connecting the HeliaLux SmartControl to home networks Notice Please ensure that your home network has access to the Internet 2 Select the main Settings menu it...

Страница 21: ...ts up continuously after successfully connecting to a Wi Fi home network Brie y lights up twice and once long in Access Point Mode Flashes when establishing a connection to a Wi Fi home network Lights...

Страница 22: ...ill access the user interface by pressing the key combination to return the SmartControl to Access Point Mode Activation Press the Reboot button once then press the Mode button once to do so Reboot Pr...

Страница 23: ...23...

Страница 24: ...martControl flashes continuously Possible cause The selected Wi Fi network is not available or is out of range You have entered an incorrect password for your Wi Fi network You have changed your Wi Fi...

Страница 25: ...signed to your HeliaLux SmartControl ____________________________ Please ensure that your end device is connected to the same Wi Fi network as your HeliaLux SmartControl ___________________________ Pl...

Страница 26: ...ousehold waste Please recycle where facilities exist When you need to dispose of this tting check with your retailer or local authority for suitable options New regulations will encourage the recyclin...

Страница 27: ...ents have been maintained by persons or companies not authorised by the manufacturer to do so c the product or its components have been damaged by mechanical means of whatsoever kind in particular bro...

Отзывы: