4
5
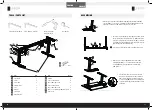
Befestigen Sie das Handbedienungsteil
(6)
an der Unterseite der Tischober-
fläche, wo Sie möchten. Befestigen Sie es mit ST5 × 16 Holzschrauben
(12)
.
Stecken Sie das Kabel des Mobilteils in die Steuerbox.
MONTAGE
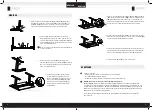
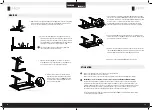
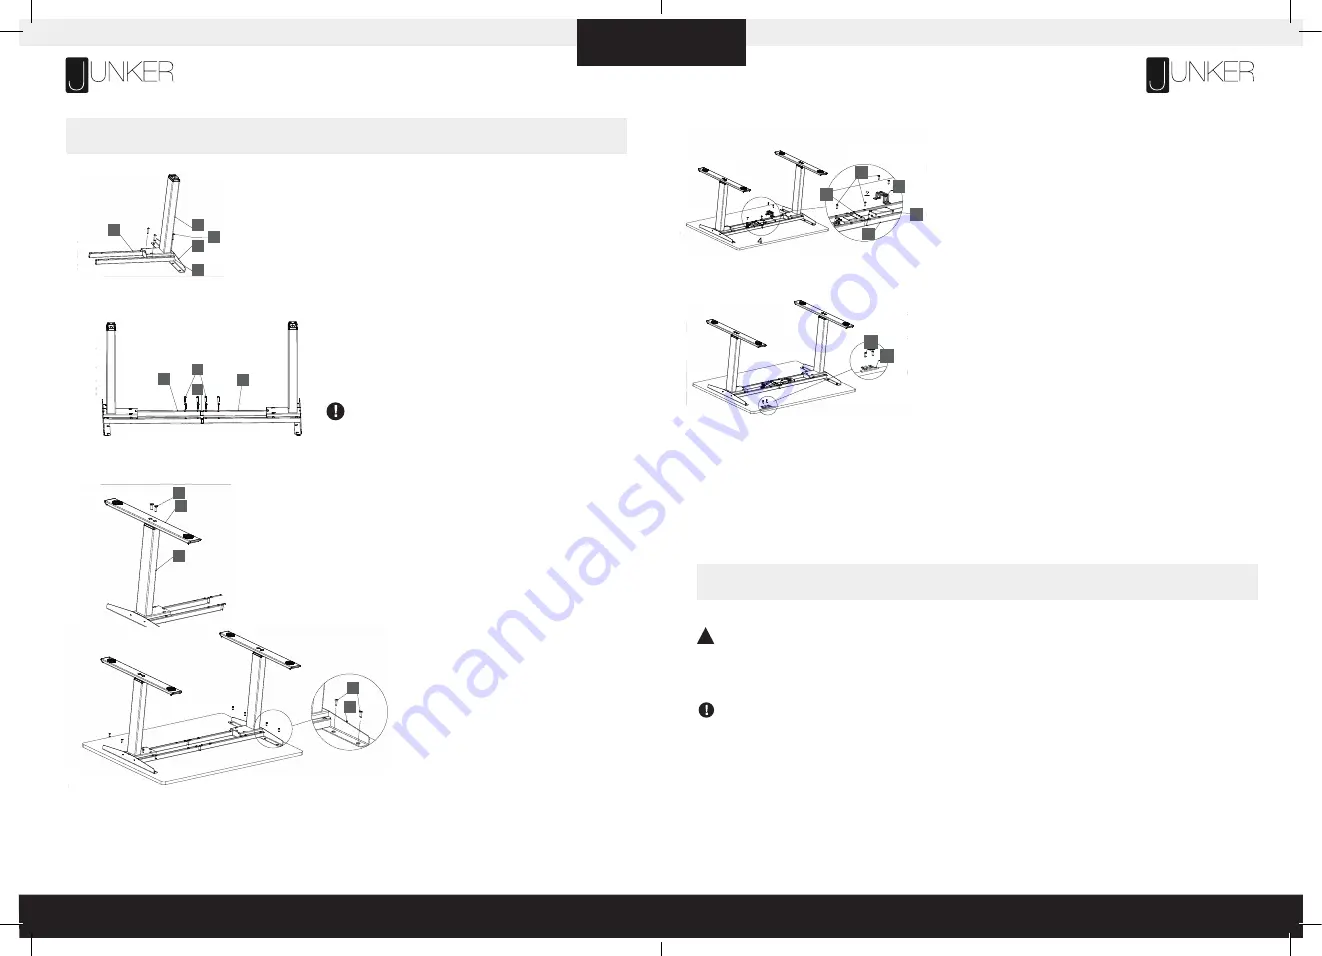
Bringen Sie die Löcher der Seitenhalterung
(1)
, des Rahmens
(2)
und der Hebe-
säule
(4)
in eine gerade Linie. Setzen Sie dann die Maschinenschraube M6 × 35
mit rundem Kopf
(11)
in die Löcher ein und ziehen Sie die Schrauben mit dem
4-mm-Sechskantschlüssel fest. Wiederholen Sie dies auf der anderen Seite.
Setzen Sie die Mittelschiene
(3)
auf beiden Seiten in den
Rahmen
(2)
ein und stellen Sie die entsprechende Position ein.
Setzen Sie dann die M6 x30 Schrauben mit rundem Kopf
(13)
in
die in der Abbildung gezeigte Position und ziehen Sie sie mit dem
4-mm-Sechskantschlüssel fest.
Wenn eine Schraube in das Rahmenende fällt, einfach kippen um
sie raus zu bekommen.
Richten Sie die Löcher am Fuß
(5)
mit den Löchern an der
Hebesäule
(4)
aus. Setzen Sie die Schrauben
(14)
mit Senkkopf
M10 × 30 in den Fuß ein und ziehen Sie die Schrauben mit dem
6-mm-Sechskantschlüssel fest.
Stellen Sie den Tischrahmen auf die Unterseite
der Tischoberfläche und positionieren Sie den
Rahmen auf der Mitte der Tischplatte. Setzen Sie
die ST5 × 20 Holzschrauben
(10)
in die entspre-
chenden Löcher in der Seitenhalterung
(1)
ein
und befestigen Sie sie mit einem Kreuzschlitz-
schraubendreher.
Align the holes of the side bracket (1), the frame (2), and the lifting column (4).
Then put the M6×35 machine screw
with round head (11) into the holes,
and tighten the screws with a 4MM hexagon wrench. Repeat on the other side.
Insert the center rail (3) into the frame (2) on both sides, and adjust the appropriate position (note: the word
"MAX" on the center rail can't be completely exposed). Then put the M6 x30 machine screw with round
head (13) into the position as shown in the figure, and tighten with a 4MM hexagon wrench.
If you drop a screw inside the frame end , simply tilt to retrieve.
Align the holes on the foot (5) with the holes on the lifting column (4). Put the
M10×30 countersunk head machine screws (14) into the foot, and tighten the
screws with a 6MM hexagon wrench.
Put the table frame on the desktop and adjust the position of the table frame to the middle of the desktop. Put the ST5×20
wood screw
s (10) into the corresponding holes on the side bracket (1) and fix them with a Phillips screwdriver.
4
4
1
11
2
2
2
3
13
5
14
4
10
1
2.
1.
3.
4.
DEUTSCH
DEUTSCH
Setzen Sie den Steuerkasten und den Adapter
(9)
in die Mitte des Rahmens
(2)
. Befestigen Sie sie mit Schrauben
(10)
. Setzen Sie die Adapterschnalle
(8)
auf den Adapter und befestigen Sie die ST5 × 20-Holzschrauben an
beiden Seiten der Adapterschnalle. Stecken Sie das Motorkabel der Säule in
die Steuerbox. Stecken Sie das Kabel des Adapters in die Steuerbox.
Stecken Sie das Netzkabel
(15)
in eine 230-V-Steckdose.
6.
8.
Align the holes of the side bracket (1), the frame (2), and the lifting column (4).
Then put the M6×35 machine screw
with round head (11) into the holes,
and tighten the screws with a 4MM hexagon wrench. Repeat on the other side.
Insert the center rail (3) into the frame (2) on both sides, and adjust the appropriate position (note: the word
"MAX" on the center rail can't be completely exposed). Then put the M6 x30 machine screw with round
head (13) into the position as shown in the figure, and tighten with a 4MM hexagon wrench.
If you drop a screw inside the frame end , simply tilt to retrieve.
Align the holes on the foot (5) with the holes on the lifting column (4). Put the
M10×30 countersunk head machine screws (14) into the foot, and tighten the
screws with a 6MM hexagon wrench.
Put the table frame on the desktop and adjust the position of the table frame to the middle of the desktop. Put the ST5×20
wood screw
s (10) into the corresponding holes on the side bracket (1) and fix them with a Phillips screwdriver.
4
4
1
11
2
2
2
3
13
5
14
4
10
1
Putthecontrolboxandadapter(9)intothemiddleofthe
frame (2).Fix with tapping screw (10) into the holes on
bothsidesofthecontrolbox.Puttheadapterbuckle(8)
on the adapter, and fix the
ST5×20 wood screw
s
into
the holes on both sides of the adapter buckle. Plug the
motor wire of the column into the control box.Plug the
wireoftheadapterintothecontrolbox.
Double-check that the wood screws are not too long for your desktop
and won’t puncture the surface when screwed all the way in.
We recommend that you pre-drill any holes needed for fasteners
if your desktop is not pre-drilled. Never use countersunk screws.
10
8
9
2
7
Put the handset (6) on the edge of the desktop where you
like. Fix with
S
T
5×16 wood screw
s (12) the handset on
the desktop. Plug the wire of the handset into the control
box.
6
12
Turn the assembled desk right-side up. With at least two people, grab the DESK BASE (not the desktop) and turn the
desk right-side up. Adjust the pre-installed glides on the Feet (part 5) as needed.
Plug the Power Cord (part 15) into a 230V outlet.
5.
Stellen Sie den Schreibtisch mit mindestens zwei Personen auf. Greifen Sie
das Tischgestell (nicht die Tischplatte) und drehen Sie den Schreibtisch um.
Passen Sie die vorinstallierten Gleiter an den Füßen
(5)
nach Bedarf an.
7.
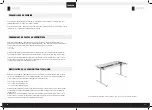
Stellen Sie sicher, dass
- keine Hindernisse das Herauf- und Herunterfahren des Tisches behindern,
- die Schreibtischplatte keine Wände berührt,
- alle Kabel die erforderliche Länge für jede gewünschte Schreibtischhöhe aufweisen.
WICHTIG: führen Sie vor Gebrauch des Tisches unbedingt einen Reset aus.
RESET-VERFAHREN: Halten Sie die DOWN-Taste am Mobilteil
(6)
gedrückt, bis der Schreibtisch die niedrigste Höhe
erreicht hat. Lassen Sie die DOWN-Taste los. Halten Sie die DOWN-Taste erneut gedrückt, bis auf der LED-Anzeige „RST“
angezeigt wird, oder etwa 10 Sekunden bei Modellen ohne LED-Mobilteil. Lassen Sie die DOWN-Taste los. Halten Sie die
DOWN-Taste erneut gedrückt, bis sich der Schreibtisch etwas weiter absenkt, leicht ansteigt und anhält. Lassen Sie die
DOWN-Taste los. Ihr Schreibtisch ist jetzt einsatzbereit.
Die Tischbasis kann durch Drücken und Halten der UP- oder DOWN-Taste eingestellt werden, bis die gewünschte
Höhe erreicht ist.
BENUTZUNG
!


