13
© 2017, JUN-AIR
We reserve the right to make any alterations which may be due to any technical improvements
Printed in the USA
87R-4P Compressor System User Guide
6190900 (Rev B)
Pressure-Switch Adjustment
WARNING
Exceeding the maximum pressure may result in a reduced
system life. Contact Gast Manufacturing for information
regarding operation at higher pressure.
Equipment Alert: The factory set cut-in and cut-out
pressures are approximately 6 bar (87 psi) and
8 bar (116 psi), respectively.
Equipment Alert: The system should operate
at 50% duty cycle or less.
1. Turn the system off and disconnect it from electrical
power.
2. Remove the handle bolts (4) and loosen the cover
screws (4) to tip the cover forward.
3. Remove the screw retaining the pressure-switch cover
and remove the cover.
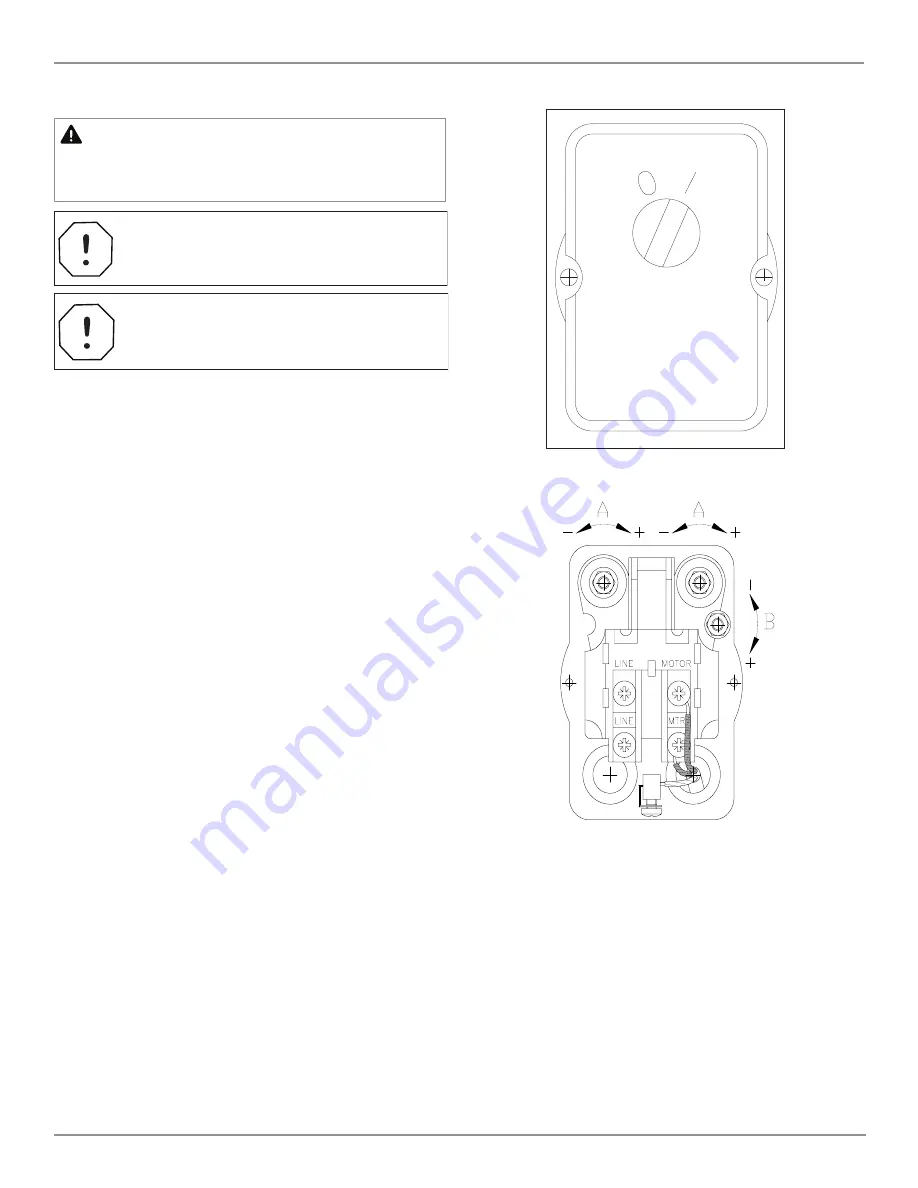
4. To increase the cut-in pressure, use a 7 mm wrench or
socket to turn each of the two nuts on the large springs
(A) clockwise; both springs should be adjusted equally.
Each half-turn raises the cut-out pressure approxi-
mately 0.25 bar (3.5 psi). The cut-in pressure can be
reduced by turning the springs in the opposite direc-
tion.
5. Set the cut-out pressure by adjusting the pressure dif-
ferential (the difference between the cut-in and cut-out
pressures). To increase the pressure differential turn
the nut on the small spring (B) clockwise. Decrease the
pressure differential by turning the nut counter-clock-
wise. Ensure that the cut-out pressure does not exceed
the maximum rated pressure of the system.
6. Replace and secure the pressure-switch cover to pro-
tect against electric shock.
7. Reconnect the system power and charge the tank and
verify that the compressor switches off at the desired
cut-out pressure. Should the pressure reach 9.3 bar
(135 psi) ±3%, the safety relief valve will open and purge
the tank.
8. Drain air from the system through the regulator to
verify that the compressor switches on at the desired
cut-in pressure.
9. Disconnect power and repeat steps 3-8, if necessary.
10. Replace the cover and reinstall the handle bolts and
cover screws.
11. Reconnect the system to electrical power.
Pressure Switch ’1’ on or ’O’ off
Adjustment of Pressure Switch Section


