


– 89 –
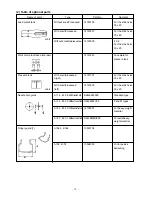
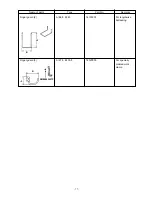
Grease joint
40013451
Juki Grease B
(10g contained)
40013640
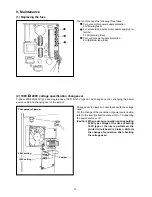
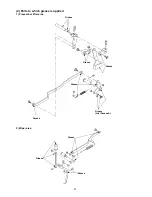
2) Greasing to the oscillator pin area
1. Open the upper cover and take out the grease cover
.
2. Remove the rubber cap
that is located beside the
eccentric cam
. Feed the specified grease (Juki
Grease B
).
1. Lay down the sewing machine body and remove the
grease cover
.
2. Remove the set screw
of the oscillator gear
and screw in the Juki Grease B
into the threaded
hole. This grease tube is attached with an accessory
grease joint
. Then, the grease can be replenished.
(The amount of grease to be replenished is 0.74
grams.)
3. After the grease has been replenished, firmly fasten
the set screw
that has been removed.
(5) Grease-up procedures for the specified position
When sewing operation is repeated for a certain time period, Error Code No. E220 is displayed at the operation
panel when the power supply is turned ON. This error code is used for the indication of the grease replenishing time
for the specified parts. When you see this error code, replenish the grease specified below, without fail. After greas-
ing, call the memory switch No. 245 and set up “0” with the reset key.
Even after the display of Error Code No. E220, this error code can be canceled by pressing the reset key and the
machine can be used continuously. Since then, however, this Error Code No. E220 is displayed each time the power
supply is turned on.
When the sewing machine is used further for the specified time period after the display of Error Code No. E220,
Error Code No. E221 is then displayed. In this case, this error code cannot be canceled even though the reset key
is pressed, and the sewing machine cannot work anymore.
Therefore, when this Error Code No. E221 is displayed, replenish the grease, without fail, to the parts specified
below. Start the memory switch and set up the Memory switch No. 245 at “0” with the reset key.
Cautions: 1. If the memory switch No. 245 is not reset at “0” after the replenishment of grease, Error No.
E220 or No. E221 will be displayed again.
2. For the replenishment of grease to the parts specified below, use the attached Juki Grease B
(Part No. 40013640). If any grease other than the specified item is replenished, this can be
a cause of destruction of parts.
1) Greasing to the eccentric cam area
Содержание LK-1900A
Страница 20: ... 16 10 Hook adjustment Standard Adjustment 0mm 0mm 7 5mm 0 05 0 1mm For DPX5 For DPX17 ...
Страница 87: ... 83 Grease Grease 3 Thread tension area 4 Thread trimmer area Grease Juki Grease A Grease Grease Juki Grease A ...
Страница 88: ... 84 Grease Grease Grease Templex N2 Grease Templex N2 Grease Grease Grease Grease Grease 5 Feed area ...
Страница 90: ... 86 Grease Grease Grease Grease Grease 8 Needle thread clamp mechanism area ...
Страница 91: ... 87 Grease Grease A Grease Grease Grease Grease 9 LK 1901A relations ...
Страница 92: ... 88 10 LK 1903A relations Grease Grease ...
Страница 114: ... 111 12 Circuit diagrams 1 Block diagram A ...
Страница 115: ... 112 2 Power supply circuit diagram A ...
Страница 116: ... 113 3 Power supply circuit diagram B ...
Страница 117: ... 114 4 Power supply circuit diagram C ...
Страница 118: ... 115 5 Servo motor circuit diagram ...
Страница 119: ... 116 6 Sensor pedal VR circuit diagram ...
Страница 120: ... 117 7 MAIN PANEL board circuit diagram ...
Страница 121: ... 118 8 Motor solenoid circuit diagram Thread trimmer Lifting the work clamp foot motor ...