background image

29

Straight Stitch / Point droit
Pespunte Recto / Rechte steek

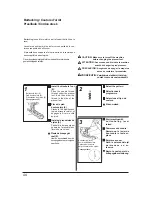
The straight stitch is the basic stitch.
Le point droit est le point de base.
El pespunte recto es el tipo de puntada más básica.
De rechte steek is de basissteek.

Begin sewing.

Commencez à coudre.

Empiece a coser.

Select a stitch pattern.

Sélectionnez le

programme.

Seleccione el tipo de

puntada.

Make sure that the

presser foot is correct.

Vérifiez d’utiliser le bon

pied presseur.

Asegúrese de que el

prensatelas sea el

correcto.

Left needle
position

Aiguille à
gauche

Posición
izquierda de
la aguja

Center needle
position

Aiguille au
centre

Posición cen
tral de la
aguja

1

4

2

Standard presser foot (A)
Pied standard (A)
Prensatelas estándar (A)

CAUTION: Turn off the machine before changing

the presser foot.

ATTENTION:

PRECAUCIÓN: Apague la máquina antes de

cambiar el prensatelas.

Eteignez la machine avant changer
le pied presseur.

Set the fabric and lower

the presser foot.

Place the fabric under the
presser foot so the needle
will enter the sewing start
point of the fabric. Pull both
the needle and bobbin
threads to the rear of the
machine and lower the
presser foot.

3

Placez le tissu et abaissez le pied.

Mettez le tissu ou le pied afin que l’aiguille pénètre au point
de départ voulu.Tirez les deux fils vers l’arrière et abaissez
le pied presseur.

Coloque el tejido y baje el prensatelas.

Coloque el tejido bajo el prensatelas de forma que la aguja
empiece a coser allí donde desee. Tire de los hilos de la
canilla y de la aguja hacia atrás de la máquina y baje el
prensatelas.

VOORZICHTIG: 

Verwijder de stekker uit het stop-


contact voor u de voet verwisselt.

Standaard naaivoet (A)

Kies de juiste voet

Linker 
naald-
positie

Centrale 
naaldpositie

Kies een steek

Plaats de stof en doe de naaivoet omlaag.


  Plaats de stof zo onder de voet dat de naald bij uw beginpunt 


  is. Doe de boven en onderdraad naar achteren en doe dan de 


naaivoet 

omlaag.

Begin te naaien.

00

01

Содержание HZL-E80

Страница 1: ...COMPUTER SEWING MACHINE MACHINEACOUDRE ELECTRONIQUE MAQUINADE COSERELECTRONICA COMPUTER NAAIMACHINE INSTRUCTION MANUAL MANUEL D INSTRUCTIONS MANUAL DE INSTRUCCIONES GEBRUIKSAANWIJZING HZL E80 ...

Страница 2: ......
Страница 3: ...oose cloth 5 Keep fingers away from all moving parts Special care is required around the sewing machine needle 6 Always use the proper needle plate The wrong plate can cause the needle to break 7 Do not use bent needles 8 Do not pull or push fabric while stitching It may deflect the needle causing it to break 9 Switch the sewing machine off O when making any adjustments in the needle area such as ...

Страница 4: ...rhéostat et éviter la poussière et les chutes de tissus aux alentours des sources d aération de la machine 5 Eloigner vos doigts des pièces mobiles de la machine Faites particulièrement aux mouvements de l aiguille 6 Toujours utiliser la plaque aiguille appropriée Un plaque non appropriée peut faire casser l aiguille 7 Ne pas utiliser d aiguilles courbes 8 Ne pas tirer ou pousser le tissu lorsque ...

Страница 5: ...abiertas y limpias de suciedad y de residuos También mantenga en óptimas condiciones el pedal 5 No acerque nunca los dedos a las partes móviles sobretodo a la aguja de la máquina cuando esté enchufada 6 Use siempre el placa agujas original un placa agujas no adecuado puede romper la aguja 7 No use agujas torcidas 8 Cuando esté cosiendo no tire de la ropa ni la empuje sino la aguja acabará rompiénd...

Страница 6: ...ald verbuigen en breken 9 Schakel de machine uit O als u aanpassingen uitvoert in de buurt van de naald zoals naald verwisselen of draad inrijgen van de naald of bij het verwisselen van de naaivoet en dergelijke 10 Haal de stekker van het apparaat altijd uit het stopcontact bij het openen van de machine bij het smeren of andere onderhoudswerkzaamheden beschreven in deze gebruiksaanwijzing 11 Stop ...

Страница 7: ... 66 Specification table 66 CONTENTS TABLE DES MATIERES Notes de securite importantes 2 Principaux éléments 7 8 Accessoires 9 Fonctions principales 10 14 Embobinage 15 17 Placer la canette dans le boîtier Enfilage 18 20 Enfileur automatique de láiguille Remonter le fil de canette Changement de pied presseur 21 Mise en place de l aiguille 22 Types de pieds et spplications 23 Réglage de la tension de...

Страница 8: ...racolillo Prensatelas para alimentar el tejido de forma uniforme Pata deslizante Cambiar la bombilla 64 Mantenimiento limpieza 65 Lista de problemas y soluciones 68 Tabla de características 68 ÍNDICE INHOUD Belangrijke veiligheidsinstructies 4 Voornaamste delen 7 8 Accessoires 9 Voornaamste functies 10 14 Opspoelen 15 17 Plaats de spoel Inrijgen van de machine 18 20 De automatische naaldinrijger O...

Страница 9: ...uridad 14 Panel de selección de puntadas 15 Volante 16 Interruptor de encendido Luz 17 Enchufe para el cable 18 Enchufe para el pedal 19 Asa 20 Palanca del prensatelas 12 Palanca de los dientes de arrastre 13 Bouton de point d arrêt auto 14 Panneau de sélection du point 15 Volant manuel 16 Interrupteur de courant 17 Prise du cordon d alimentation 18 Prise du rhéostat 19 Poignée 20 Levier du pied p...

Страница 10: ... d entraînement 7 Plaque aiguille 8 Boîtier à canette 9 Montage du pied 10 Aiguille 11 Pied presseur 12 Bouton d ouverture du capot 13 Capot de la canette 14 Canette 1 Thread Cutter 2 Needle threader 3 Buttonholing lever 4 Presser foot release lever 5 Presser foot shank 6 Feed dog 7 Needle plate 8 Bobbin case 9 Needle clamp 10 Needle 11 Presser foot 12 Hook cover release button 13 Hook cover 14 Bo...

Страница 11: ...Prensatelas standard A Buttonhole foot E Pied boutonnière E Prensatelas de ojales E You can keep instruction manual at hard case Vous pouvez ranger votre manuel d instructions dans le capot rigide Le sugerimos guardar el manual de instrucciones en la maleta rígida Spool pin Broche porte bobine Eje de carrete Quilt guide Guide ouateur Guía de colcha Quilting attachment Ensemble pour quilting Mecani...

Страница 12: ...patterns 30 to 99 in to memory Letters and patterns can be stored in to memory up to 40 Touche de mémorisation Appuyer sur cette touche pour mémoriser les lettres ou configurations sélectionnées 30 à 99 Jusqu à 40 lettres et configurations peuvent être mémorisées Tecla de memoria Pulse esta tecla cuando almacene en la memoria las letras o patrones 30 a 99 seleccionados Las letras y patrones se pue...

Страница 13: ... Bijvoorbeeld Wanneer u wilt kiezen No 23 1 Druk twee keer de linkerknop per 10 2 Druk 3 keer de rechterknop per 1 This sewing machine has stitch patterns for stretchy fabric such as knitted fabric jersey and so on Cette machine possède des programmes spéciaux pour les matières extensibles comme les mailles tricots jerseys etc La máquina tiene tipos de puntada para diferentes tejidos como el punto...

Страница 14: ...c la position du curseur de vitesse On arrête la machine en retirant le pied Pise el pedal para que la máquina empiece a funcionar Cuanto más fuerte sea la presión que ejerce con el pie más rápida irá la máquina Para parar simplemente deberá de dejar de pisar el pedal 1 2 Major functions Fonctions principales Funciones principales De voornaamste functies Light Power switch Interrupteur de courant ...

Страница 15: ...position basse Cette touche n est active que le rhéostat débranché Botón de marcha paro Apriete dicho botón para empezar a coser Apriételo una segunda vez para parar la máquina La aguja parará en su posición más baja Botón de puntada inversa Apriétela manualmente para atacar en el inicio y final de costura Si aprieta dicho botón al final de la costura la aguja parará en su posición más alta 13 Pre...

Страница 16: ...n 1 or the left up 2 To bring up the feed dog turn the handwheel after sliding lever to the left 1 2 Griffe d entraînement par griffe La griffe d entraînement doit être placée en position basse pour certaines techniques de couture spéciales telles que la broderie libre La griffe d entraînement doit toujours être en position haute pour la couture normale Localiser le levier de griffe d entraînement...

Страница 17: ...in winding regulator Arrêt de canette Regulador del bobinador Spoelwinderdraadgeleider Spoelwinder Spoelwinder schakelaar Take out the bobbin Retirez la canette vide Saque la canilla Open the hook cover Caution Turn off the machine before opening the hook cover Ouvrez le capot Attention Débranchez la machine auparavant Abra la tapa del garfio Precaución Antes de abrir la tapa del garfio apague la ...

Страница 18: ...hilo y saque la canilla Start winding the bobbin Upon completion of winding the bobbin press the start stop button again Embobinez la canette Une fois la canette remplie arrêtez la machine Empiece a hacer canilla Tras haber completado la canilla apriete otra vez el botón de marcha paro Bobbin winding regulator Arrêt de canette Regulador del bobinador Bobbin winder Dévidoir Bobinador 5 6 7 Place th...

Страница 19: ...venly wound with thread according to the type of thread the bobbin thread guide has to be ad justed Dans le cas où la canette serait mal remplie selon le type de fil il convient de régler le guide En el caso de que la canilla esté mal bobinada se deberá ajustar el guía hilo de la canilla Move the bobbin thread guide up or down to adjust so that the bobbin is evenly wound with thread Déplacez le gu...

Страница 20: ...to 3 y tire de él hacia arriba 3 2 1 Be sure to raise the presser foot before threading the machine head Le pied presseur doit toujours être relevé pour enfiler la machine Asegúrese de subir el prensatelas antes de enhebrar la máquina 1 2 2 3 4 Be sure to turn off the machine before threading CAUTION ATTENTION PRECAUCIÓN Apague la máquina antes de enhebrar la máquina Assurez vous d avoir éteint la...

Страница 21: ...eje que sobresalga un cabo de hilo de unos 10 cm por detrás de la aguja Check to be sure that the needle is in its highest position Contrôlez que l aiguille est bien en position la plus haute Asegúrese de que la aguja esté en su punto más alto Automatic Needle Threader Enfilage automatique de l aiguille Enhebrado automático del aguja A 1 4 3 2 Hook Crochet garfio Thread the thread to take up 4 the...

Страница 22: ...s doigts Sostenga ligeramente el hilo con los dedos Pull both the needle and bobbin threads out by 10 cm Passthemunderpresserfoot toward back of machine Tirez les deux fils sur 10 cm Passez les sous le pied et vers l arrière de la machine Deje que el hilo de aguja y el de la canilla sobresalgan 10 cm Páselos por debajo del prensatelas y llévelos hacia la parte posterior de la máquina 1 2 3 Ophalen...

Страница 23: ... y éste se encajará en su sitio Make sure to disconnect the plug from the wall outlet before changing the presser foot CAUTION ATTENTION Antes de cambiar el prensatelas asegúrese de desconectar la máquina de la red eléctrica PRECAUCIÓN Assurez vous d avoir débranché la machine avant de changer le pied Align the presser foot pin with the marker line on the throat plate Alignez l attache du pied ave...

Страница 24: ... needle would cause stitch skipping thread breakage or damage to materials Vérifiez la bonne qualité de l aiguille régulièrement Toute aiguille épointée ou tordue peut endommager votre tissu et causer des défauts de couture importants Compruebe que la aguja no esté torcida ya que las agujas dobladas puede ocasionar saltos de puntada rotura de hilo o daño a los tejidos When purchasing spare needles...

Страница 25: ...verlocking Surfilage overlock Sobrehilado overlock Overlocken Blinde steek Blindstitch Point invisible Puntada invisible Blindstitch for elastic fabric Point invisible pour tissu stretch Puntada invisible para tejido tipo punto Blinde steek voor elastische stoffen Buttonholing Boutonnière Ojales Knoopsgaten Overcasting foot C Pied surfilage C Prensatelas de sobrehilar C Overlock voet C Blindstitch...

Страница 26: ...upérieure Para disminuir la tensión del hilo superior To increase upper thread tension Pour augmenter la tension supérieure Para aumentar la tensión del hilo superior Bobbin thread Fil de canette Hilo de la canilla Upper thread Needle thread Fil supérieur fil d aiguille Hilo superior hilo de la aguja Fabric right side Tissu dessus Derecho del tejido Fabric wrong side Tissu dessous Revés del tejido...

Страница 27: ...tting needle No 11 No 11 14 No 11 14 Knitting needle No 11 No 14 16 Denim Jersey Coating Cotton Synthetic Silk Synthetic Silk 30 50 30 50 50 50 60 50 Les aiguilles jersey HAx1sp évitent de sauter le point et sont idéales pour les tissus stretch Tissu Tissu fin 9 o N 0 0 1 0 8 n i I s e l l i u g i A l i F HA x 1 130 705H Tricot Crépe Laine et vêtements en fibre synthétique Soie Synthétique Synthét...

Страница 28: ...os Hilo y Agujas Las agujas para punto HAx1sp evitan los saltos de puntada y son ideales para coser tejidos como el punto Tejido Fino Lino 80 100 No 9 Hilo Agujas HA x 1 130 705H Malla tricot Crespón Lana y fibra sintética Seda Sintético Sintético Hilo sintético Hilo fino No 11 Medio Grueso 90 100 Hilo de algodón Agujas para punto No 11 60 100 80 60 100 No 11 No 11 14 Algodón y fibra sintética Pun...

Страница 29: ...de la longitud de puntada manual When machine is turned on again or a pattern is re selected the stitch length will be automatically set to a preset one To adjust the stitch length to a desired one press the manual button the lamp will light up To cancel the manual adjustment mode select a pattern or press the manual button again Lorsque la machine est rallumée ou qu un autre point a été sélection...

Страница 30: ... semuevelapalancadeajustehacia la izquierda más allá del punto en el cual el botón manual destella intermitentemente The machine will peep when the adjusting lever is moved Set the adjusting lever at a desired position Even in the case where the stitch length is manually adjusted the manual button will flash on and off when the automatically determined stitch length position is reached La machine ...

Страница 31: ...avant changer le pied presseur Set the fabric and lower the presser foot Place the fabric under the presser foot so the needle will enter the sewing start point of the fabric Pull both the needle and bobbin threads to the rear of the machine and lower the presser foot 3 Placez le tissu et abaissez le pied Mettez le tissu ou le pied afin que l aiguille pénètre au point de départ voulu Tirez les deu...

Страница 32: ...botón de puntada inversa para subir la aguja y a continuación suba la palanca del prensatelas Trim the threads Pull out the needle and bob bin threads by approximately 10 cm and cut them with the thread cutter mounted on the face plate cover A Thread cutter Coupez les fils Tirez les deux fils sur env 10cm et coupez les avec coupe fils situé sur l avant du capot frontal A coupe fils A 9 Corte de lo...

Страница 33: ...costura To cancel the automatic back tacking follow one of the three different procedures described below Pour annuler cette fonction suivez une des trois procédures proposées ci dessous Para anular el atacado final automático siga cualquiera de los tres procedimientos que se describen a continuación 1 Press button again 2 Select another pattern 3 Turn on the power to the machine once again 1 Pres...

Страница 34: ...cute alors des points noués et s arrête sur la position prédéterminée La machine s arrête avec l aiguille en position haute La machine exécute des points noués lorsqu on appuie sur le bouton d exécution de points arrière après avoir appuyé sur le bouton d arrêt Apriete el botón de costura inversa Apriete el botón de costura inversa Apriete el botón de costura inversa en la posición preestablecida ...

Страница 35: ...rm reverse stitching as long as the reverse stitch button is held pressed The machine performs reverse stitching at low speed La machine coud en arrière tant que la touche est pressée La machine ne coud en arrière qu à vitesse électroniquement réduite La máquina coserá puntadas inversas mientras se tenga apretado el botón de puntada inversa La máquina coserá puntadas inversas a baja velocidad Pres...

Страница 36: ...ght fabric Démarrer la couture sur des matières épaisses Inicio de costura en tejidos gruesos Naaien met dikke stoffen Het begin Pressing the button spring that is mounted on the presser foot into the groove in the presser foot holder lower the presser foot Appuyez sur le bouton ressort qui est monté sur le pied dans la fente du support de pied abaissez le pied presseur Apriete el botón muelle que...

Страница 37: ...ado y apriete el botón Coloque el tejido en el lugar donde desea empezar a coser y cosa Select the zigzag stitch pattern Automatic Zigzag width 7 0 mm Stitch length 2 0 mm Sélectionnez le point zig zag Automatique Largeur du point 7 0 mm Réglagedelongueur 2 0mm Seleccione el tipo de costura zig zag Automática Anchura punto 7 0 mm Longitud punto 2 0 mm Make sure that the presser foot is correct Vér...

Страница 38: ...rilla de ajuste hacia la izquierda o hacia la derecha Para cancelar l modalidad de ajuste manual seleccione un patrón o pulse otra ve el botón manual Stitch width manual override indicator lamp Témoin de correction manuelle de largeur des points Lámpara indicadora de solapamiento manual de anchura de puntada Manual button Touche manuelle Botón manual Adjusting lever Curseur de réglage Palanca de a...

Страница 39: ...da 7 0 2 5 7 0 Stitch pattern Programme Tipo de puntada Steek Steek Automatic mm Automatique mm Automático mm Automatisch mm Automatisch mm Manual mm Manuel mm Manual mm Handmatig mm Handmatig mm 6 3 3 3 6 3 2 0 4 5 2 5 7 0 3 3 6 3 3 0 5 5 5 0 7 0 3 0 5 0 7 0 7 0 3 0 6 3 4 0 3 0 7 0 5 0 7 0 5 0 7 0 3 0 5 0 5 0 3 5 Stitch pattern Programme Tipo de puntada Automatic mm Automatique mm Automático mm M...

Страница 40: ... that matches the pattern to be sewn For or patterns be sure to use the standard presser foot A Vérifiez que le pied soit adapté à ce programme Pour les programmes ou vérifiez d utiliser le pied standard A Cambie el prensatelas por aquel adecuado al tipo de costura que se vaya a hacer Para los tipos de costura ó se utilizará el prensatelas estándar A Standard presser foot A Pied standard A Prensat...

Страница 41: ...wing is frequently sewn with reinforcing stretch stitches Couture de poche renforcée avec ces points Cosido de bolsillos Attaching handles to bags Montage des poignées de sac Cosido de asas a bolsos Reinforcing stitch Points renforcés Puntada de refuerzo Side Côté Lateral Patch pocket Application de la poche Bolsilo CAUTION Make sure to turn off the machine before changing the presser foot ATTENTI...

Страница 42: ... changing the presser foot ATTENTION PRECAUCIÓN Asegúrese de apagar la máquina antes de cambiar el prensatelas Assurez vous d éteindre la machine avant de changer le pied presseur Kies een knoopsgat dat bij de grootte van uw knoop en uw stof hoort VOORZICHTIG Verwijder de stekker uit het stop contact voor u de voet verwisselt Knoopsgatvoet E Plaats de knoopsgatvoet E Haal de bovendraad door de kno...

Страница 43: ...ntro del prensatelas de ojales Si hay algún botón que no quepa en el prensatelas de ojales la longitud del ojal será el diámetro del ojal el grosor del botón Pattern Programme Tipo Typical application Application type Aplicación For sewing large buttonholes in thick or heavy weight fabrics Pour la couture de grandes boutonnières dans du tissu épais ou lourd Para coser botones qrandes en tejidos qr...

Страница 44: ...on Lower the buttonhole foot so that the marked position is at the center of needle en try hole in the foot Abaissez le pied boutonnière à la position marquée Abaissez le pied boutonnière afin que la position marquée soit un centre du point de pénétration de l aiguille dans le pied boutonnière Baje el prensatelas de ojales a la posición marcada Baje el prensatelas de ojales de forma que la posició...

Страница 45: ...ing trim the threads From the second buttonhole and beyond lower the buttonhole foot at the next marker line on the fabric for sewing buttonholes Après avoir fini le cycle coupez les fils Depuis la seconde boutonnière et plus abaissez le pied sur la marque suivante sur le tissu Tras completar toda la costura corte los hilos Desde el segundo ojal en adelante para coser los ojales baje el prensatela...

Страница 46: ...y llévelo hacia un lado Buttonhole foot E Pied boutonnière E Prensatelas de ojales E 3 Start machine with buttonholing lever raised Commencez à coudre Remarque le levier de boutonnière resta en place Empiece a coser Nota la palanca del ojal p e r m a n e c e e n s u reserva Buttonholing lever Levier de boutonnière Palanca del soporte del prensatelas de ojales CAUTION Make sure to turn off the mach...

Страница 47: ...predetermined position A Once the needle returns to the start position the ma chine automatically starts zigzag stitching Appuyez sur le bouton de marche arrières à la position déterminée à l avance Une fois que l aiguille revient en position de départ la m a c h i n e c o m m e n c s automatiquement la couture en points zigzag Presione el boton de punto reversible en la posiciónpredeterminada A U...

Страница 48: ...cambiar el prensatelas Assurez vous d éteindre la machine avant de changer le pied presseur 1 Buttonhole foot E Pied boutonnière E Prensatelas de ojales E Install buttonhole foot E Pass the needle thread through under the presser foot and then draw the thread to the side of the presser foot Placez le pied boutonnière E Placez le fil d aiguille sous le pied à travers celui ci et dégagez le fil vers...

Страница 49: ...oint de courtepointe Puntada acolchada Quiltsteek Lower the presser foot lifting lever and start sewing Abaisser le levier relève presseur et commencer la couture Baje la palanca elevadora del prensatela y comience el cosido CAUTION Make sure to turn off the machine before changing the presser foot ATTENTION PRECAUCIÓN Asegúrese de apagar la máquina antes de cambiar el prensatelas Assurez vous d é...

Страница 50: ...ric Cousez les points afin qu ils s étendent au delà des deux morceaux de tissu Cosa de forma que las puntadas caigan en las dos piezas de ropa Overlapping patch Patch recouvert Unión sobrepuesta Open patch Patch ouvert Unión abierta Fabric right side Tissu dessus Tejido del derecho Fabric right side Tissu dessus Tejido del derecho Fabric wrong side Tissu dessous Tejido del revés Standard presser ...

Страница 51: ... cache ne laissant apparaitre que le point droit Bàti à la machine Longueur de la fermeture 1cm Colocación de cremalleras usando el prensatelas estándar A Coloque el tejido encarado Compruebe la longitud de puntada y la longitud de la cremallera que se debe coser Hilvane la cremallera al tejido Hilván Longitud de la apertura de la cremallera 1 cm Machine baste Stitch length 4 Bâti Longueur de poin...

Страница 52: ...ith an iron to make a crease Fit the crease at the edge of teeth Recouvertes Les fermetures sont insérées dans la couture du vètement Le bord des dents suit la couture Coudre la fermeture du bas vers le haut au bord de la partie à rabattre Margen de apertura de la costura Debe existir un margen limpio Establezca el margen de la costura trasera de forma que quede a 3 mm de la costura Aplique una pl...

Страница 53: ...ipper tape on the seam allowance At the slider part of the zipper stop the machine at a position about 5 cm before the slider move the slide to the far side of the presser foot then sew the zipper until its top end is reached Plaquer le tissu à rabattre au bout de la fermeture Coudre la fermeture du bas vers le hant comme indiqué en suivant le bord Cosa la cremallera en el margen de la costura de ...

Страница 54: ...es coutures de bâti Cosa la parte derecha de la cremallera Tras haber acabado de coser quite el hilván Teeth Dents Dientes Slider Glisseur Carro Baste Bâti Hilván Fabric wrong side Tissu dessous Tejido del revés Fabric wrong side Tissu dessous Tejido del revés Zipper wrong side Fermeture dessous Cremallera del revés Attach the right side Attachez le côté gauche Coloque la parte derecha Opening end...

Страница 55: ... procure une finition durable pour les ourlets et est facilité par son programme instantanément sélectionné Il nécessite un peu de pratique aussi faîtes quelques essais auparavant Con la puntada invisible se puede obtener un acabado duradero de los dobladillos Es un tipo de costura que se puede seleccionar Para obtener unos resultados óptimos se necesita práctica es por ello que se recomienda hace...

Страница 56: ...d edge Si les points n atteignent pas lebord du pli Si las puntadas no se dan en el extremo del dobladillo Als de blindzoomsteek de gevouwen rand niet overlapt How to adjust the guide of the blindstitch presser foot Comment régler le guide du pied ourlet invisible Ajuste de la guía del prensatelas de puntada invisible De geleiderstand van de blindzoomvoet aanpassen Guide Guide Guía Geleider Turn t...

Страница 57: ... tornillo y saque el soporte Set the drop feed knob to NOT FEED Placer le bouton d entraînement par griffe sur NOT FEED Fije la perilla de bajada de transporte a NOT FEED 3 Install the quilting foot Installez le pied quilting Instale el prensatelas para acolchar Pattern to be used Programme Tipo de costura a utilizar CAUTION Make sure to turn off the machine before changing the presser foot ATTENT...

Страница 58: ...al En dicha apertura cambie la longitud de puntada a 2 0 y cosa con puntadas inversas durante 1 cm A continuación siga cosiendo hasta que alcance la posición que desea Respete el margen de apertura de la costura Fabric wrong side Tissu envers Tejido del revés Basting Bâti Hilvanar Runstitch Surpiqûre Pespunte Reverse stitch 1 cm Couture arrière 1cm Puntada inversa 1 cm 1 2 5 cm a Apertura final b ...

Страница 59: ...fin que son centre rencontre la ligne de couture Placez du carton de renfort entre la bande de tolérance et le dessus du tissu Bâtissez manuellement chacun des côtés de la bande de tolérance et celle du zip Une fois terminé retirez le renfort Coloque la cremallera invisible en el tejido de forma que el centro coincida con la línea de costura Coloque un cartón entre el margen de la costura y el del...

Страница 60: ...ance de cou ture Cosa el otro lado de la cremallera en el otro margen de la costura siguiendo el mismo procedimiento La parte inferior de la cremallera que queda por debajo de la apertura inferior quedará suelta sin coserse a la costura Teeth Dents Dientes Seam Couture Costura Fabric Tissu Tejido Invisible zipper foot Pied fermeture invisible Prensatelas de cremallera invisible Tape Bande Cinta de...

Страница 61: ...e de fin Final de la marca When needle reaches end of marker line slightly press buttonholing lever towards rear of machine Quand l aiguille arrive à la fin de la marque appuyez franchement sur le levier boutonnière en direction de l arrière de la machine Cuando la aguja alcance el final de la línea marcada empuje suavemente hacia atrás la palanca del soporte del prensatelas CAUTION Make sure to t...

Страница 62: ...achine Paro de la máquina Caution 1 Take care not to allow fabric to come in contact with buttonholing lever If buttonholing lever is pressed by mistake operation mode will be changed to bartacking 2 If sewing machine does not operate as described above stop machine and re press stitch selection button It will start buttonholing from the beginning ATTENTION 1 Faîtes attention que le tissu ne gêne ...

Страница 63: ...d while rolling it under Used for finishing bottom of shirts and blouses and edges of frills and handkerchiefs Le bord du tissu est ainsi roulé en dessous Permet de finir les bas de robes chemisiers et les bord des mouchoirs légers Se hace el dobladillo mientras se va enrollando Este tipo de dobladillo se utiliza a menudo en camisas y blusas CAUTION Make sure to turn off the machine before changin...

Страница 64: ...aque el soporte Attach even feed foot to machine Put forked section of actuating lever around needle clamp attach to presser bar and securely tighten presser foot clamp screw Mettez le pied double entraînement sur la machine Mettez la partie fourchue du levier en mouvement du pied sur la vis du serre aiguille mettez le pied en place et vissez fortement la vis du support Coloque el prensatelas para...

Страница 65: ...nte Se aconseja su uso en tejidos dificiles de alimentar jerseys vinilo ropa o piel CAUTION Make sure to turn off the machine before changing the presser foot ATTENTION PRECAUCIÓN Asegúrese de apagar la máquina antes de cambiar el prensatelas Assurez vous d éteindre la machine avant de changer le pied presseur Teflonvoet VOORZICHTIG Verwijder de stekker uit het stop contact voor u de voet verwisse...

Страница 66: ...la CAUTION Be sure to disconnect the plug from the wall outlet before replacing light bulb Contact the dealer in your area for the correct light bulb replacement Light bulb is hot after usage of the machine ATTENTION 1 2 Rear of sewing machine Dos de la machine à coudre Parte trasera de la máquina PRECAUCIÓN Antes de cambiar la bombilla asegúrese de desconectar la máquina de la red eléctrica Conta...

Страница 67: ...rte en su sitio 1 3 CAUTION Be sure to disconnect the plug from wall outlet before cleaning and lubricating machine ATTENTION Clean to remove lint and dust Clean the area between feed dog teeth and slots in needle plate using brush or the like Nettoyez la partie entre les griffes et le crochet Limpie de polvo y de restos de suciedad Utilizando un cepillo limpie el área que hay entre los dientes y ...

Страница 68: ...ng occurs Thread tangles on wrong side of fabric Loud noise heavy to turn the handwheel Sewing machine will not sew when start button is pressed Needle cannot be threaded Thread tension is too high Needle and thread do not match fabric Adjust thread tension adequately Use needle and thread that correctly match fabric Machine head is not correctly threaded Re thread machine head correctly Lint or d...

Страница 69: ...ne correctement Vérifier depuis le porte bobine et les guide fils Régler correctement la tension Remplacer l aiguille L aiguille est mal mise L aiguille est épointée La machine est mal enfilée Remettre correctement l aiguille Remplacer l aiguille Refaire l enfilage 22 23 25 Fronçes Boucles au dessous du tissu Machine dure et bruyante La machine ne coud pas quand on actionne la touche Start L aigui...

Страница 70: ...ebrada Instale bien la aguja Cambie la aguja Vuelva a enhebrar la máquina 22 23 26 El tejido se ondula El hilo se enreda en el revés del tejido La máquina hace un ruido raro y cuesta girar el volante Al apretar el botón de inicio la máquina no cose La aguja no se puede enhebrar La tensión del hilo es muy alta El hilo y la aguja no son los adecuados para el tejido Ajuste la tensión del hilo Utilice...

Страница 71: ...geplaatst De naald is krom De machine is niet goed ingeregen Plaats de naald op de juiste wijze Plaats een nieuwe naald Rijg de machine opnieuw in 22 22 18 20 De stof rimpelt De spanning is te hoog Naald en draad zij niet afgestemd op de stof Corrigeer de spanning Gebruik naald en garen dat bij de stof hoort 24 26 De onderdraad verwart aan de onderkant van de stof De machine is niet goed ingeregen...

Страница 72: ...JUKI CORPORATION All rights reserved throughout the world 000105 T A9250E71Z00 8 2 1 KOKURYO CHO CHOFU SHI TOKYO 182 8655 JAPAN PHONE 03 3480 5034 FAX 03 3480 5037 http www juki co jp E mail hsm juki co jp AJE800S0B0A ...

Отзывы: