


6 Operation Settings
6-4
6
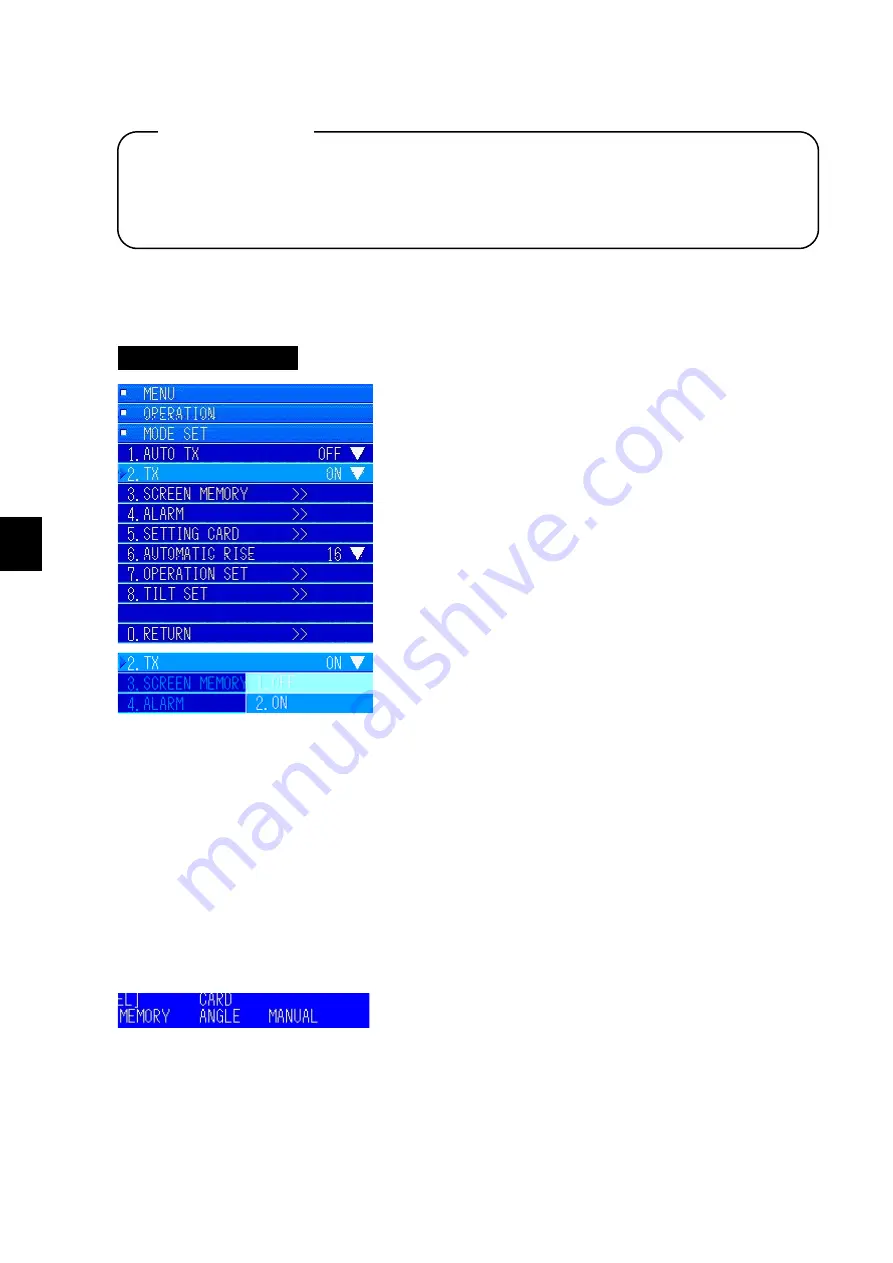
6.1.2 TX
If the "AUTO TX" menu is "On", the menu is masked (cannot be set).
You can set this to "On" or "Off" while "AUTO TX" is set to "Off".
If "AUTO TX" is set to "On", transmission is automatic, regardless of this setting.
Operating Procedure
Press the keys "8
→
1
→
2" to go to TX settings
Press the [MENU] key to open the menu.
Turn the [MULTI] knob to move to "OPERATION".
Press the [MULTI] knob to open the submenu.
Turn the [MULTI] knob to move to "MODE SET".
Press the [MULTI] knob to open the submenu.
Turn the [MULTI] knob to move to the "2. TX" menu.
Press the [MULTI] knob to display the pulldown menu.
Turn the [MULTI] knob and select "On" or "Off".
6.1.3 Screen Memory Card
You can save or read the entire screen to and from the memory card. You need a
compact
flash card
to save data. (Precaution: Check with your retailer or service representative before
purchase.)
6.1.3.1 Saving Screen Images
First, for the screen you want to save, press the [MEMORY/4] key on the controls.
[MEMORY] appears in the lower left part of the screen.
Always confirm that the hoisting device is extended before turning this setting "On". Do not
turn it "On" if the hoisting device is stored. Doing so could damage both the transmitter and the
transducer.
Precautions
Содержание JFS-280
Страница 2: ......
Страница 3: ...A General Information Before you begin 7ZPNA2401...
Страница 4: ......
Страница 34: ......
Страница 36: ......
Страница 38: ...1 Overview of the equipment 1 2 1...
Страница 43: ...1 7 1 Overview of the equipment 1 Diagram 1 1 Exterior view of the NWZ 207 display unit...
Страница 44: ...1 Overview of the equipment 1 8 1 Diagram 1 2 Exterior view of the NCH 578 keyboard...
Страница 47: ...1 11 1 Overview of the equipment 1 Diagram 1 5 Exterior view of the NKF 2800 hoisting device...
Страница 50: ...2 Names and Functions of Parts 2 2 2...
Страница 55: ...2 7 2 Names and Functions of Parts 2 Names and Functions of the Keyboard 2 2 Diagram 2 Controls...
Страница 64: ...3 Operating procedures 3 2 3 TRACK LINE 3 26 3 3 8 Sonar range setting 3 26 3 3 9 Stabilize 3 27 3 3 10...
Страница 90: ...3 Operating procedures 3 28 3...
Страница 148: ...5 Adjusting How Images Appear 5 34 5...
Страница 267: ...7 33 7 Other Items 7...
Страница 274: ...7 Other Items 7 40 7 7 6 2 Test Ring Number 7 6 3 Reservation Settings...
Страница 282: ...8 Maintenance and inspections 8 2 8...
Страница 288: ...8 Maintenance and inspections 8 8 8...
Страница 290: ...9 Malfunctions and after sales service 9 2 9...
Страница 294: ...9 Malfunctions and after sales service 9 6 9...
Страница 296: ...10 Disposal 10 2 10...
Страница 298: ...10 Disposal 10 4 10...
Страница 300: ...11 Specifications 11 2 11...
Страница 306: ...11 Specifications 11 8 11...
Страница 308: ...12 Other 12 2 12...
Страница 309: ...12 3 12 Other 12 12 1 List of Menus...
Страница 310: ...12 Other 12 4 12...
Страница 311: ...12 5 12 Other 12...
Страница 312: ...12 Other 12 6 12...
Страница 313: ...12 7 12 Other 12...
Страница 314: ...12 Other 12 8 12...
Страница 315: ...12 9 12 Other 12...
Страница 316: ...12 Other 12 10 12...
Страница 317: ...12 11 12 Other 12...
Страница 318: ...12 Other 12 12 12...
Страница 319: ...12 13 12 Other 12...
Страница 320: ...12 Other 12 14 12 12 2 Setting the Colors of the Sonar Display...
Страница 321: ...12 15 12 Other 12...
Страница 322: ...12 Other 12 16 12 12 3 Setting the Colors of the Fish Finder Display...
Страница 323: ...12 17 12 Other 12 12 4 Sonar Range and Initial Setting Values for the Fish Finder Range...
Страница 326: ...12 Other 12 20 12...
Страница 327: ......


