background image

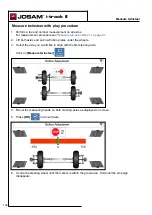
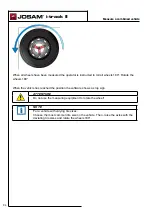
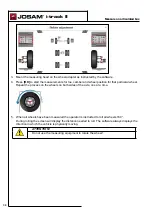
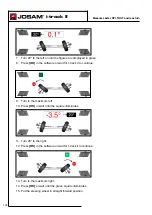
3.  Mount the measuring head on the wheel adapter as instructed by the software. 
4.  Press 

[OK]

 to start the measurements for toe, camber and wheel position for that particular wheel. 

Repeat the process on the wheels on both sides of the axle, one at a time.

5.  When all wheels have been measured the operator is instructed to roll all wheels 180°. 

During rolling the screen will display the distance needed to roll. The software always displays the 

direction in which the vehicle is physically moving.

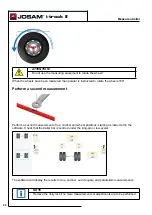
ATTENTION!

Do not use the measuring equipment to rotate the wheel!


i-track II

Measure an articulated bus

98

Содержание homebase 4

Страница 1: ...Operator manual Homebase I track ll and Tire Manager 16538 T 194 1 1901 ...

Страница 2: ...This page is intentionally left blank ...

Страница 3: ...initions 21 Measurement references 24 Component description 25 I track II components 25 Abbreviations 29 Homebase start 31 New order 33 Navigator 37 Order information 38 Customer information 39 Vehicle information 40 Employee information 41 Deleted orders 42 Definitions 43 Tire configuration 48 Frame configuration 49 Report and preview 53 Separate 53 Graphical 54 Text 54 Tire management 55 Toolbar...

Страница 4: ...e measurement 77 Measure truck or bus 81 Measure toe and camber 81 Measure a trailer 85 Measuring for the first time 87 Perform a second measurement 88 Measure a semi trailer 89 Perform a second measurement 92 Measure a combined vehicle 93 Conditions 93 Measuring first time 93 Perform a second measurement 95 Measure an articulated bus 97 Perform a second measurement 99 Adjust toe and camber 101 Me...

Страница 5: ...turn 113 ADAS Safety system calibration 117 Tire Manager user guide 122 Tire Manager 123 Maintenance of magnetic wheel adapter 127 Periodic maintenance 127 Repair 127 Maintenance of Low friction plate 129 Preventive Maintenance 129 Maintenance of measuring head 131 Buttons and LED s on the measuring unit 131 Periodic maintenance 132 Calibration 133 Calibrate camber 137 Error messages 139 homebase ...

Страница 6: ...This page is intentionally left blank ...

Страница 7: ...fety devices such as fuses and warning labels immediately DANGER The indication DANGER warns of the danger of minor physical injury or damage to equipment WARNING The indication WARNING warns you of the danger of serious physical injury CAUTION The indication CAUTION warns of the danger of minor physical injury or damage to equipment ATTENTION The indication LASER RADIATION warns of possible injur...

Страница 8: ...This page is intentionally left blank ...
Страница 9: ...Information NOTE Notes usage tips or additional information This font Indicates a physical button to press This font Indicates emphasis This font Indicates a software button to click homebase 4 9 ...

Страница 10: ...This page is intentionally left blank ...

Страница 11: ...er s is in conformity with the provisions of the following EU directive s EMC Directive 2014 30 EU and other applicable directives 2006 25 EC Artificial Optical Radiation Directive Standard used EN 60825 1 2007 2011 65 EU RoHS directive Morgan Ekskär Director Business Unit Truck Bus OEM Örebro 11 September 2018 Car O Liner Group AB Hulda Mellgrens gata 1 SE 421 32 Västra Frölunda Sweden Telephone ...

Страница 12: ...This page is intentionally left blank ...

Страница 13: ...e s EMC Directive 2014 30 EU References of standards and or technical specifications applied for this declaration of conformity European Standards EN 61000 6 3 2007 EN 61000 6 1 2007 A1 2011 and other applicable directives 2006 25 EC Artificial Optical Radiation Directive Standard used EN 60825 1 2007 2011 65 EU RoHS directive Morgan Ekskär Director Business Unit Truck Bus OEM Örebro 11 September ...

Страница 14: ...This page is intentionally left blank ...
Страница 15: ...homebase 4 Homebase 4 user guide 15 ...

Страница 16: ...This page is intentionally left blank ...
Страница 17: ...ehicle and measurement information is stored and edited in Homebase Backup restoring and updating of Homebase is performed on the database manager The Homebase system uses Bluetooth for the transmission of information between measuring units the distance laser tool and computer The Homebase system plug ins I track ll Tire Manager 17 ...

Страница 18: ...This page is intentionally left blank ...
Страница 19: ...uired operating system Microsoft Windows 7 or later Additional system requirements might apply to get the above mentioned operating systems fully func tional please check with your operating systems supplier Technical data Feature Measurement range Accuracy Toe 25 0 25mm m Camber 5 10 3 min Caster 20 KPI 20 Max Turn 60 For each measuring head Operational time 12 h Charging time 1 h Laser Class 2 O...

Страница 20: ... serial number a CE and ETL symbol that certifies that the product is approved The batteries are of Li Ion type and are not environmentally friendly Dispose of batteries according to local regulations www josam se Prod ID JT731 Serial 00000 Prod year 201x Fixed workplace Mobile workplace 20 ...

Страница 21: ...Toe The angle of a horizontal line drawn through the wheel in relation to the measurement reference line from a top view Camber The angle of the wheel relative to vertical as viewed from the front or the rear of the vehicle Out of Square EU Thrust Angle US The thrust angle of the driven axle in relation to the measurement reference line homebase 4 21 ...

Страница 22: ... axle in relation to the vertical as viewed from the side of the vehicle KPI King pin inclination The angle of the king pin relative to vertical as viewed from the front or the rear of the vehicle Max turn EU Lock to lock US The angle of the wheel relative to the measurement reference line when the wheel is turned to its maximum outwards homebase 4 22 ...

Страница 23: ...TOOT Toe out on turns The angle difference between the inner wheel and the outer wheel when the inner wheel is angled at 20 Offset When the axle is offset from the chassis homebase 4 23 ...

Страница 24: ...the standard reference used in I track II when measuring wheel angles without performing a frame reference measurement prior to the wheel angle measurements Chassis centre line Chassis centre line is a reference line drawn through the centre of the vehicle frame or chassis In I track II the chassis centre line is detected by using the centre line tool during a frame reference measurement homebase ...

Страница 25: ...n each strip Reflective target scales The reflective target scales comprise of luminous strips which enable the lasers to identify distance and angle Each target is unique to its purpose It is important that the correct target is placed in the correct position To maintain a high level of accuracy during measurement the targets must be kept clean at all times Magnetic wheel adapter The magnetic whe...

Страница 26: ...tance during measurement The scales can be used in measurements of varying sizes and can be adjusted according to the measurement Distance is set before measurement Centre line tool The centre line tool is used to calculate the centre line of the chassie The centre line tool consists of a trolley a battery powered distance laser for measuring the distance and a reference axle on to which the measu...

Страница 27: ... to the tow bars on the vehicle to create a reference point for the centre line tool Steering wheel holder Is used to lock the steering wheel in the straight ahead position Low friction plate The low friction plates are used to eliminate friction between the floor and tire when adjusting twinsteer and toe on the front axle The plates can hold a weight of up to six tons each 27 ...

Страница 28: ...This page is intentionally left blank ...

Страница 29: ...g Diode N A Not Applicable TOOT Toe out on turns VIN Vehicle Identification Number ADAS Advanced Driver Assistance Systems The following components may differ in software and technical documentation Software names Documentation names Centre line tool Distance laser and trolley Unit Measuring head homebase 4 29 ...

Страница 30: ...This page is intentionally left blank ...

Страница 31: ...nistration menu employee administration menu and order deletion menu Print Used to print and preview reports Definitions Used to access the Axle Tire and Frame configurations Settings Used to access the Workflow Reports Units Communications Customizing and Licenses registration menus Current order Displays information concerning an ongoing order Continue on this order Used to continue with the cur...

Страница 32: ...This page is intentionally left blank ...
Страница 33: ...ns will be subject to change in future software versions Click on the I track ll button to access New order I track ll To use an existing axle configuration Choose vehicle type and an axle configuration and click on Next To define a new axle configuration Click on New See Create a new axle configuration See page 44 Click on Back to return to the application window homebase 4 New order 33 ...

Страница 34: ... software how far the vehicle is to be rolled in the rolling sequence Click on Next to continue with the selected dimensions Click on Back to return to the axle choice window or Click on New to define a new wheel configuration Enter the tire designation tire code and the wheel diameter Click on Save ...

Страница 35: ...ave and start measure The software will proceed automatically to the pre selected measurement process For measurement processes see chapters Measure frame reference See page 77 Measure truck or bus See page 81 Measure a trailer See page 85 Measure a semi trailer See page 89 Measure a combined vehicle See page 93 Measure an articulated bus See page 97 Click on Back to return to the wheel selection ...

Страница 36: ...This page is intentionally left blank ...
Страница 37: ...gator serves as the administrator of the database Press on Navigator in the Start Menu to access the Navigator menu Navigator window is displayed Order information Customer information Vehicle information Employee information Deleted orders ...

Страница 38: ...regarding existing orders All orders are created and stored in the database Create a new order Edit an existing order Only accessible if the administrator rights function is enabled Delete an order Only accessible if the administrator rights function is enabled Print an order Continue an order ...

Страница 39: ...information regarding existing customers Create new customer information Edit existing customer Only accessible if the administrator rights function is enabled Delete existing customer information Only accessible if the administrator rights function is enabled ...

Страница 40: ...le information related to existing vehicles Create a new vehicle specification Edit vehicle specification Only accessible if the administrator rights function is enabled Delete a vehicle specification Only accessible if the administrator rights function is enabled ...

Страница 41: ...mation related to existing employees Create a new employee specification Edit employee specification Only accessible if the administrator rights function is enabled Delete an employee specification Only accessible if the administrator rights function is enabled ...

Страница 42: ...homebase 4 Navigator 42 Deleted orders Displays all deleted orders Restore Order Will restore a deleted order to the order menu ...

Страница 43: ... and Frame configuration Axle configuration Click on the axle configuration in the list to the left to display configurations for that particular vehicle Create a new axle specification Edit an existing axle specification Only accessible if the administrator rights function is enabled Delete an existing axle specification Only accessible if the administrator rights function is enabled Click on the...

Страница 44: ...ew axle configuration Click on New in the axle configuration window Choose the vehicle type manufacturer model and enter the model year Choose left or right steering Click on Next This window will vary according to the chosen vehicle type ...

Страница 45: ...t To remove the axle from the sequence click on the red cross to the right of the axle to be removed To move the axle up or down in the sequence press on the blue arrows This will move the axle one step up or down Enter the measurement tolerances for each axle in the boxes to the far right Enter the configuration name Click on Save The new configuration is now saved ...

Страница 46: ...ting axle configuration Choose the axle configuration to be edited from the list Click on Edit in the axle configuration window Choose the vehicle type manufacturer model and enter the model year Choose left or right steering Click on Next ...

Страница 47: ...homebase 4 Definitions 47 Enter the modifications and click on Save The changes are now saved ...

Страница 48: ...e edited and new tire configurations created To see instructions for editing and creating new tire configurations see chapter New order on page 33 If the tyres of the vehicle are different in size select the most common dimension or an average dimension of the ones on the vehicle ...

Страница 49: ...e configuration NOTE This software configuration will be released at a later date To enter frame configuration click on Frame configuration Create a new configuration Click on New First choose a frame type from the list to the left ...

Страница 50: ...ed for each click on the cross A red cross and measurement will be displayed to indicate each new frame member The frame member can be moved up and down the frame by clicking on the bar The bar will be highlighted by a green background to indicate that the bar can be moved The measurement number will change according to the position of the frame member To remove a frame member click the red cross ...

Страница 51: ...homebase 4 Definitions 51 Edit a frame configuration Click on Edit in the frame configuration window to edit an existing frame configuration When done click on Save ...

Страница 52: ...This page is intentionally left blank ...
Страница 53: ...d preview 53 Report and preview To enter the report preview click on Print in the order menu The report window can be viewed in four different formats Separate Displays before and after adjustment values on separate pages ...

Страница 54: ...homebase 4 Report and preview 54 Graphical Displays before and after adjustment values on the same page Text Displays before and after adjustment values on the same page without any images ...

Страница 55: ...homebase 4 Report and preview 55 Tire management Displays the report for tire management ...

Страница 56: ...e Displays the first page Displays the next page Displays the last page Refresh Refresh the page after changes Print Report Print Layout Preview the layout before printing Page Setup Change the page setup configurations Export Exports the report to Excel PDF or Word format ...

Страница 57: ... for the measurement of trucks This measurement box is by default ticked Measure twinsteer with play Check this box for the measurement of twinsteer with play This process will take longer but the result will be more acurate depending on less play in the linkage The program uses right hand steering as a default Check this box if right hand steering is used as a default Centre line tool Check this ...

Страница 58: ...a logotype Report settings Check or uncheck the boxes in the report settings list to choose which measurement results should be displayed in the report For examples of report settings see Chapter Report and Preview on page 53 Here you can also choose the default printer When no printer is selected the software selects the default Windows printer ...

Страница 59: ...tware settings 59 Units Select units mm m Degrees Minutes Decimal Degrees etc in which the measurement results will be displayed The selection made here will be displayed on both the printed reports and on the screen ...

Страница 60: ...nterline tool is only visible if pre selected in the workflow window When connected the serial numbers for the measuring heads measuring heads 1 and 2 are displayed in the boxes to the right Disconnects the units Connects the units Searches for units For more information on connecting the units see chapter System start up on page 73 ...

Страница 61: ...the box to activate login If activated the user must use a password to login Text Auto Completion Check the box to activate automatic text completion when entering data Set the minimum road legal tread depth for tires Enter value in mm Language Select default language ...

Страница 62: ...homebase 4 Software settings 62 Licenses Displays status of licenses Licenses can also be registered by clicking on For the Activate license instruction see the Installation and Registration Manual ...

Страница 63: ...base 4 Software settings 63 About Displays information for contact details service and remote support For online assistance click on Remote Support The Teamviewer window will display instructions to connect ...

Страница 64: ...i track II 64 I track II user guide ...

Страница 65: ... steering gear and the balancing arms support on support axle vehicles 3 The attachment of the axles Play in spring eye bolts shackles broken centre rivets broken springs and loose spring straps 4 Worn torsion bar bushings NOTE Any faults concerning the above mentioned points should be corrected before proceeding with measurements 5 Check ride height 6 Make sure that the wheel alignment is calibra...

Страница 66: ...d firmly attached Rotate the spirit level holder so that the bubble is levelled and lock it The wheel adapter is now ready to be used in measurements If JOSAM i track II classic wheel adapters are being used make sure to mount every wheel adapter with the main knob facing upwards Scales and gauges mounted in the workshop Place them according to the correct position Left front Left rear Right front...

Страница 67: ...s or semi trailers use the special clamp for tow eyelet or king pin Windy environment Attach the stabilizer bracket to the hangers Secure the hangers to the chassis frame This will prevent swaying and vibration Adjustment of self centering frame gauges Use the adjusting device on the self centering frame gauges to adjust until the extensions are horizontal Check the bubble on the gauge extension ...

Страница 68: ...the same for all scales when assembled Adjust the height of the target scale so that its center is positioned at the same level as the lower edge of the measuring head Position the other target scales at the same height and reading as the first target scale Preparations are now completed WARNING Do not alter the position of the self centering frame gauges while measuring procedure is in progress T...

Страница 69: ...eck the calibration of the portable work bay regularly See the instructions in the installation guide Before starting measurement position the targets in a box formation as close to the frame centre line as possible Procedure for work bay setup 1 Mount all wheel adapters on the vehicle 2 Mount the measuring heads on the rear axle 3 Click on Setup in the measurement window in the software 4 Click o...

Страница 70: ... vehicle s centre line 6 Place the rear targets at least 2 m 6 feet behind the rear most axle of the vehicle and centred in relation to the frame centre line 7 Click on Next 8 The software checks that the distances relative to the rear targets are within specified limits 9 When all values are green click Next in the software ...

Страница 71: ...t targets according to the distances in the software 11 Click on Next 12 Start the measurement NOTE Important The mobile targets are not to be used with the centre line tool NOTE Important The mobile targets are not to be used with the optional trailer bar ...

Страница 72: ...This page is intentionally left blank ...

Страница 73: ... centre line tool laser A green LED will light up to indicate the systems are activated NOTE During installation and if experiencing communication problems To prevent Bluetooth conflicts during installation and communication problems the internal Bluetooth should be disabled before the JOSAM Bluetooth dongle JT621 is inserted For Bluetooth connection instructions see the Homebase Installation Guid...

Страница 74: ...1 and measuring head 2 and choose the correct serial number for the unit The software will display a list of serial numbers with Bluetooth connection in the drop down list The centre line tool is only visible if pre selected in the Workflow settings window see page 57 Chose the serial numbers connected to the measuring heads ...

Страница 75: ...the units are connected If the software cannot find the units click on Search for units NOTE Check the calibration of the measuring heads regularly see Measuring unit compare on page 133 NOTE Check the calibration of the workbay regularly see instructions in the installation guide NOTE Check the rest of the equipment regularly for damages and play that can affect the measurements accuracy ...

Страница 76: ...This page is intentionally left blank ...
Страница 77: ...ither New Order if starting a new order See chapter New order on page 33 or click on Continue this Order to proceed with the current order The application window for I track ll will be displayed Click on I track ll The software will proceed to the main measurement window NOTE Shiny or reflective surfaces may disturb the laser equipment Make sure that any such surfaces are covered before start of m...

Страница 78: ...ion and demo mode Check the demo box to run the software in demo mode No measuring heads are needed Measure Starts the measurement process 1 Click on Measure to access the measurement mode If the centre line tool is activated in the setup menu the software will enter the frame centre line measurement process automatically i track II Measure frame reference 78 ...

Страница 79: ... correct position on the chassis on the frame reference target If frame reference targets can not be used an aiming point in the wheel housing can be used 3 Press OK on the measuring head When the LEDs display a green light a measurement has been taken 4 Roll the centre line tool to the rear of the chassis 5 Press OK on the measuring head When the LEDs display a green light a measurement has been ...

Страница 80: ...ight a measurement has been taken 8 Roll the centre line tool to the front on the right side Make sure that the laser is aimed a similar position as on the left side of the chassis 9 Press OK on the measuring head When the LEDs display a green light a measurement has been taken 10 All measurements for the frame reference are completed The software will now proceed to measure toe and camber i track...

Страница 81: ...suring method all axles are measured before adjustment 1 Mount a wheel adapter on each wheel 2 Lock the steering wheel in the straight ahead position 3 Mount the measuring heads according to the software instructions Press OK on a measuring head on any side of the vehicle 4 The green LED will light up to indicate that a measurement has been registered 5 The software will indicate which wheel to me...

Страница 82: ...on a measuring head on any side This will inform the software that rolling has been completed and at the same time a second measurement of that wheel will be made 10 Measure all remaining wheels according to the software instructions NOTE For vehicle with varying tire sizes Choose the most common tire size on the vehicle Then raise the axles with the deviating tire sizes and rotate the wheels 180 ...

Страница 83: ...es are selected See chapter Measure Twinsteer page 105 ADAS Safety system calibration only visible when a complete recent measurement has been performed i e will not appear on orders previously measured See chapter ADAS Safety System Calibration page 117 Adjust See chapters Adjust Twinsteer axels page 109 Adjust Max Turn page 113 Setup Perform I track II specific settings calibrations placement of...

Страница 84: ...This page is intentionally left blank ...
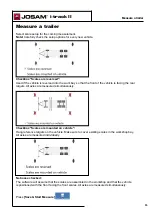
Страница 85: ...s All axles are measured simultaneously Checkbox Scales are mounted on vehicle Hang reference targets on the vehicle Make sure to cover existing scales in the workshop bay All axles are measured individually No boxes checked The software will assume that the scales are assembled in the workshop and that the vehicle is positioned with the front facing the front scales All axles are measured simulta...

Страница 86: ...d Levelling the trailer bar Place the trailer bar on two stands either directly under the king pin or directly under the tow eyelet on the semi trailer Level the trailer bar using the bubble fine tuning is done using the measuring system later during the process Switch the laser on and point it at the centre of the king pin or the tow eyelet NOTE Lock the dolly on a full trailer using the dolly lo...

Страница 87: ...e measuring heads Continue the flow by placing measuring head on a wheel adapter on the first axle and press the button on the measuring head to take the initial measurements of toe camber and position of that wheel When the software has registered the data the user moves the measuring head to the next axle which can be measured the same way Up to two operators may measure at the same time using t...

Страница 88: ...rform a second measurement of toe camber and wheel positions starting as instructed in the software Check that the trailer bar is centred under the king pin or tow eyelet The software will display the results for toe camber out of square and parallelism measurements NOTE Remove the dolly lock if no more measurements or adjustments are to be performed i track II Measure a trailer 88 ...

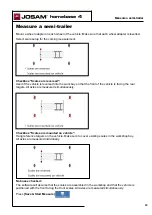
Страница 89: ...ng the rear targets All axles are measured simultaneously Checkbox Scales are mounted on vehicle Hang reference targets on the vehicle Make sure to cover existing scales in the workshop bay All axles are measured individually No boxes checked The software will assume that the scales are assembled in the workshop and that the vehicle is positioned with the front facing the front scales All axles ar...

Страница 90: ...ailer king pin Level the trailer bar using the bubble Switch the laser on and point it at the centre of the king pin or the tow eyelet Place both measuring heads on the trailer bar then press OK on the measuring heads to start levelling the trailer bar Adjust the trailer bar in level indicated with green digits using the instructions on the display When ready move the trailer bar sideways so that ...

Страница 91: ...e has registered the data the operator moves the measuring head to the next axle which can be measured the same way There is no specified measuring flow other than that all wheels must be measured as instructed by the software When the wheels have been measured the operator is instructed to rotate the wheels 180 ATTENTION Do not use the measuring equipment to rotate the wheel homebase 4 Measure a ...

Страница 92: ...Perform a second measurement of toe camber and wheel positions Start as instructed by the software The software will display the results for toe camber out of square and parallelism measurements homebase 4 Measure a semi trailer 92 ...

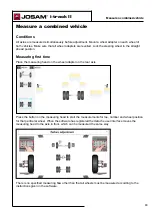
Страница 93: ...ing head on the wheel adapter on the rear axle Press the button on the measuring head to start the measurements for toe camber and wheel position for that particular wheel When the software has registered the data the user interface moves the measuring head to the axle in front which can be measured the same way There is no specified measuring flow other than that all wheels must be measured accor...

Страница 94: ...s reached the position the software shows a stop sign ATTENTION Do not use the measuring equipment to rotate the wheel NOTE For a vehicle with varying tire sizes Choose the most common tire size on the vehicle Then raise the axles with the deviating tire sizes and rotate the wheels 180 i track II Measure a combined vehicle 94 ...

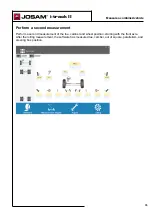
Страница 95: ...cond measurement of the toe camber and wheel position starting with the front axle After the rolling measurement the software has measured toe camber out of square parallelism and steering box position i track II Measure a combined vehicle 95 ...

Страница 96: ...This page is intentionally left blank ...
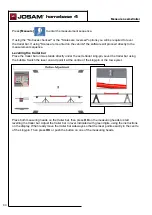
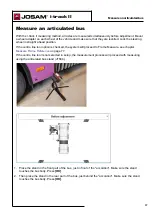
Страница 97: ... will proceed to Frame Measure see chapter Measure Frame Reference on page 77 If the centre line tool is not selected in setup the measurement process will proceed with measuring using the articulated bus stand JT684 1 Place the stand in the front part of the bus just in front of the accordion Make sure the stand touches the bus body Press OK 2 Then place the stand in the rear part of the bus just...

Страница 98: ...n the wheels on both sides of the axle one at a time 5 When all wheels have been measured the operator is instructed to roll all wheels 180 During rolling the screen will display the distance needed to roll The software always displays the direction in which the vehicle is physically moving ATTENTION Do not use the measuring equipment to rotate the wheel i track II Measure an articulated bus 98 ...

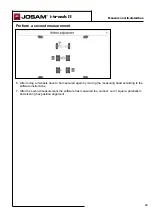
Страница 99: ...easurement 6 After rolling all wheels have to be measured again by moving the measuring head according to the software instructions 7 After the second measurement the software has measured toe camber out of square parallelism and steering box position alignment ...

Страница 100: ...This page is intentionally left blank ...

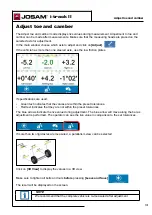
Страница 101: ...within the preset tolerances Red text indicates that they are not within the preset tolerances The blue arrows indicate the live value during adjustment The blue arrow will move along the bar as adjustment is performed The operator can see the live value in comparison to the set tolerances If more than two rigid axles are measured a parallelism view can be selected Click on 3D View to display the ...

Страница 102: ...This page is intentionally left blank ...
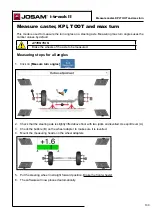
Страница 103: ...angles 1 Click on Measure turn angles 2 Check that the steering axle is slightly lifted above floor with two jacks and levelled Use spirit level A 3 Check the bubble B on the wheel adapter to make sure it is levelled 4 Mount the measuring heads on the wheel adapters 5 Put the steering wheel in straight forward position Brake the front wheels 6 The software will now proceed automatically Measure ca...

Страница 104: ...e maximum left 10 Press OK or wait until the square illuminates 11 Turn 20 to the right 12 Press OK in the software or wait for I track ll to continue 13 Turn to the maximum right 14 Press OK or wait until the green square illuminates 15 Put the steering wheel in straight forward position 104 Measure caster KPI TOOT and max turn i track II ...

Страница 105: ...e without play procedure 1 Perform a toe and camber measurement on all axles For measurement procedure see Measure toe and camber on page 81 2 Lift both axles and put low friction plates under the wheels 3 Select the axle you would like to align with the first steering axle Click on Measure Twinsteer 4 Mount the measuring heads on both steering axles as displayed on the screen 5 Press OK in the so...

Страница 106: ...put low friction plates under the wheels 3 Select the axle you would like to align with the first steering axle Click on Measure Twinsteer 4 Mount the measuring heads on both steering axles as displayed on screen 5 Press OK in the software 6 Centre the steering wheel until the marker is within the green area Hold until the stop sign disappears i track II Measure twinsteer 106 ...

Страница 107: ...0 mm m and hold until the stop sign disappears 8 Turn the wheel back to the green area between 25 and 35 mm m and hold until the stop sign disappears 9 Centre the steering wheel until the marker is within the green area i track II Measure twinsteer 107 ...

Страница 108: ...mm m and hold until the stop sign disappears 11 Centre the steering wheel until the marker is within the green area Hold until the stop sign disappears 12 The measurement is now completed The values are automatically saved i track II Measure twinsteer 108 ...

Страница 109: ...steer axles The Adjust twinsteer axle mode displays the toe values simultaneously during the adjustment of the twin steered axles 1 Click on Adjust 2 Click on Adjust twinsteer i track II Adjust twinsteer axles 109 ...

Страница 110: ...out play see Measure without play procedure on page 105 Adjust twinsteer with play 1 Mount the measuring heads to the wheel adapters as shown 2 Click on OK 3 Turn the steering wheel to the indicated value on the screen it will vary depending of the measured twinsteer value i track II Adjust twinsteer axles 110 ...

Страница 111: ... that the marker is within the green area 5 The system will now display the live values Press OK to exit and save the twinsteer value 6 The results are displayed on the screen Twin steer values i track II Adjust twinsteer axles 111 ...

Страница 112: ...This page is intentionally left blank ...

Страница 113: ...x turn measurements 1 Brake the wheels 2 Make sure that the steering axle is slightly jacked up using two jacks and make sure that it is levelled 3 Make sure that the measuring heads are mounted on the wheel adapters 4 Click on Adjust Note that all turn angles need to be measured before continuing homebase 4 Adjust max turn 113 ...

Страница 114: ... turn 6 Live values are shown in the adjust max turn window 7 Turn the steering wheel to the left and press OK when finished adjusting 8 Turn the steering wheel to the right and press OK when finished adjusting homebase 4 Adjust max turn 114 ...

Страница 115: ...When the result window appears the results are saved See the values marked with red circles homebase 4 Adjust max turn 115 ...

Страница 116: ...This page is intentionally left blank ...
Страница 117: ...e ADAS Safety system calibration 2 Mount the measuring heads on the calibration rod 3 Place the target in front of the vehicle perpendicular to the vehicle s centreline 4 Move the unit until the correct distances are reached the blue adjustment arrows disappear NOTE Make sure that the rods are fully extended until they hit the stop rings If not done correctly the measurement will be incorrect ...

Страница 118: ...s Next 6 Rotate the platform until the angle indicator turns green Press Next 7 Set the height on target according to the vehicle s configurations given in Tech Tool When setting the height make sure that the yellow or blue arrow is level with the lower edge of the calibration target 8 Positioning completed ...

Страница 119: ...This page is intentionally left blank ...
Страница 120: ...ance ie 2mm m LPOS calibration with high setting 2000 mm 1 Adjust the height of the target by rotating the crank clockwise 2 Adjust the height of the target until the little yellow arrow is exactly level with the bottom edge of the red target holder 3 Check the height of the target by measuring from the bottom edge of the second black square on the target to the floor 2000 mm To floor ...

Страница 121: ...the target by rotating the crank counterclockwise 2 Adjust the height of the target until the little blue arrow is exactly level with the bottom edge of the red target holder 3 Check the height of the target by measuring from the bottom edge of the second black square on the target to the floor 1050 mm To floor ...

Страница 122: ...tire manager Tire Manager user guide 122 ...

Страница 123: ...alled on a PC is a measuring software designed for tracking tire wear The Tire Manager is free to use in combination with an I track ll license Click on the Homebase Icon to start the Homebase software Click on New Order Click on JOSAM TM tire manager Tire Manager 123 ...

Страница 124: ...Select vehicle Click on Next to continue Enter VIN Customer Employee and additional comments if needed Click on Save and Start Measure tire manager Tire Manager 124 ...

Страница 125: ... will be highlighted by a blue rectangle The following tire information can be entered Width Ratio Type R for Radial D for Diagonal Size Manufacturer Model Milage Enter tire pressure Enter thread depth Use the buttons Copy and Paste to enter reoccurring information on each tire NOTE Refer to the manufacturer s specifications for correct tire pressure and positioning of the tires tire manager Tire ...

Страница 126: ...This page is intentionally left blank ...

Страница 127: ...leaning a magnet foot 1 Remove any large metallic items such as nuts from the inside of the foot 2 Use compressed air to blow the magnet foot and inner sleeve clean of debris Take extra care around the magnet and in the gap between the magnets and inner sleeve Repair Replace the reference axle 1 Remove the three screws and the washer that secure the reference axle assembly to the frame 2 Replace t...

Страница 128: ...emble the magnet foot correctly CAUTION Be sure to re assemble the magnet foot with the polarization of the magnets positioned correctly Every other magnet should be positioned with its north pole outwards A single magnet placed with wrong polarization will render the magnet system of the entire foot powerless 3 Place the leg magnet foot down on a flat surface 4 Remove the 4 screws keeping the mag...

Страница 129: ...tenance of Low friction plate Preventive Maintenance Once a week Check for any visible damage and that the low friction plate turns freely Replace the V rail and ball bearings 1 Remove the screw Seat and O ring 2 Remove the ball bearings and the V rail ...

Страница 130: ... V rail When replacing the ball bearings and the V rail lubricate with Q8 Rembrant EP2 or Grease APS2 for ball bearings Castrol Rubber Grease for V rail 4 Replace the new O ring seat and screw when assembling the lid Grease APS2 or Q8 Rembrant EP2 Grease APS2 or Castrol Rubber Grease ...

Страница 131: ...arging Green when ready Power LED Green 30 100 battery capacity Red below 30 battery capacity ON OFF button Press to switch measuring head ON Press and hold for app roximately 3 seconds to switch measuring head OFF Status LEDs left and right Indicates scale hits front and rear during toe measuring or flashing simultaneously during camber measuring OK button Press to measure Bluetooth LED Blue when...

Страница 132: ...ould be disposed of according to local regulations ATTENTION Charging only allowed in office environment Troubleshooting If there are any problems there are a few alternatives that can be used to diagnose the system To access these systems click on Setup in the I track II plugin Then select Calibration Click on Compare units The measuring head is malfunctioning Symtoms The yellow LED malfunctions ...

Страница 133: ...ct measuring values To enter the calibration mode click on Setup Measuring unit compare Always compare the measuring units before calibration Click on Compare units 1 Mount wheel adapter on the left side of a non steering axle Distance to scale preferably 3 meters in both directions 2 Make sure that the axle is NOT jacked up Unit 1 3 Mount the first measuring head in the inner groove of the wheel ...

Страница 134: ... 2 still working on the same wheel 8 Centre the bubble on top of the measuring unit 9 Press the OK button on the measuring head to get the values for unit 2 10 The results for the second unit are displayed The software will now display the difference between the first and second unit ...

Страница 135: ...suring head on the left side of a non steering axle The distance to scale preferably 3 meters 1 Click on Calibrate Toe in the software 2 The software displays the calibrate toe window 3 Adjust until the top bubble indicates the measuring head is horizontal 4 Lock the measuring head to the wheel adapter reference axle by tightening the locking excenter 5 Press OK button on the measuring head to get...

Страница 136: ...rence axle by tightening the locking excenter 10 Press the OK button on the measuring unit to get the values for the unit Old calibration and new calibration toe values are shown The difference between both the readings should not exceed 1 0 3 mm m To calibrate the unit press Store calibration To set the calibration to default click on Restore factory calibration If difference exceeds 1 the operat...

Страница 137: ...icates the measuring head is horizontal 3 Slide the measuring head on to the axle until the measuring head clicks into place 4 Lock the measuring head to the wheel adapter reference axle by tightening the locking excenter 5 Press OK button on the measuring head to get the values for the unit 6 Unlock the measuring head by loosening the locking excenter 7 Slide the measuring head off the axle and t...

Страница 138: ...eadings should not exceed 2 0 6 mm m To save the calibration in the measuring head click on Store calibration To set the calibration to default click on Restore factory calibration If difference exceeds 2 the operator should perform the calibration procedure once more Click on Calibration menu to return to the calibration menu ...

Страница 139: ...ack II Error messages 139 Error messages The following error messages can appear in the measurement window The Centre line tool is incorrectly placed Check position of measuring heads Check measuring heads ...

Страница 140: ...i track II Branch office Printed on environmentally friendly paper Car O Liner Group AB Box 419 SE 701 48 ÖREBRO Sweden Phone 46 19 30 40 00 Fax 46 19 32 03 16 E mail info josam se Internet www josam se ...

Отзывы: