


13
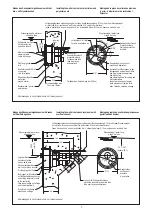
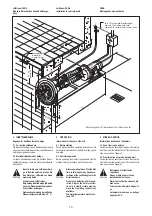
7 AN DEN ELEKTROINSTALLATEUR
7.1 Hinweise zum Anschluss der stationären
Schwimmbeckenpumpe JetStream DUNA,
BAMBO2, BAMBO, COCO (unbeleuchtete
Ausführungen) VIVA, LIBRA 3-5, LIDO,
LIDO2 für Drehstrom 3N PE ~ 400 V 230 V
50 Hz und 1 N PE ~ 230 V - 50 Hz
Es geht um Ihre Sicherheit!
Führen Sie deshalb die Anschluss-
arbeiten sorgsam nach den Bestim-
mungen DIN VDE 0100 Teil 702 aus.
Halten Sie unbedingt die Sicher-
heitshinweise und die Anforderun-
gen der Normgeber ein.
Warnung
7 INFORMATION FOR THE ELECTRICIAN
7.1 Notes about connection of the pool pumps
JetStream DUNA, BAMBO2, BAMBO,
COCO (version without illumination)
VIVA, LIBRA 3-5, LIDO, LIDO2
for threephase 3 N PE ~ 400 V 50 Hz
and 1 N PE ~ 230 V - 50 Hz
This affects your safety!
Therefore, perform all work careful-
ly in accordance with the regulations
EN-60335-2-41. You must definitely
observe the safety instructions and
the requirements stated by the stan-
dards authorities.
Attention
Warning
7 A L’ATTENTION DE L’ELECTRICIEN
7.1 Remarques concernant le branchement
des pompes uwe Jetstream DUNA,
BOMBO2, BAMBO, COCO (modèles sans
éclairage) VIVA, LIBRA 3-5, LIDO, LIDO2
Triphases 3N PE ~ 400 V 230 V 50 Hz
et 1 N PE ~ 230 V - 50 Hz
Il en va de votre sécurité! Effectuez
tous les travaux en respectant atten-
tivement les prescriptions DIN VDE
0100 partie 702 et les normes C
15.100. Respectez impérativement
les instructions de sécurité et les
prescriptions des différentes nor-
mes en vigueur.
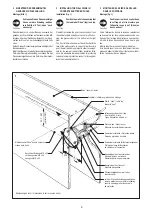
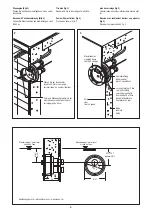
Montage in Betonbecken mit Putz oder Fliesenauskleidung
Fitting in concrete shuttered pools
piscines béton avec carrelage ou peinture
Montage in Stahl- Alu- oder Polyesterbecken mit und ohne Hinter-
mauerung bzw. Hinterbeton /
Fitting in steel, aluminium or polyester pools
Piscines d’ acier aluminium ou polyester, sans ou avec un support de
maçonnerie
Abmessungen in cm /
dimensions in cm
/ mesures en cm
Abmessungen in cm /
dimensions in cm
/ mesures en cm
Senkschraube
/ vis T.F.
M 6 x 40
screw
Senkschraube
/ vis T.F.
M 6 x 25
screw
Spannplatte
centre de plaque
de fixation
clamping plate
Befestigungsplatte
plaque de fixation
back plate
Dichtung
joint
gasket
Dichtung
/ joint
gasket
Beckenwand
pool wall / paroi
45
Ø 7
Ø 8
50
Senkholzschraube
/ vis a bois T.F.
fixing screw
Bei Fertigbecken müssen
die beiden zusätzlichen
Bohrungen angezeichnet
werden
Bien êtirer les poignées vers
le bas avant de réaliser la
fixation inférieure
prefab. pools:
mark the two addetional drills
Dübel /
/ chevilles
wall plug
36
58
Halteseildeckel
capot de
fixation des
poignées
end cap
Dichtung /
/ joint
gasket
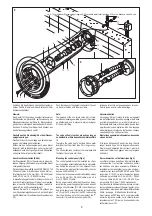
6 MONTAGE DER HALTEGRIFFE
Montage
1
Obere Halteseildeckel wie vermasst verschrauben.
2
Untere Haltseildeckel leicht nach unten ziehen, so dass sich das Halteseil
gerade richtet.
3
Schraubenlöcher abbohren und Deckel verschrauben.
6 FITTING INSTRUCTIONS FOR HANDGRIPS
Mounting
1
Fix upper end cap to pool wall as shown.
2
Pull down lower cap to straighten rope.
3
Drill holes for lower cap and screw into position.
6 CONSEILS POUR MONTAGE DES POIGNÉES DE
SOUTIEN
Montage
Béton
Monter d’ abord le capot de fixation supérieur à l’ aide des chevilles scéllées et
des vis TF (si bassin avec liner ne pas oublier le joint caoutchouc).
Bassin préfabriqué
Pour le perçage des 5 trous: s’aider soit du croquis ci - contre soit des joints de
fixation. Après perçage monter d’ abord: plaques et con treplaques sans omettre
les deux joints. Monter enfin les poignées, les capots de fixation supérieur en
premier.
800
58
105
45
ca. 736
JETSTREAM
Die Haltegriffe sind symmetrisch, sie können untereinander vertauscht
werden /
les poignées de soutien sont symétriques et peuvent être interchangées
hand grips are identical and can be interchanged
Halteseildeckel /
capot de fixation des poignées
end cap
gestrichelte Schrauben werden
nur für Fertigbecken benötigt
les vis en pointillés ne sont nécessaires
que piscine préfabriquées
broken screw are only needed for prefab. Pools
Düse /
buse
nozzle /