Chlorinator C 2700
BW 2 03 01 / 4
Operating and Maintenance Instructions
Checking the Adjusting Screw
For sealing, the flow volume adjusting screw is fitted with
an O-ring at the front end. During operation, it can be
checked if this O-ring leaks. Move the adjustment knob
laterally. As long as the O-ring is in the adapter, the
display of the measuring glass must not change
considerably. If it does, however, remove the adjusting
screw and equip it with a new O-ring. Before screwing it
in place again, coat it slightly with silicon lubricant.
Gas Pressure Line
The leakage test of the parts in contact with chlorine gas
is realized by blowing-in of the lines and especially the
fittings with (liquid) ammonia. The chlorine tank must be
shortly opened for this purpose in order to pressurize the
system. If chlorine escapes, white smoke occurs. Due to
the extreme corrosiveness of humid chlorine gas, leaks
will grow larger in course of time.
Consequently, even the smallest leak must be
eliminated!
Barrel/Cylinder Connecting Valves
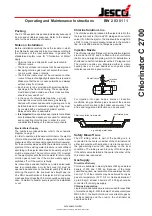
If the barrel connecting valve (2) leaks the gland stud
must be retightened by about a quarter turn. For this
purpose the handwheel of the valve must be removed.
This can be done under gas pressure, as the valve stem
cannot drop out. For detailed instructions, see
ET 2 22 01.
Attention!
The valve stem has a very fine thread. Please make sure
that it is not damaged when the handwheel of the valve
is dismounted.
Silicon lubricant
Vaseline or Silicon lubricant makes installation easier
Gland stud
Cylinder auxiliary
valve X = 23 mm
Barrel auxiliary
valve X = 35 mm
Inlet Valve
Plug the valve seat assembly incl. the PTFE bush (2) with
O-ring (3) into part (6) and tighten it with part (4) and
screw (5). Insert stem (1) with spring (8) and prestress it
with the help of part (7) until the latter is countersunk in
part (6) (approx. 5 mm).
Test:
Connect the valve to compressed air (6 bar) and plunge
it into water. Air bubbles must not occur.
Setting the External-Air Valve
The external-air valve is set so that the vacuum does not
exceed 0.5 bar absolute. Detach part (17). Hold part (18)
with a screw driver and turn part (16) (turn right to reduce
the absolute suction pressure).
X
Lutz-Jesco GmbH
Improved changes are always reserved without notice.


