Jenn-Air JEC0530ADB Скачать руководство пользователя страница 20

A–4

16023537

©2004 Maytag Services

Installation Instructions

INSTRUCTIONS TO

INSTALLER:

S

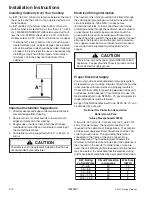
Side and Back Wall Clearance:

Unit may be safely installed as near as 2 1/2 inches (6.35 centimeters) from side

walls and 3/4 inch (1.91 centimeters) from back wall.

Notice To Installer:

Leave these instructions with the appliance.

Notice To Consumer:

Retain these instructions for future reference.

8101P645-60

(03-04-00)

DIMENSIONS

inches

cm

A

34-9/16 + 1/16

87.9 + 0.2

B

20-3/8 + 1/16

51.9 + 0.2

C

2-1/8

5.4

D

4-1/4 min. clear

10.8

E

35-5/16

89.7

F

21-1/2

54.6

G

3-5/8

7.6

INSTALLATION

INSTRUCTIONS

Radiant Cooktop

Models JEC0530 & JEC0536

403 WEST FOURTH STREET, NORTH D NEWTON, IA 50208
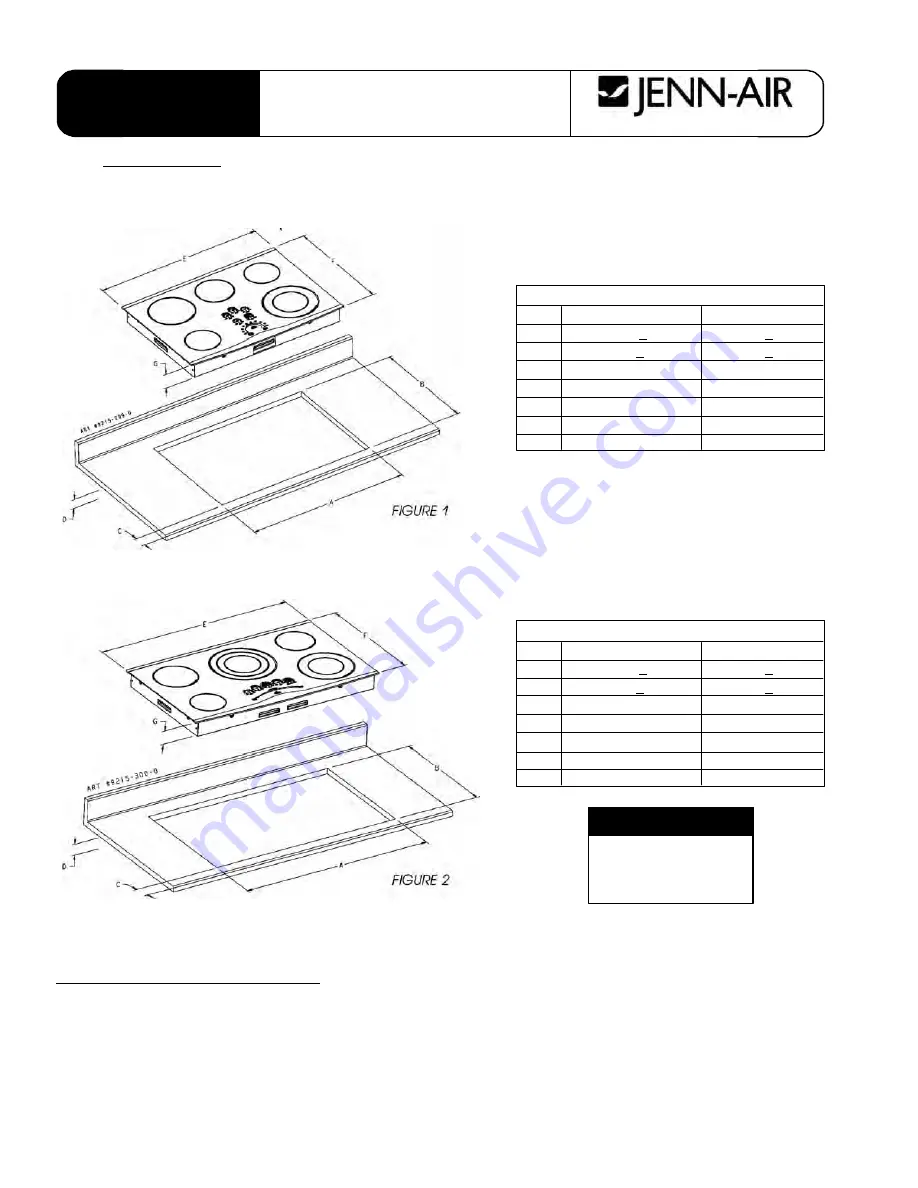
JEC0536

FIVE-ELEMENT RADIANT COOKTOPS

JEC0530

FOUR-ELEMENT RADIANT COOKTOPS

IMPORTANT

- SAVE FOR THE LOCAL ELECTRICAL INSPECTOR’S USE

IMPORTANT:

Installation should be performed only by an authorized Jenn-Air Service Contractor or other qualified
installer. Read safety precautions in the Use & Care Manual before using this appliance.

(Dimensions shown in both inches and centimeters)

DIMENSIONS

inches

cm

A

29-1/16 + 1/16

74.0 + 0.2

B

20-3/8 + 1/16

51.9 + 0.2

C

2-1/8

5.4

D

4-1/4 min. clear

10.8

E

29-15/16

76.0

F

21-1/2

54.6

G

3-5/8

7.6

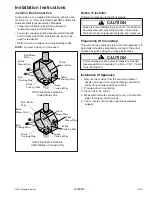
UNITS PROVIDED WITH 1/2 (1.3 cm) I.D. FLEXIBLE CABLE 48 (121.9 cm) LONG WITH 6 (15.2 cm) WIRE LEADS
AT END, FURNISHED AND INSTALLED BY MANUFACTURER (CONNECT TO 240 VOLT ELECTRICAL SERVICE).

NOTE:

“D” is clearance needed for unit depth measure down from top of countertop. Typical for all units.

D

IMPORTANT

CUTOUT

DIMENSIONS ARE

CRITICAL

FIGURE 1

FIGURE 2

Содержание JEC0530ADB

Страница 1: ...This manual includes but is not limited to the following JEC0530ADB S W JEC0536ADB S W Service This manual is to be used by qualified appliance technicians only Maytag does not assume any responsibili...

Страница 2: ...WARNING To avoid risk of severe personal injury or death disconnect power before working servicing on appliance to avoid electrical shock To locate an authorized servicer please consult your telephone...

Страница 3: ...Cooktop 8 LocationofModelNumber 8 ModelIdentification 8 Service 8 Parts and Accessories 8 ExtendedServicePlan 8 Grounding 8 CooktopDescription 9 Table of Contents TroubleshootingProcedures Electronic...

Страница 4: ...g procedures GROUND PATH SPECIFICATIONS Ground Path Resistance 0 1 ohms maximum Insulation Resistance 250k ohms minimum WARNING To avoid risk of electrical shock property damage personal injury or dea...

Страница 5: ...order Maytag supports damage claims by supplying invoices bills of laden and other documentation as needed Providing this assistance however does not imply any responsibility for settling claims Do no...

Страница 6: ...e risk of burns ignition of flammable materials and spillage due to unintentional contact with the utensil the handle of a utensil should be positioned so that it is turned inward and does not extend...

Страница 7: ...to the Technical Sheets or toll free technical support line to recieve technical assistance from authorized service technicians General Information Cooking Nomenclature J E C 0 5 3 6 A D W Brand A Am...

Страница 8: ...enn Air product call 1 800 536 6247 or visit the Web Site at www jennair com For product in Canada call 1 800 688 2002 or visit the Web Site at www jennair com Warranty service must be performed by an...

Страница 9: ...2004 Maytag Services 16023537 9 General Information Glass Top Assembly Surface Elements Surface Controls Burner Box Surface Elements Surface Elements Cooktop Description...

Страница 10: ...alarm Hardware watchdog error power board Replace power board 3 LEDs flash electronic control locked 1 audible beep Redundant OFF key input line is not operating properly control board Replace control...

Страница 11: ...ic operation of surface elements Loose or broken wiring Check wiring against appropriate wiring diagram Verify all terminals and connections are correct and tight Indicator light remains on when contr...

Страница 12: ...A Glass ceramic heater panels are slightly opaque Element may transfer a glow through a panel This is NOT a defect and has no effect on performance Performance on surface element is poor Warped pots...

Страница 13: ...W 9 6 Dual element 3000 W 12 9 6 Triple element Ribbon radiant elements Remove one wire lead from element and measure resistance of element Dual element 1400 1600 3000 W Triple element 1050 2200 2700...

Страница 14: ...4 16023537 2004 Maytag Services Illustration Component Test Procedure Results Control Right Rear Fan Right Front Left Rear Left Front Center L1 L2 L1 L2 L1 L2 L1 L2 L1 L2 J11 J12 J6 J5 J4 Control surf...

Страница 15: ...ensor to element 4 Disconnect wiring to sensor 5 Replace sensor and reverse procedure to reinstall Limiter Replacement Dual Element Only 1 Remove main top see Main Top Removal procedure 2 Remove screw...

Страница 16: ...r to cooktop before servicing unless testing requires power Cooktop Disassembly Glass Top Assembly Element Element Element Element Element Cooling Fan Snap Acting Thermostat Bottom Baffle Heat Shield...

Страница 17: ...2004 Maytag Services 16023537 A 1 Appendix A...

Страница 18: ...re to ground in accordance with local code Connect the white neutral to the service neutral Connect all wires to the branch circuit with approved connectors Use copper or aluminum wire If aluminum wir...

Страница 19: ...4 Wire Electrical Installation United States or Canada Only Installation Instructions Notice To Installer Follow accompanying instruction carefully CAUTION Never use a metal blade to pry knob off If...

Страница 20: ...0536 FIVE ELEMENT RADIANT COOKTOPS JEC0530 FOUR ELEMENT RADIANT COOKTOPS IMPORTANT SAVE FOR THE LOCAL ELECTRICAL INSPECTOR S USE IMPORTANT Installation should be performed only by an authorized Jenn A...

Страница 21: ...2004 Maytag Services 16023537 B 1 Appendix B...

Страница 22: ...2 Left front element 3 Center element warming element 4 Right front element custom control element 5 Right rear element 1 Left front element 2 Left rear element cook and warm 3 Center element triple...

Страница 23: ...o bring liquid to a boil Always reduce setting to a lower heat when liquids begin to boil or foods begin to cook 6 8 Use to brown meat heat oil for deep fat medium high frying or sauteing Maintain fas...

Страница 24: ...ng area to cool to the Ultra Lo Warm temperature setting Triple Element select models The Triple Element located in the center position offers three different element sizes to accommodate different pa...

Страница 25: ...Plastic may melt on to the surface and be very difficult to clean Use only cookware and dishes recommended as safe for cooktop use Always use potholders when removing food from the Warming Center as c...

Страница 26: ...nd Cooktop Cleaning Creme Hold a razor blade scraper at 30 angle and scrape any remaining soil Then clean as described above NOTE Do not use the razor blade for daily cleaning as it may wear the patte...

Отзывы: