


To raise the footrest, lift it upwards, it will lock automa-
tically. The footrest can be extended by pulling out the
plastic footrest and fixing it in the corresponding holes
(Photo no. 18 a,b,c).
16. ADJUSTING THE SAFETY BELT (SEAT)
The seat is equipped with a 5-point safety belt. Use it
from the moment when the baby starts to sit on their
own. Undo belts, removing the fork from the central
buckle, place the child in the seat, adjust the length of the
belt by means of brackets, so that they fit the child’s body
but are not too tight, then plug the fork back into the
central belt buckle (Photo no. 19). To remove the belt,
open the flap in the rear of the backrest, then pull the
buckles located at the ends of the belt through the holes
in the backrest. This is the way to dismantle the belts
positioned above the child’s shoulders. Lap belts are
fixed in place and they cannot be dismantled. If we want
to dismantle one of the elements of the cover of the seat,
dismantle the shoulder straps and drag the entire belt
with the buckle through the hole in the seat cover. The
seat belt has an additional crotch belt, which is fastened
around the railing using press-studs. This is an additional
element, and does not exempt from the application of the
5-point safety belt.
WARNING
! Always use seat belts when the child is able
to sit independently.
17. REMOVAL OF SEAT COVER
Dismantling is performed by first removing the hood
(Pos. 11) and removing the 5-point belt (paragraph 16).
The next step is taking off the material of the seat, by
removing the 4 elastic bands located in the bottom of the
seat (Photo no. 20 a,b), which hold the material in place.
Then remove the material of the seat, by sliding it from
the slots located around the seat backrest (Photo no.21 a,b).
WARNING
! When putting on the material of the seat, pay
attention that the retaining elastic bands do not get into
the backrest folding mechanism (Photo no .22 a,b).
18. HANDLE HEIGHT ADJUSTMENT
Simultaneously press the two buttons on both sides of
the inside of the handle and move the handle to increase
or decrease its height accordingly. (Photo no. 23)
19. UNFOLDING OF THE STROLLER
WARNING! In order to unfold the frame, one should
dismantle the carry cot or the seat, unfold the mechanism
of central plugging (photo 24 a,b) and put the handle so
that it sticks to the frame’s profile. (photo 25)
WARNING!
Stroller must always be collapsed with the
front wheels unlocked.
Then, one should unfold the frame by pressing the button
on the handle for carrying the frame ( photo 26)
In order to further reduce the size of the stroller before
starting the collapsing procedure, remove the wheels.
20. RAIN COVER
The stroller is equipped with a rainproof cover with vents,
for both the carry cot and the seat. To mount it, slide one
end onto to the hood, and the other onto the carry cot
(from the side of the lever).
21. MOSQUITO NET
The carry cot and the seat are equipped with a mosquito
net; to mount it, slide one end (marked INSERT) onto
the hood and attach it with press-studs located on both
sides, then hook the other end of the mosquito net to the
carry cot or the footrest of the seat.
22. CAR SEAT INSTALLATION
The stroller is also manufactured in a version with a car
seat, for children weighing from 0 to 13 kg. In order to
install the car seat, first put the adapters on the stroller
chassis, plugging them identically as for the carry cot,
then mount the seat on the adapter. It plugs in automa-
tically.
WARNING!
Before using the seat, make sure that the
adapters are properly mounted.
In order to unplug the adapters, press the button on the
side of the seat, repeat for the other side.
WARNING!
The car seat, used together with the chassis, does not
replace a crib or bed; should the child needed to sleep,
it is recommended to place it in a proper carry cot, crib
or bed.
With the use of brand adaptors, the following baby seats
can be installed on a TRIM stroller:
1. The MM Adapter
-Maxi – Cosi : Cabriofix, Citi, Pebble
-Cybex: Aton 3, Aton 4, CBX
-Kiddy: Evolution Pro2,Evo- Lunafix
-Safety 1st : Mimas
-Recaro: Privia
- Avionaut:Ultralite , Kite
2. The MR Adapter
- Römer: Baby Safe Plus, Baby Safe Plus SHR II
Содержание LARK
Страница 1: ...LARK...
Страница 2: ......
Страница 3: ...LARK...
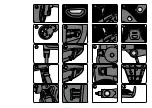
Страница 22: ...EN 1888 2012 TRIM TRIM 6 0 15 3 2 9 JEDO...
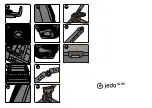
Страница 23: ...1 2 3 4 PCV 5 6 0 14 0 17 MPa 7 8 9 1 J droch JEDO 24 2 3 4 14 5 6 7 8 9 10 PCV 11...
Страница 24: ...1 2 1 2 10 4 3 3 5 4 6 5 T R 6 7 7 8 a b 8 9 9 10 4 11 10 11 12 13 12 14 15 A 15 B 13...
Страница 27: ......
Страница 28: ......
Страница 29: ......
Страница 30: ......


