

Quick Installation Guide
Get Started
Easy as One, Two, Three
Step 1: Getting Start
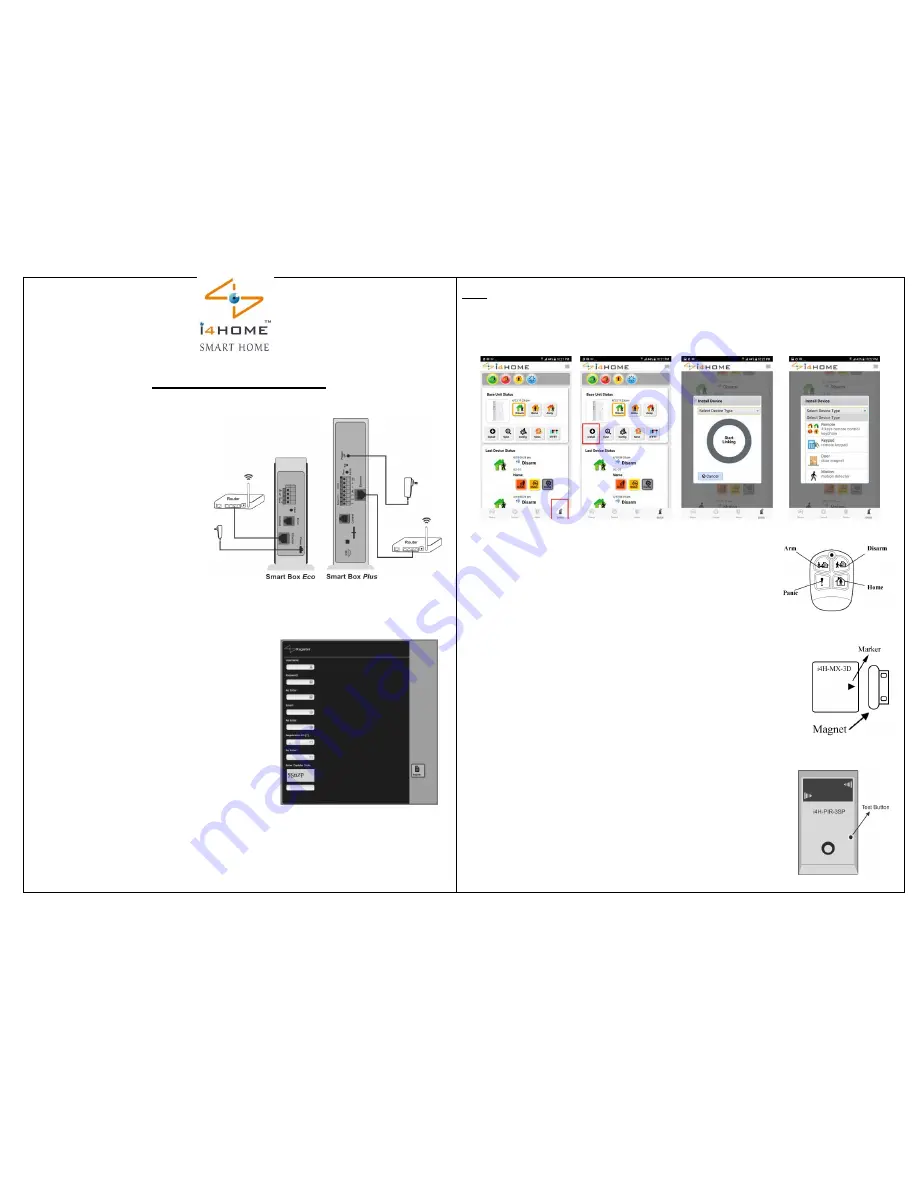
Install the Smart Box:
Ethernet Version:
Connect the i4Home Smart Box to your router
and into your wall outlet according
to the picture provided.
Then wait for the booting process to finish
(it will automatically boot, and should take less than 1 minute)
You will know the booting process is finished
when the green LED light flashes slowly
Wi-Fi Version:
Please refer to the Wi-Fi Adaptor Settings guide
Step 2. to add sensors or any device to i4Home app of your Smart box
Press “Device” button from i4Home App and then press “Install” button
You will hear Buzzer beeps from the Smart Box and all LEDs blink simultaneously
(This means the system is ready for adding device within 30 second)
Then select your “Device Type” according to the device you want to enroll it
- Remote Control: i4H-RC-3
1- Apply Step 2 and set the device type to “Remote”
2- Press the Disarm button of the RC-3 for two seconds.
You will hear 3 short beeps and your device added successfully
Now you can press any button to check the R/C in the i4Home App’s Status
Remarks:
- If you will hear one long beep after 30 seconds that means the adding failed, so you have to repeat enrolling action again
- Avoid activating any other sensors during the 30 seconds Device Enroll period
- Door/Window Sensor: i4H-MX-3D
Open the case and insert a 3V CR-2032 Lithium battery
1- Apply Step 2 and set the device type to “Door”
2- Within 30 seconds place the small magnet piece closely
to the mark of the transmitter, or place it away from the transmitter if they are close originally.
You will hear 3 short beeps and your device is added successfully
Now you can
move the magnet back and forth to check it
in the i4Home App’s Status
Remarks:
- If you will hear one long beep after 30 seconds that means the adding failed, so you have to repeat enrolling action again
- Avoid activating any other sensors during the 30 seconds Device Enroll period
-
Motion Sensor: i4H-PIR-3SP
Loosen the screw at the bottom of the motion sensor, and then remove the front cover.
Insert two AA alkaline batteries and keep it open to be able to add it to the Smart Box
1-
Apply Step 2 and set the device type to “Motion”
2- Within 30 seconds, press the TEST button on the motion sensor board
You will hear 3 short beeps and your device is added successfully
Now you can press the test button again to check it in the i4Home App’s Status
Then you can close the sensor front cover
Page 2
Download i4Home App:
- Download “i4Home” application from your smartphone’s App
store (Google Play or Apple Store)
Your registration ID Serial number is located on the back of the
Smart Box and make a note of it as it will be required when
registering your device online.
- Launch i4Home App, and register your Smart Box using the
registration form (Register Button) and then you will receive a
confirmation email to activate your account
Ensure that you have enabled push notifications option on your
smartphone
- Login in to i4Home app using your username and password
Step 2: Adding your Sensors: (Enroll Devices)
Before adding any new device, you have to insert
Batteries to device or connect it to the power supply.
It is recommended to bring device closer to Smart Box
Page 1


