background image

113

112

1

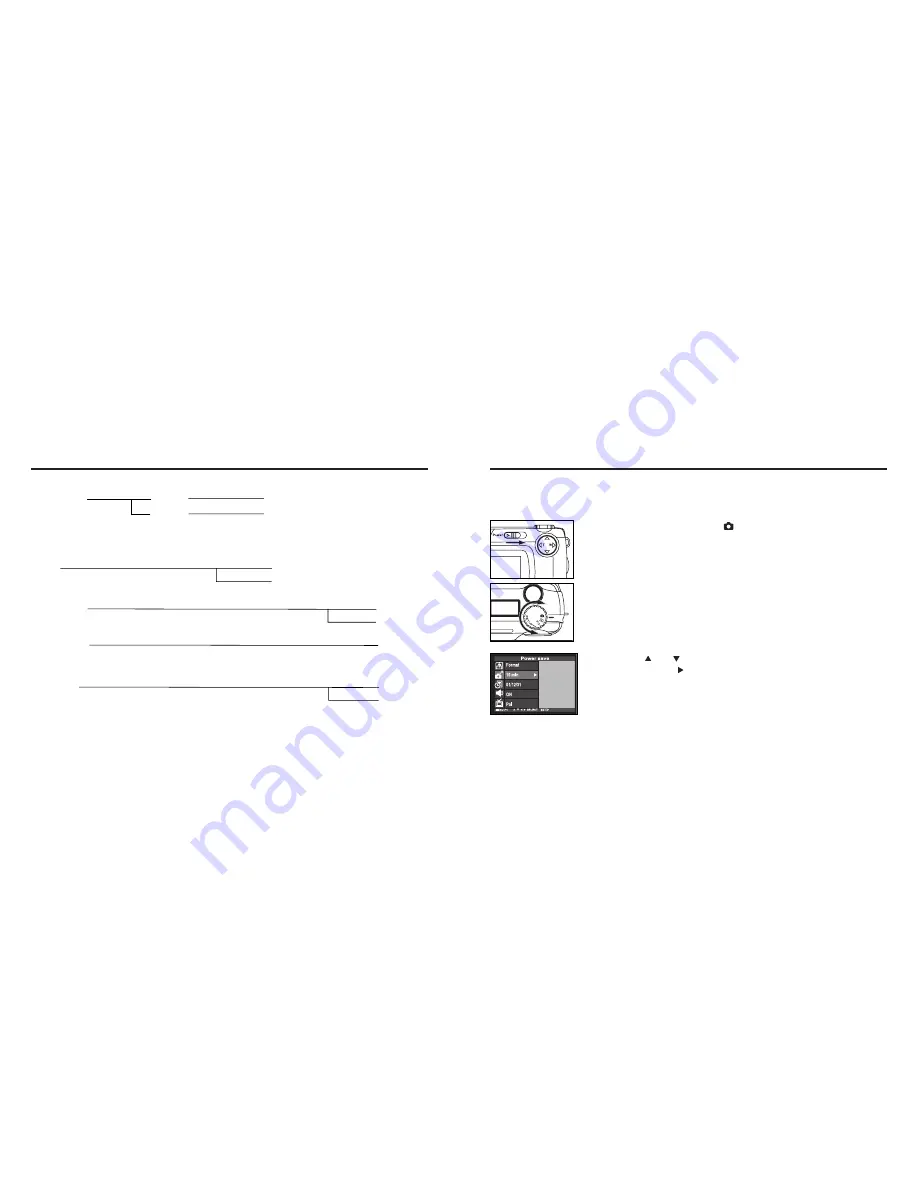
1 Rotate the function dial to       and slide the power switch

to turn on the camera.

• The power switch returns to the initial position.

2

2 Rotate the function dial to "SETUP".

• The setup mode menu is displayed on the LCD monitor as shown in the fig-

ure.

3

3 Press the      or       key so that [POWER SAVE] is highlight-

ed and press the      key.

SPECIFYING THE TIME FOR THE AUTO POWER OFF FUNCTION

To save the battery power, this camera will be turned off automatically if it is not operated more than 3

minutes. (Auto Power Off function) The time for the auto power off function is set to 3 minutes unless

you change the setting after you purchase this camera.

Continued on Next page

THE SETUP MODE MENU DISPLAY - CONT'D

NO

YES

DATE/TIME

(For setting or correcting

the date and time, see

page 117)

DATE

TIME

YYYY/MM/DD

HH:MM

BEEP

(For turning on or off the beep, see page 120)

ON (The beep sounds.)

OFF (The beep does not sound.)

VIDEO OUT

(For switching the video signal from the video-out terminal, see page 122)

PAL

NTSC

LANGUAGE

(For switching the language displayed on the LCD monitor, see page 124)

ENGLISH

DEFAULT

(For resetting the camera, see page 126)

Содержание 4100Z3

Страница 1: ......

Страница 2: ...enjoy all its features This mark on your camera certifies that this camera meets the requirements of the EU European Union concerning interference causing equipment regulations CE stands for Conformi...

Страница 3: ...ell heat or smoke Do not walk while looking at the monitor Do not disassemble Electric shock may occur if a high voltage circuit inside the camera is touched Take your camera to a JENOPTIK Service Fac...

Страница 4: ...ISTANCE IN THE AUTOFOCUS MODE Minimum Focus Distance 35 THE SUBJECT THAT IS DIFFICULT TO FOCUS IN THE AUTOFOCUS MODE 36 WHEN THE SUBJECT IS NOT IN THE CENTER OF THE FRAME Focus Lock Function 37 ADJUST...

Страница 5: ...ERMINAL 122 SWITCHING THE LANGUAGE DISPLAYED ON THE LCD MONITOR 124 RESETTING TO THE DEFAULT SETTINGS 126 CONNECTING TO THE PERSONAL COMPUER CONNECTING TO THE PERSONAL COMPUTER 130 Edition 130 For Win...

Страница 6: ...11 10 NAMES OF PARTS NAMES OF PARTS CAMERA BODY Do not touch...

Страница 7: ...record DATA PANEL The following diagram shows all items displayed to aid the explanation Battery condition indicator Self timer indicator Number display of recordable remaining frame No card indicato...

Страница 8: ...ow the subject is too dark or too close Or the subject is too far in the close up mode Blinks slowly about 2 times in a second The image is being recorded in the CF Compact Flash card The camera reads...

Страница 9: ...r viewfinder 5 5 Press the shutter release button part way down When the image is focused the focus lamp green lights up 4 4 Adjust the image range and size with the four way keys When the key is pres...

Страница 10: ...last is displayed on the LCD monitor 3 3 When the or key is pressed the image changes to the next or previous one respectively DELETING IMAGES See page 88 for details 1 1 Display the image to be dele...

Страница 11: ...itor and the display to conform whether you delete the image or not appears as shown in the figure QUICK REFERENCES CONT D 6 6 To complete the operation of deleting an image after con firming that NO...

Страница 12: ...he camera You may skip this step when inserting the batteries for the first time after a purchase 2 2 Slide the battery chamber door slightly in the 1 direction and open it in the 2 direction 3 3 Inse...

Страница 13: ...ck that the batteries are installed with a correct polarity When nothing is displayed even though the batteries are installed correctly replace the batteries with new ones INSERTING THE BATTERIES CONT...

Страница 14: ...tomatically if it is not operated more than 3 minutes Auto Power Off function To operate the camera slide the power switch to turn on the camera again When using the batteries the time for the auto po...

Страница 15: ...hot Keep the CF card in the protection bag supplied with the card 5 5 Close the card slot door until it clicks 3 3 Fold the card release lever down as shown in the figure Be sure to fold the lever Oth...

Страница 16: ...LCD please press once 3 3 Determine the image composition while looking into LCD monitor or viewfinder When holding the camera be sure not to cover the lens with your fingers and so on When the focus...

Страница 17: ...fixing the camera on the tripod 6 6 Press the shutter release button the rest of the way down If the flash lamp orange blinks when the shutter release button is pressed all the way down the flash is b...

Страница 18: ...farther than 40 cm in the close up mode Refer to the followings FOCUS DISTANCE IN THE AUTOFOCUS MODE Minimum Focus Distance The focus distance in the autofocus mode is described on the list below When...

Страница 19: ...e way down to take a picture ADJUSTING THE FOCUS CONT D THE SUBJECT THAT IS DIFFICULT TO FOCUS IN THE AUTOFOCUS MODE The autofocus mode uses the image contrast the difference of light and dark parts o...

Страница 20: ...distance 7 Press the shutter release button all the way down to take picture Even after taking a picture the manual focus mode is not cancelled The aut ofocus mode returned when the camera is turned...

Страница 21: ...ight level is low or the subject is backlit The flash fires every time a picture is taken regardless of the brightness Select this mode to reduce the harsh shadows when you take the picture outdoor an...

Страница 22: ...f and on again Flash Lamp The flash lamp orange shows the flash status The flash rdady for fires The flash is being charged The shutter release button is not released The shutter speed becomes slow Ta...

Страница 23: ...maximum number of images that can be captured at a time in follows mage quality The maximum number of the pictures as a guide 2272X1704 size 1600X1200 size FINE Fine about 2 pictures about 6 pictures...

Страница 24: ...ge and size with the or key When the key is pressed the image size becomes large Telephoto mode When the key is pressed the image range becomes wide Wide angle mode 7 7 Press the shutter release butto...

Страница 25: ...After taking the self timer shot the single shot mode returns Do not press the shutter release button when standing in front of the camera The camera cannot adjust the focus To interrupt the self time...

Страница 26: ...al zoom function is trimmed in 640 X 480 pixels Therefore the recorded image is smaller when displaying it on your computer or printing out it with fixing the print resolution DIGITAL ZOOM The digital...

Страница 27: ...s the or key so that FOCUSING is highlighted and press the key 3 Press the or key so that FOCUS is highlighted and press the key CLOSE UP CONT D 5 Press the MENU button is displayed on the upper right...

Страница 28: ...is a difference between the image range through the viewfinder and the actual one in the close up mode We recommend you to use the LCD monitor when you determine the image composition We recommend you...

Страница 29: ...on the camera again When the image to be captured is whitish increase the exposure compensation value so that the white part can be easily represented on the other hand when the image to be captured i...

Страница 30: ...r THE RECORDING MODE MENU ITEMS FLASH For the Flash mode see page 41 FOCUSING For the Focus mode see page 35 Auto Auto focus CLOSE UP Close up shot MANUAL Manual focus Auto flash Fill flash Flash canc...

Страница 31: ...3 2 1 0 dark EV MODE CENTRAL FALL SPOT AUTO Auto setting Daylight Light bulb Fluorescent DRIVE MODE For the Drive mode see page 65 WHITE BALANCE For the White Balance see page 69 QUALITY For the Imag...

Страница 32: ...parentheses are the values when the image size is set to The compression rate The image recording format The image file size The recordable number of the image using the CF card of 8 MB Fine about 1...

Страница 33: ...ber of images which can be recorded in the card Selecting in particular may considerably reduce the remaining number of imaged We recommend you to check the number display of recordable remaining flam...

Страница 34: ...ize mode affects the remaining number of images which can be recorded in the card We recommend you to check the number display of recordable remaining frame on the data panel when you change the image...

Страница 35: ...light Light bulb mode Select this mode when taking the picture of the subject illuminated by an incandescent light or tungsten light Fluorescent mode Select this mode when taking the picture of the su...

Страница 36: ...he LCD monitor see page 34 However when NORMAL is selected no display appears on the LCD monitor 2 Press the or key so that SHARPNESS is highlighted and press the key 1 Rotate the function dial to and...

Страница 37: ...ra settings are reset to the default The LCD monitor display return to the recording mode menu This allows you reset this camera s RECORDING MODE to the default at a time The camera settings The defau...

Страница 38: ...3 3 Press or key to display the desired image When the key is pressed the following image is displayed When the key is pressed the preceding image is displayed When the latest image last recorded is d...

Страница 39: ...ghted The ninth frame is the last displayed image in the figure above Recorded date and time of the image THE PLAYBACK MODE DISPLAY ON THE LCD MONITOR CONT D THE PLAYBACK MODE DISPLAY ON THE LCD MONIT...

Страница 40: ...onitor It is convenient when you search the desired image quickly 1 1 When the camera is set to the single frame play mode press the display button once or twice see page 76 When the image information...

Страница 41: ...yed in 640 x480 pixels on the LCD monitor 4 4 Press the or key to scroll the magnified image The image moves slightly in the direction of the key you press The image keeps moving while the key is held...

Страница 42: ...emporarily the playback mode menu is displayed on the LCD monitor 82 The images can be played back continuously on the LCD monitor like an automatic slide show TO START THE SLIDE SHOW SLIDE SHOW 1 1 R...

Страница 43: ...Rotate the function dial to and press the MENU button 2 2 Press the or key so that SLIDE SHOW is highlighted 3 3 Press the or key so that TIME is highlighted and press key Continued on Next page 4 4 P...

Страница 44: ...to The function dial can be rotated even when the camera is turned on 2 When the camera is not turned on slide the power switch to turn on the camera The power switch returns to the initial position...

Страница 45: ...firm press the The LCD monitor display returns to the playback menu 1 10 0 Press the MENU button The LCD monitor display returns to the playback mode DELETING SELECTED IMAGES CONT D 4 4 Press the MENU...

Страница 46: ...th this camera can be all deleted Even if you insert the CF card in which the images captured with other camera is record ed the images cannot be deleted DELETING ALL IMAGES All images recorded in thi...

Страница 47: ...ss key 5 5 Press the key so that FOLDER is highlighted and press the key DELETING FOLDERS Delete the folder and all images in the folder CAUTION As the deleted folder cannot be recovered be careful wh...

Страница 48: ...y displayed in the background ADJUSTING THE BRIGHTNESS OF THE LCD MONITOR CONT D 1 1 Rotate the function dial to and press the MENU button ADJUSTING THE BRIGHTNESS OF THE LCD MONITOR This allows you t...

Страница 49: ...EMS AND EACH SETTINGS DELETE For deleting images see page 87 ZOOM For the zoom play mode see page80 SLIDE SHOW For the slide show mode see page 82 SELECT IMAGE DELETE ALL IMAGES FOLDER YES NO YES NO Y...

Страница 50: ...Canon Inc Fuji Photo Film co Ltd and Matsushita Electric Industrial Co Led for direct printing form digital camera This camera does not support DPOF Version 1 10 which is released in July 2000 SPECIF...

Страница 51: ...lowing 6 frames are diaplayed When the seventh frame is selected and the key is pressed the preced ing 6 frames are displayed SPECIFYING THE PRINT SETTINGS WITH THE DPOF CONT D 6 6 Repeat step 4 4 and...

Страница 52: ...nd press the MENU button The playback mode menu is displayed on the LCD monitor 2 Press the or key so that PRINT is highlighted and press key 3 Press the key so that INDEX is highlighted and press key...

Страница 53: ...der and the 10000th file is recorded with the file name of SIMG0001 jpg in the 101sk410 folder There will be two folders for the images in one CF card if you capture more than 10000 images You can sel...

Страница 54: ...aracter arbitrary FOLDER NAME CONT D Even if other digital camera supporting the DCF format is used to record the captured images in the CF card you can insert the CF card into this camera and play ba...

Страница 55: ...era can be played back on the LCD monitor of other digital camera The images captured with some digital cameras can be printed out from a printer A recording media such as a CF card or SmartMediaTM ca...

Страница 56: ...age 115 NO YES THE SETUP MODE MENU DISPLAY ON THE LCD MONITOR POWER SAVE For the time for the auto power off function see page 113 30 min 30 minutes 10 min 10 minutes 5 min 5 minutes 3 min 3 minutes 1...

Страница 57: ...not operated more than 3 minutes Auto Power Off function The time for the auto power off function is set to 3 minutes unless you change the setting after you purchase this camera Continued on Next pa...

Страница 58: ...POWER OFF FUNCTION CONT D 4 4 Press the or key so that the desired time for the auto power off function is highlighted The time for the auto power off function changes in the following order 5 5 Press...

Страница 59: ...camera The power switch returns to the initial position 2 2 Rotate the function dial to SETUP The setup mode menu is displayed on the LCD monitor as shown in the figure Continued on Next page FORMATT...

Страница 60: ...hold the or key the value goes fastforward or fastbackward SETTING THE DATE TIME CONT D Continued on Next page 3 3 Press the or key so that DATE TIME is highlighted and press the key The display to s...

Страница 61: ...F The beep does not sound SETTING THE BEEP SOUND The beep sounds each time you operate this camera with the buttons or function dial and you can turn off or on the beep The beep is turned on unless yo...

Страница 62: ...OUTPUT TERMINAL As this camera has the video out terminal you can watch the captured images on TV by connecting this camera to your TV with the supplied video cable The video output signal can be swi...

Страница 63: ...MONITOR SWITCHING THE LANGUAGE DISPLAYED ON THE LCD MONITOR The language displayed on the LCD monitor can be switched to English 1 1 Rotate the function dial to and slide the power switch to turn on t...

Страница 64: ...ngs Delete see page 87 Slide show Time see page 85 Slide show Direction see page 85 Print see page 99 Folders see page 105 LCD see page 94 The Camera Setup settings Power save see page 113 Beep sound...

Страница 65: ...s are reset to the default The LCD monitor display returns to the setup mode menu 3 3 Press the or key so that DEFAULT is highlighted and press the key The display to confirm whether you reset the cam...

Страница 66: ...98 98 SE ME 2000 1 Insert installation CD ROM 2 Digital camera is power on and ready 3 Pulg in USB line Window will find new hardware 4 Press Next button Caution Be disconnect the camera to your comp...

Страница 67: ...1 Select appropriate driver for your operation system 2 Double click icon for installation 132 INSTALLATION OF THE DRIVER AND DRIVER SOFTWARE 7 Window find digital camera device press Next button 8 C...

Страница 68: ...ER CONT D 4 Click the install button to install 5 Look the warning message then click the con tinue botton If you want to leave please click cancel to leave 3 When Welcome dialog box appers click Cont...

Страница 69: ...ay of writing even when the display on the computer shows that copying is finished As the data is transferred for a while even after the copying message disappears do not turn off the power of the cam...

Страница 70: ...e software CPU OS Memory Hard disk space Monitor CD ROM drive 68040 or later processor or better or Macintosh or Power Macintosh Mac OS 8 6 OS9 32MB RAM or higher 110 MB or more of available hard disk...

Страница 71: ...lly select Start Run and input D ENGLISH NSTALL SETUP EXE in the box of Open when your CD ROM drive is the D drive and click OK Installing to the Apple Macintosh 1 Turn on the computer and start up Ma...

Страница 72: ...on the LCD monitor Rotate the function dial to and slide the power switch to turn on the camera 31 32 The image is recorded in the CF card Wait until the recording is completed and the focus lamp gre...

Страница 73: ...on the LCD monitor The auto power off function acti vates Is the focus lamp green blinks slowly about 2 times in a second and PLAY BACK blinks on the LCD monitor Did you take a picture within the flas...

Страница 74: ...f and the camera can not function The recorded image file is damaged The camera does not function correctly due to the strong static electricity etc Check Did you take a picture with the digi tal zoom...

Страница 75: ...formed In this case buy a new card Do not touch the electrical contacts of the card with your fingers or a metal object Keep away from heat moisture and direct sunlight Keep away from small children W...

Страница 76: ...ke sure it is functioning properly before using Before Important Events such as a Wedding Ceremony Overseas Travel We recommend you to check the camera s operation beforehand or take test pictures and...

Страница 77: ...d 153 152 TECHNICAL DETAILS CONT D Autofocus System AF system by CCD Focus locked when the shutter release button is pressed halfway Focus mode One shot AF Manual Focus Avaliable operated with and key...

Страница 78: ...night mode Flash intensity control Adjusted automatically by an external light Interface Video output Compositevideo signal switchable between NTSC and PAL PC interface USB port Power Supply Batteries...

Отзывы: