background image

Configuration

Configuring the Receiver

35

www.javad.com


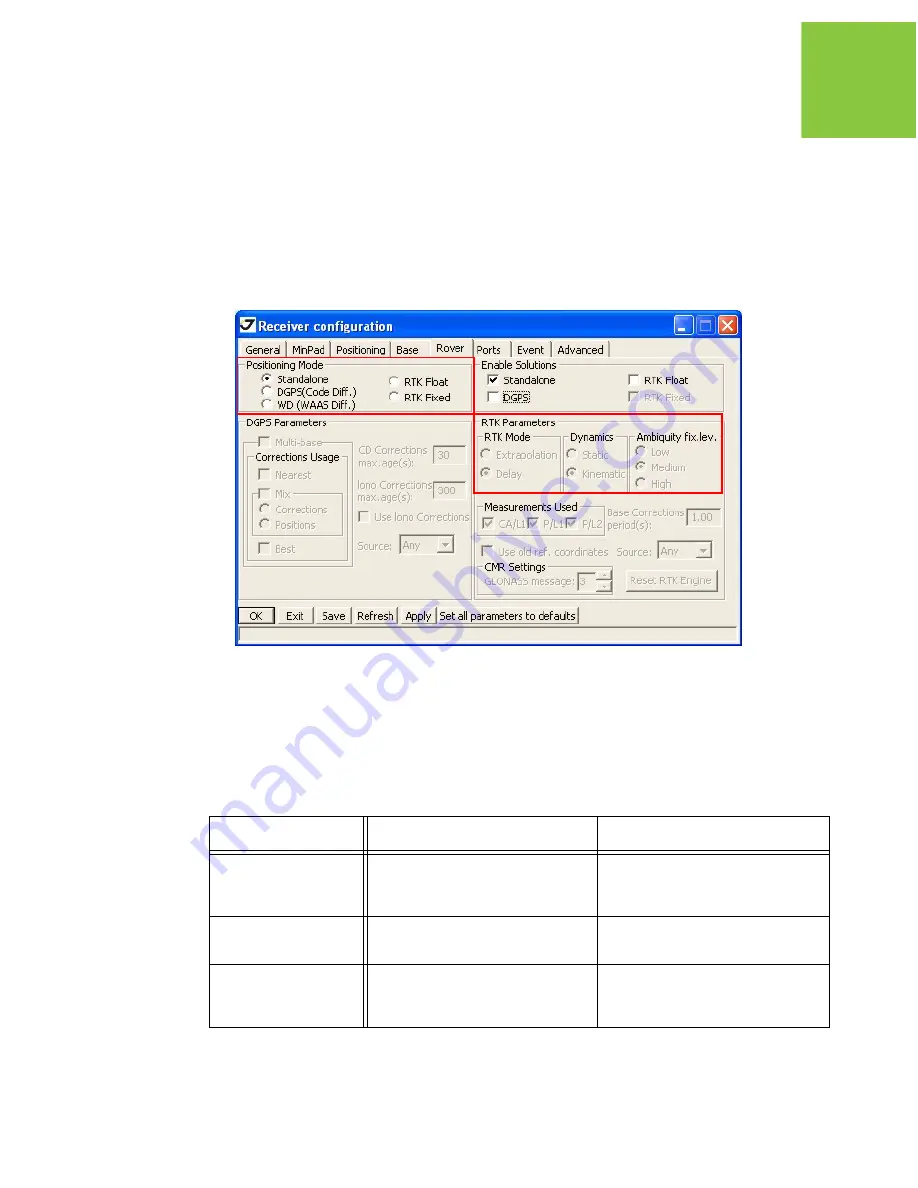
• RTK Parameters, Dynamics – select Static or Kinematic.

• RTK Parameters, Ambiguity fixing level – (not applicable to RTK Float) select either Low,

Medium, or High for indicator states of 95%, 99.5%, or 99.9%, respectively. The RTK
engine uses the ambiguity fix indicator when making decisions whether or not to fix
ambiguities. The higher the specified confidence level, the longer the integer ambiguity
search time.

Figure 3-6. Rover Configuration

9. For RTK measurings, click the Ports tab and set the following port parameters for the

serial port (Table 3-6), then click Apply (Figure 3-7 on page 36).

Note:

For post-processed measurings, keep the default values for these parameters.

Table 3-2. Receiver Parameters for the Ports Tab

Parameter

Base Receiver

Rover Receiver

Input

n/a (Leave the default.)

Select the same differential 
correction format selected for the 
Base.

Output

Select the type and format of 
differential corrections.

Select “None”.

Period (sec)

Enter the interval at which the 
receiver will transmit differential 
corrections.

n/a (Leave the default.)

Содержание DELTA

Страница 1: ...served The information contained herein may not be used accessed copied stored displayed sold modified published or distributed or otherwise reproduced without express written consent from JAVAD GNSS DELTA GNSS Receiver Operator s Manual Version 1 4 Last Revised May 4 2009 ...

Страница 2: ...www javad com ...

Страница 3: ...g Absolute Positions 17 1 1 3 Calculating Differential Positions 17 1 1 4 Essential Components for Quality Measuring 18 1 2 Getting Acquainted 19 1 2 1 DELTA Receiver 19 TriPad 19 Data and Power Ports 20 Connectors 21 1 2 2 Cables 21 1 2 3 Literature 22 1 2 4 Storage Precautions 22 1 3 Option Authorization File OAF 22 Chapter 2 Pre measuring Preparation 23 2 1 Installing JAVAD GNSS Software 23 2 2...

Страница 4: ...1 Angle messages 42 3 3 TriPad Configuration 43 Chapter 4 Setup and Measuring 49 4 1 Receiver Setup 49 4 1 1 External Antenna Setup 49 4 1 2 Measure Antenna Height 50 4 2 TriPad Operation 51 4 3 Static Measuring for Base Stations 51 4 4 Kinematic Stop Go Measuring for Rover Stations 52 4 5 Real Time Kinematic Measuring 53 Chapter 5 Receiver and File Maintenance 55 5 1 Downloading Files to a Comput...

Страница 5: ... Receiver Specifications 77 A 1 1 General Details 77 A 1 2 GNSS Board Details 81 A 2 Connector Specifications 82 Power Connector 82 Serial RS 232C Connector 83 USB Connector 84 Ethernet Connector 85 RS422 and CAN Connector 86 GNSS External Antenna RF Connector 86 EVENT and 1PPS Connectors Optional 86 Appendix B Safety Warnings 87 General Warnings 88 Power Supply 88 Usage Warnings 89 Appendix C War...

Страница 6: ...6 www javad com ...

Страница 7: ...rks of sell modify publish distribute or allow any third party access to any graphics content information or data in this Manual without JAVAD GNSS express written consent and may only use such information for the care and operation of your DELTA The information and data in this Manual are a valuable asset of JAVAD GNSS and are developed by the expenditure of considerable work time and money and a...

Страница 8: ...nate the license at any time by destroying the Software and Manual JAVAD GNSS may terminate the license if you fail to comply with any of the Terms or Conditions You agree to destroy the Software and manual upon termination of your use of the DELTA receiver All ownership copyright and other intellectual property rights in and to the Software belong to JAVAD GNSS If these license terms are not acce...

Страница 9: ...nditions will be governed by and construed in accordance with the laws of the State of California without reference to conflict of laws WEEE Directive The following information is for EU member states only The use of the symbol indicates that this product may not be treated as household waste By ensuring this product is disposed of correctly you will help prevent potential negative consequences fo...

Страница 10: ... presente JAVAD GNSS declara que el DELTA Receiver cumple con los requisitos esenciales y cualesquiera otras disposiciones aplicables o exigibles de la Directiva 1999 5 CE Ελληνική Greek ΜΕ ΤΗΝ ΠΑΡΟΥΣΑ JAVAD GNSS ΗΛΩΝΕΙ ΟΤΙ DELTA Receiver ΣΥΜΜΟΡΦΩΝΕΤΑΙ ΠΡΟΣ ΤΙΣ ΟΥΣΙΩ ΕΙΣ ΑΠΑΙΤΗΣΕΙΣ ΚΑΙ ΤΙΣ ΛΟΙΠΕΣ ΣΧΕΤΙΚΕΣ ΙΑΤΑΞΕΙΣ ΤΗΣ Ο ΗΓΙΑΣ 1999 5 ΕΚ Francais French Par la présente JAVAD GNSS déclare que l appar...

Страница 11: ...zjavlja da je ta DELTA Receiver v skladu z bistvenimi zahtevami in ostalimi relevantnimi doloèili direktive 1999 5 ES Slovensky Slovak JAVAD GNSS týmto vyhlasuje že DELTA Receiver spåòa základné požiadavky a všetky príslušné ustanovenia Smernice 1999 5 ES Suomi Finnish JAVAD GNSS vakuuttaa täten että DELTA Receiver tyyppinen laite on direktiivin 1999 5 EY oleellisten vaatimusten ja sitä koskevien ...

Страница 12: ...s Product Number 01 580300 01 01 580301 01 01 580302 01 01 58030X 01 Product Options All conforms to the following Product Specification Safety Low Voltage Directive 73 23 EEC IEC 60950 1999 3rd Edition EN 60950 1 2001 EMC Directive 89 336 EEC EN 301 489 1 EN 301 444 Supplementary Information The product herewith complies with the essential requirements of the directive 1999 5 EC of the European P...

Страница 13: ...injury DANGER UNDER NO CIRCUMSTANCES SHOULD THIS ACTION BE PERFORMED Screen Captures This manual includes sample screen captures Your actual screen can look slightly different from the sample screen due to the receiver you have connected operating system used and settings you have specified This is normal and not a cause for concern Example Description File Exit Click the File menu and click Exit ...

Страница 14: ...l support using the QUESTIONS system at the JAVAD GNSS World Wide Web site www javad com Return Material Authorization Initially the customer contacts support to report a problem Please refer to support Question section on www javad com If support determines the problem cannot be resolved over e mail internet it will authorize the return of the unit for repair or replacement depending on the natur...

Страница 15: ...ult jobsite conditions The GNSS component of DELTA receivers means you can access the GPS Global Positioning System satellites of the United States the Galileo an upcoming global positioning system maintained and operated by Galileo Industries and the GLONASS Global Navigation Satellite System satellites of the Russian Federation increasing the number of satellites your receiver can detect thus im...

Страница 16: ...n Ministry of Defense For information on the status of this system visit the Coordinational Scientific Information Center website http www glonasscenter ru frame_e html Galileo an upcoming global positioning system maintained and operated by Galileo Industries a joint venture of several European space agencies companies working closely with the European Space Agency Unlike GPS and GLONASS this is ...

Страница 17: ...tive coordinates with high accuracy DGPS accommodates various implementation techniques that can be classified according to the following criteria The type of GNSS measurements used either code phase differential measurements or carrier phase differential measurements If real time or post mission results required Real time applications can be further divided according to the source of differential...

Страница 18: ...ng quality position results requires the following elements Accuracy The accuracy of a position primarily depends upon the satellite geometry Geometric Dilution of Precision or GDOP and the measurement ranging errors Differential positioning DGPS and RTK strongly mitigates atmospheric and orbital errors and counteracts Selective Availability SA signals the US Department of Defense transmits with G...

Страница 19: ... LED will blink red When satellites are tracked the STAT LED will produce one blink for each tracked satellite green for GPS orange for GLONASS The On Off power button turns the receiver on and off Pressing the FN button for less than one second switches the receiver between different information modes normal and extended information or between static and dynamic post processing modes depending on...

Страница 20: ...the next three seconds Pressing the FN button for more than eight seconds has no impact After loading new firmware or clearing the receiver s NVRAM the receiver checks its internal file system During this operation the REC LED flashes orange and the file system is not accessible for CDU control display unit applications or for data recording This operation may require from fractions of a second to...

Страница 21: ...l The 1PPS and Event marker TNS connectors up to two optional External Frequency Input Output TNC connector optional 1 2 2 Cables The DELTA receiver package includes standard communication and power cables for configuring the receiver and providing a power source to the receiver Receiver to computer RS232 serial cable connects the receiver s serial port and an external device hand held controller ...

Страница 22: ... the instrument is completely dry before storing Dry the receiver with a soft clean cloth 1 3 Option Authorization File OAF JAVAD GNSS issues an Option Authorization File OAF to enable the specific options that customers purchase An Option Authorization File allows customers to customize and configure the DELTA receiver according to particular needs thus only purchasing those options needed Typica...

Страница 23: ...installing this software and other sections throughout the manual describe using this software with the receiver TriVU is a comprehensive Windows software product designed for controlling GNSS receivers developed by JAVAD GNSS Note Refer to the TriVU Software Manual for full details on installing and using TriVU Software 1 If downloading the program from the website extract the program files into ...

Страница 24: ...onnector Receiver to SAE power cable shall be used The external power supply needs to be Listed for US and Certified for EU countries it needs also to be a Limited Power Source and have an output rated for 4 5 35 V DC not less than 2A This may not be the same range as other JAVAD GNSS products with which you are familiar Note JAVAD GNSS recomends sertified Phihong power supply PSAA60W 120 JAVAD GN...

Страница 25: ...utton and DELTA will be turned ON when receiver is powered from external power supply Note Jumper is installed by default if DELTA ordered without TriPad 2 3 Connecting the Receiver and a Computer JAVAD GNSS TriVU software provides an interface for various configuration monitoring and management functions for the receiver To configure manage files or maintain the receiver connect the receiver and ...

Страница 26: ...rt A 2 Press the power buttons on the receiver and computer to turn them on 3 Connect to the desired configuration software TriVU Figure 2 2 Connection via RS 232 2 3 2 Establishing a USB Cable Connection Make sure the computer has JAVAD GNSS s USB driver installed available from www javad com before continuing 1 Using the USB cable connect the USB port on the receiver to a USB port on the compute...

Страница 27: ...Pre measuring Preparation Connecting the Receiver and a Computer Establishing a USB Cable Connection 27 www javad com 3 Connect to the desired configuration software TriVU Figure 2 3 Connection via USB ...

Страница 28: ...ly with a period of 2 5 minutes If the receiver has an almanac you can considerably reduce the time needed to search for and lock on to satellite signals The receiver regularly updates the almanac and ephemerides and stores the most recent versions in its Non Volatile Random Access Memory NVRAM 1 Set up the receiver in a location with a clear view of the sky 2 Turn on the receiver 3 Wait for about...

Страница 29: ...n algorithms to accurately calculate a new point In applications intended for post processing the receivers typically log code phase and or carrier phase measurements separately from common satellites and during the same time interval This data is then processed using post processing software for example Justin When configuring receivers for RTK measuring use the following list to ensure the recei...

Страница 30: ...osition A Rover acting as a repeater to re transmit RTK Base station measurements to other rover receivers extending the range of a GPS system To configure manage files or maintain the receiver connect the receiver and a computer using one of the following methods and start TriVU use an RS232 cable use a USB cable and a computer with the JAVAD GNSS USB driver installed available on the JAVAD GNSS ...

Страница 31: ...tion parameters as needed for your particular jobsite Note Do not make other changes without consulting the TriVU Software Manual 1 Connect the receiver and computer as described in Connecting the Receiver and a Computer on page 25 2 Start TriVU Select the COM port and click Ok Figure 3 1 Figure 3 1 Connection Parameters 3 Click Configuration Receiver Note Click Apply after making any configuratio...

Страница 32: ...re 3 2 Figure 3 2 Set all parameters to defaults 5 Click the MinPad tab and configure the following settings Table 3 1 then click Apply Figure 3 3 on page 33 Table 3 1 Receiver Parameters for the MinPad Tab Parameter Base Receiver Rover Receiver Recording interval Enter 15 seconds Elevation mask angle Enter 15 degrees File name prefix Enter a unique ID such as the last 3 digits of receiver s seria...

Страница 33: ...for data recording 6 Click the Positioning tab and set the Elevation mask to 15 Figure 3 4 then click Apply Figure 3 4 Configure Receiver Positioning Elevation Mask 7 For the Base receiver click the Base tab and set the following parameters Figure 3 5 on page 34 then click Apply GPS GLO at one time enable ...

Страница 34: ...ameters then click Apply Figure 3 6 on page 35 Positioning Mode For post processed measuring select Standalone for RTK Missourians select RTK float or RTK fixed RTK Parameters RTK mode select either Extrapolation for RTK float kinematic or Delay for RTK fixed static Extrapolation is for low latency high frequency output 5 Hz RTK applications The Rover will extrapolate the Base station s carrier ph...

Страница 35: ...earch time Figure 3 6 Rover Configuration 9 For RTK measurings click the Ports tab and set the following port parameters for the serial port Table 3 6 then click Apply Figure 3 7 on page 36 Note For post processed measurings keep the default values for these parameters Table 3 2 Receiver Parameters for the Ports Tab Parameter Base Receiver Rover Receiver Input n a Leave the default Select the same...

Страница 36: ...en the Multipath tab Set the following parameters and click Apply Figure 3 8 on page 37 Code multipath reduction enable Baud rate Select a baud rate to use for transmitting differential messages from the receiver board to the modem module The baud rate must match the modem s serial port speed RTS CTS Select to enable handshaking Parameter Base Receiver Rover Receiver ...

Страница 37: ...hange it using TriVU or clearing the NVRAM For more details on the settings available for configuring the Base and Rover receivers refer to the TriVU Software Manual 12 Continue with other configuration activities or click File Disconnect then File Exit to quit TriVU Disconnecting before exiting ensures proper port management Note Disconnect the receiver from TriVU before exiting to eliminate poss...

Страница 38: ...so that the manual refers to both 3 2 1 Hardware The unit has two antenna inputs a and b as shown in the figure below It can be considered as two independent receivers In this case the receivers will be denoted as a and b accordingly to antenna inputs Figure 3 9 Back panel Antenna connectors Any of communication ports on the front panel serial A and C USB Ethernet can be used for connection with t...

Страница 39: ...ow a brief description of the heading determination is given Heading and Pitch Angles Determination The local horizon frame is depicted inFigure 3 10 its axes are called North East and Up Figure 3 10 Local horizon coordinate frame Two angles that define orientation between antennas base line are available as shown in the Figure 3 11 The heading angle is the angle between the projection of the base...

Страница 40: ...e is the angle between the base line vector and the local horizon plane Figure 3 11 Local horizon coordinate frame Standalone Setup The standalone position of the antenna a or b is available along with two orientation angles Figure 3 12 Standalone operation of the unit North East Up Pitch Heading North a b ...

Страница 41: ...ntenna a In other words the antenna b is calculated as an RTK rover corrected from the moving base b Figure 3 13 Differentially corrected operation of the unit Unit Setup Let us suppose for example that the system should operate at 5 Hz The 10 Hz 20 Hz and 50 Hz cases are considered the same way 1 Setting of the standalone setup The following set of commands must be sent to the unit set rover mode...

Страница 42: ...o the listed above commands the input mode of one of the ports must be set For example if CMR corrections are received through the serial port c the setting set dev ser c imode cmr Angle messages The heading angle is available in the NMEA string message HDT which is activated by the command em nmea HDT The heading and pitch angles are available in the NMEA string message PTPSR ATT from the rover w...

Страница 43: ...m 3 3 TriPad Configuration The DELTA s simple user interface TriPad consists of two buttons Power and FN and up to six LEDs that control and display the receiver s operation Figure 3 14 Figure 3 14 DELTA TriPad The TriPad performs numerous functions Turn the receiver on off Turn data recording on or off FN button Show the status of satellites being tracked STAT LED Show data recording status REC L...

Страница 44: ... receiver and computer See Connecting the Receiver and a Computer on page 25 for this procedure 2 Start TriVU Select the COM port and click Ok Figure 3 1 Figure 3 15 Connection Parameters 3 Click the Configuration Receiver and open the MinPad tab Set the following parameters and click Apply See the following pages for descriptions of these parameters Recording interval on page 45 Elevation mask fo...

Страница 45: ...o when logging receiver data in AFRM mode Values are 1 86400 seconds The default value is one second Elevation Mask for Log File parameter This parameter specifies the minimum elevation angle for the satellites whose data will be put in the receiver files logged when pressing FN The default value is five degrees File Name Prefix parameter This parameter specifies what prefix will be added to the n...

Страница 46: ...ording to a user defined schedule The Period and Phase parameters specify this schedule File rotation launches the moment the receiver time module Period is equal to Phase More precisely a new log file opens immediately before the scheduled epoch causing data tagged with this epoch to be recorded to the new log file When opening a new log file the receiver enables the default set of messages outpu...

Страница 47: ... existing file in the following three cases After pressing the Power button to turn on the receiver After resetting the receiver with TriVU After taking the receiver out of Sleep Mode Before Power Failure Enabled Radio Button Results Off On Always 1 Receiver data logged to file specified Data logging will not resume when power is restored Receiver will resume data logging to the same file when pow...

Страница 48: ...Configuration TriPad Configuration How to Work with DELTAD G2 G2D 48 www javad com ...

Страница 49: ...rs the antenna height must be measured Before collecting data make sure the Base and Rover receivers contain a current almanac and current ephemeris data see Collecting Almanacs and Ephemerides on page 28 4 1 1 External Antenna Setup The DELTA receiver can be used with an external antenna Follow the steps below to connect an external antenna to DELTA and measure its offset 1 Attach the antenna to ...

Страница 50: ...the bottom of the receiver at the base of the mounting threads Slant measured from the marker to the lower edge of the antenna slant height measure mark SHMM located on both end panels of the receiver The point to which measuring with GNSS measures is called the Phase Center of the antenna This is analogous to the point at which a distance meter measures in a prism A user must enter the prism offs...

Страница 51: ...ta Recording Auto start parameter on page 63 for details Each time you turn off or on data recording either a new file opens or data appends to a particular file See Always Append to the File parameter on page 62 and Files Creation Mode parameter on page 62 for information on setting these functions To toggle between post processing modes press the FN button for less than 1 second when Occupation ...

Страница 52: ...rms Secondly dual frequency receivers need far less observation time to reach the desired accuracy requirement After the measuring completes data the receivers collect can be downloaded onto a computer and processed using post processing software for example JAVAD GNSS Justin 4 4 Kinematic Stop Go Measuring for Rover Stations In a kinematic stop and go measuring the stationary receiver Base statio...

Страница 53: ...a radio modem link the Base receiver transmits its measurement and location data to the Rover receiver The Rover based on the transmitted data and its own observation data immediately conducts a baseline analysis and outputs the results For specific settings used in RTK measurings see Configuring the Receiver on page 30 Usually the receiver will start to output the coordinates of the antenna s pha...

Страница 54: ...d correct messages dependent on the message type received Total number of received corrupt messages dependent on the message type received If the receiver is not for some reason receiving differential corrections or if none of the ports has been configured to receive differential corrections the LQ field will either be empty or it will look like this 100 999 0000 0000 ...

Страница 55: ...rovide appropriate functionality As JAVAD GNSS releases firmware updates loading these updates into the receiver will ensure that the receiver operates at its full potential 5 1 Downloading Files to a Computer When your measuring finishes you can download your measuring files to a computer for storage post processing or backup Also the DELTA memory holds a finite amount of files and information so...

Страница 56: ...ct the COM port and click Ok Figure 5 1 Figure 5 1 Connection Parameters 3 Click File File Manager then click the Download path tab on the File Manager dialog box 4 Navigate to or create using the Create button the folder in which to download and store files Figure 5 2 Figure 5 2 Download path tab ...

Страница 57: ...iles hold down the shift key and click on nonsequential files to select several files at once or hold down the Ctrl key and click on individual files Figure 5 3 Download Files 7 Click the Download button During the download status indicators display next to each file Figure 5 4 on page 58 Red indicator file currently downloading Green indicator file has successfully downloaded ...

Страница 58: ...e click Exit on the File Manager dialog box 9 Continue with other operations Or click File Disconnect then File Exit to quit TriVU 5 2 Deleting Files Use the following steps to delete files from your receiver 1 Connect your receiver and computer See Connecting the Receiver and a Computer on page 25 for this procedure ...

Страница 59: ...5 5 Connection Parameters 3 Click File File Manager and select the file s to delete on the Current log files tab Figure 5 6 Figure 5 6 Current log files tab 4 To select multiple files hold down the shift key and click on nonsequential files to select several files at once or hold down the Ctrl key and click on individual files ...

Страница 60: ...ote For a complete list of options and their details visit the JAVAD GNSS website You can check the status of your receiver s options and load any new OAFs using the RS232 cable a computer and TriVU Refer to the TriVU Software Manual for a more complete description of the TriVU software 1 Connect your receiver and computer See Connecting the Receiver and a Computer on page 25 for this procedure 2 ...

Страница 61: ...ed or not Expiration date the date the option will be disabled if applicable Since Options can be both purchased and leased the Current status of the option dis plays the currently effective value Option values can be one of the following 1 or the firmware version does not support this option 0 the receiver option is disabled positive integer the option is enabled yes or no the option is either en...

Страница 62: ...cking an OAF on page 60 2 Click Load Figure 5 8 on page 61 to load a new OAF file or Update to update the OAF file The new receiver option loads onto the receiver and the Option Manager table updates 3 Navigate to the location of the new Option Authorization File OAFs have jpo extension and are unique to each receiver Figure 5 9 Figure 5 9 Load OAF 4 Select the appropriate file and click Open The ...

Страница 63: ...ent receiver s settings such as active antenna input elevation masks and recording interval and information about the receiver s internal file system Even though clearing the NVRAM is not a common nor normally a recommended operation there are times when clearing the NVRAM can eliminate communication or tracking problems Clearing the NVRAM in your DELTA can be interpreted as a soft boot in your co...

Страница 64: ...uing to hold the FN button 4 Wait until the four LEDs blink yellow 5 Release the FN button 5 5 2 Using TriVU to Clear NVRAM 1 Connect your receiver and computer See Connecting the Receiver and a Computer on page 25 for this procedure 2 Start TriVU Select the COM port and click Ok Figure 5 7 Figure 5 10 Connection Parameters 3 Click the Tools Clear NVRAM Figure 5 11 Figure 5 11 Clear NVRAM ...

Страница 65: ... The receiver will automatically disconnect once the NVRAM is cleared 5 6 Checking Firmware Version Use TriVU to check the firmware version of your receiver 1 Connect your receiver and computer See Connecting the Receiver and a Computer on page 25 for this procedure 2 Start TriVU Select the COM port and click Ok Figure 5 7 Figure 5 12 Connection Parameters 3 Click on Help About TriVU Figure 5 13 F...

Страница 66: ...er IDs Firmware version 4 When finished click OK then click File Disconnect then File Exit to quit TriVU 5 7 Loading New Firmware Base and Rover receivers must be loaded with the same firmware version Use the latest firmware version available for download from the JAVAD GNSS website to ensure your receiver has the most recent updates The receiver uses Firmware Loader to load firmware onto the rece...

Страница 67: ...ce Loading New Firmware Using TriVU to Clear NVRAM 67 www javad com 4 Select the COM port receiver is connected to Click the Test button to ensure the receiver is connected Click Next Figure 5 15 Figure 5 15 Connection Parameters ...

Страница 68: ...aintenance Loading New Firmware Using TriVU to Clear NVRAM 68 www javad com 5 Select the ZIP archive or any file from unzipped set of firmware images or one image to load Click Next Figure 5 16 Figure 5 16 Firmware Source ...

Страница 69: ...iver and File Maintenance Loading New Firmware Using TriVU to Clear NVRAM 69 www javad com 6 Open the required firmware folder Select the zip file and click Open Figure 5 17 Figure 5 17 New firmware package ...

Страница 70: ...www javad com 7 Click Next to load new firmware Figure 5 18 Figure 5 18 Files to load 8 Click Exit to quit Firmware Loader 9 Clear the receiver s NVRAM see Clearing the NVRAM on page 63 and update the almanac Collecting Almanacs and Ephemerides on page 39 after loading new firmware ...

Страница 71: ... secure connections Double check for worn or defective cables Check all power sources Check that the most current software is downloaded onto the computer and that the most current firmware is loaded into the receiver Check the JAVAD GNSS website for the latest updates Then try the following Reset the receiver using TriVU Tools Reset Receiver Figure 6 1 Figure 6 1 Tools Reset receiver Restore defa...

Страница 72: ...tart TriVU 2 Click Configuration Receiver Ports 3 Change the Input for the port used for connection to Command The receiver does not lock on to satellites for a long period of time The receiver stores an old almanac Update the almanac See Collecting Almanacs and Ephemerides on page 28 for details The corresponding receiver options may be disabled or expired L1 L2 GPS GLONASS must be on to track sa...

Страница 73: ...tions on page 60 for details on how to check current options Order a new OAF with the desired options activated to enable or extend validity of the corresponding receiver options Contact your dealer or visit the JAVAD GNSS website for details Refer to the TriVU Software Manual for a detailed description of options There are not enough common satellites In order to obtain a fixed solution the Base ...

Страница 74: ...dio receivers according to the procedures listed in the applicable section The distance between the Base and Rover is too far Close the distance between the Base and Rover Use repeaters to increase radio coverage There may be a source of radio interference that disrupts radio communications Change the RF channel if possible Use a spectrum analyzer to detect the radio characteristics of the interfe...

Страница 75: ...m contact JAVAD GNSS Support Before contacting JAVAD GNSS Customer support about any problems with the receiver see Check This First on page 71 for some solutions that may fix the issue To contact JAVAD GNSS Customer Support use the QUESTIONS button available on the www javad com Note For quick and effective support provide a detailed description of the problem ...

Страница 76: ...Troubleshooting Technical Support 76 www javad com ...

Страница 77: ...c activity performance may degrade Note Use robust checking procedures in areas of extreme multipath or under dense foliage A 1 Receiver Specifications The following sections provide specifications for the receiver and its internal components A 1 1 General Details Table below lists the receiver s general specifications Table A 1 Receiver General Specifications Physical Enclosure Aluminum extrusion...

Страница 78: ...WR CAN optional up to two 1PPS output optional up to two Event Marker input optional TriPad Two LEDs STAT REC Two function buttons ON OFF FN Data Features Up to 100 Hz update rate for real time position and raw data code and carrier 1 10 cm code phase and 1 mm carrier phase precision Hardware Viterbi decoder RTCM SC104 versions 2 x and 3 x Input Output NMEA 0183 versions 2 x and 3 0 Output Multi B...

Страница 79: ...1003 1004 1005 1006 1007 1008 1019 1011 1012 1020 user selectable Ambiguity initialize OTF L1 L1 L2 Baseline Length Up to 50 km in the morning and evening Up to 32 km at noon Initialize time 5 seconds to 10 min depending on the base line length and multipath conditions Output interval for CMR RTCM 1 5 10 20 50 100 Hz optional Elevation 0 to 90 degrees independent of data logging Solution mode Dela...

Страница 80: ...na separation in m Cold Start Warm Start Reacquisition 35 sec 5 sec 1 sec 1 RTK update rate means the position update rate of the rover working in the extrapolation mode In the extrapolation mode you may use the base with measurements update rate 1 Hz and run the rover at 100 Hz RTK update rate 2 In Band interference usually is caused by harmonics of external transmitters like TV stations located ...

Страница 81: ...Code Carrier Tracking Functions Multipath reduction Code and Carrier PLL DLL settings Bandwidth order adjustable Smoothing interval Code and Carrier WAAS EGNOS WAAS optional EGNOS optional Memory Internal Memory Up to 2048MB of on board non removable memory for data storage Raw Data Recording Up to 100 times per second 100Hz Data Type Code and Carrier from GPS L1 L2 Galileo E1 E5A GLONASS L1 L2 G3...

Страница 82: ...aled receptacle 5 pin ODU p n G80F1C T05QF00 0000 Figure A 1 Power Connector Table A 3 gives power connector specifications Table A 3 Power Connector Specifications 1 5 4 2 3 Number Signal Name Dir Details 1 Power_INP P 10 to 30 volts DC input 2 Power_INP P 10 to 30 volts DC input 3 Power_GND P Ground power return 4 Power_GND P Ground power return 5 Not used ...

Страница 83: ...eceptacle 7 pin ODU p n G80F1C T07QC00 0000 Figure A 2 RS 232C Connector Table A 4 gives the RS 232C cable connector specifications Table A 4 RS 232C Cable Connector Specifications 1 7 2 3 4 5 6 Number Signal Name Dir Details 1 2 GND Signal ground 3 CTS I Clear to send 4 RTS O Request to send 5 RXD I Receive data 6 TXD O Transmit data 7 Not used ...

Страница 84: ... connector is a sealed receptacle 5 pin ODU p n G80F2C P05QF00 0000 Figure A 3 Figure A 3 USB Connector Table A 5 gives the USB connector specifications Table A 5 USB Connector Specifications 1 2 3 4 5 Number Signal Name Dir Details 1 2 USB_PWR P Bus power 3 GND Ground 4 USB D I O Data plus 5 USB D I O Data minus ...

Страница 85: ... 7 pin ODU p n G80F2C P07QC00 0000 Figure A 4 Figure A 4 Ethernet Connector Table A 6 Ethernet Connector Specifications 7 6 1 2 3 4 5 Number Signal Name Dir Details 1 Not used 2 Power_GND Signal ground 3 TXD O Transmit data plus 4 TXD O Transmit data minus 5 RXD I Receive data plus 6 RXD I Receive data minus 7 LAN LED External LAN LED anode ...

Страница 86: ... The external antenna connector type is a TNC RF connector with an Applied Engineering Product p n 6001 7051 003 RF input from LNA 100 mA at 5 0 volts DC output EVENT and 1PPS Connectors Optional The EVENT and 1PPS connectors are coaxial female receptacles of BNC series Kings Electronics part number KC 79 108 These connectors are optional 1 7 2 3 4 5 6 8 Number Signal Name Dir Details 1 PWR IN P B...

Страница 87: ...he apparatus Only use attachments accessories specified by the manufacturer Use only with a pole cart stand or tripod specified by the manufacturer or sold with the apparatus When a cart is used use caution when moving the cart apparatus combination to avoid injury from tip over Unplug this apparatus during lightning storms or when unused for long periods of time Refer all servicing to qualified s...

Страница 88: ...imited Power Source and have an output rated for 4 5 35 V DC not less than 2A This may not be the same range as other JAVAD GNSS products with which you are familiar CAUTION To reduce the risk of electric shock do not perform any servicing other than that contained in the operating instructions unless you are qualified to do so CAUTION To avoid the introduction of hazards when operating and instal...

Страница 89: ...oltage and current requirements Note JAVAD GNSS recomends sertified Phihong power supply PSAA60W 120 JAVAD GNSS p n 22 570101 01 for indoor use Note Before plugging the power cord into an AC outlet make sure that all the connections have been made Usage Warnings If this product has been dropped altered transported or shipped without proper packaging or otherwise treated without care erroneous meas...

Страница 90: ...Safety Warnings Usage Warnings 90 www javad com ...

Страница 91: ...mage to the product resulting from an accident disaster misuses abuse or modification of the product Warranty service may be obtained from an authorized JAVAD GNSS warranty service dealer If this product is delivered by mail purchaser agrees to insure the product or assume the risk of loss or damage in transit to prepay shipping charges to the warranty service location and to use the original ship...

Страница 92: ...1731 Technology Drive San Jose CA 95110 USA Phone 1 408 573 8100 Fax 1 408 573 9100 www javad com Copyright JAVAD GNSS Inc 2009 All rights reserved No unauthorized duplication ...

Отзывы: