


6
1
2
3
3
2
6
1
2
3
3
2
1
2
4
1
2
3
3
Ïîäúåì è îïóñêàíèå ïðèæèìíîé ëàïêè
Ðû÷àã ïîäúåìà ïðèæèìíîé ëàïêè ïîäíèìàåò è
îïóñêàåò ïðèæèìíóþ ëàïêó.
Âû ìîæåòå ïîäíÿòü ëàïêó íà 0,6 ñì âûøå
îáû÷íîãî ïîëîæåíèÿ äëÿ áûñòðîé ñìåíû
ïðèæèìíîé ëàïêè èëè äëÿ áåñïðåïÿòñòâåííîãî
ðàçìåùåíèè îáúåìíûõ ìàòåðèàëîâ ïîä ëàïêîé.
1 Îïóùåííîå ïîëîæåíèå
2 Îáû÷íîå ïîäíÿòîå ïîëîæåíèå
3 Íàèâûñøåå ïîëîæåíèå
Ñìåíà ïðèæèìíîé ëàïêè
ÂÍÈÌÀÍÈÅ!
Ïåðåä ñìåíîé ïðèæèìíîé ëàïêè îòêëþ÷èòå
ïèòàíèå.
Âñåãäà èñïîëüçóéòå òîëüêî ïîäõîäÿùóþ ëàïêó
äëÿ âûáðàííîãî îáðàçöà. Èç-çà íåïðàâèëüíîé
ëàïêè ìîæåò ñëîìàòüñÿ èãëà.
Êàê ñíÿòü ïðèæèìíóþ ëàïêó
Ïîâåðíèòå ìàõîâîå êîëåñî ïðîòèâ ÷àñîâîé
ñòðåëêè è ïîäíèìèòå èãëó â âåðõíåå ïîëîæåíèå.
Ïîäíèìèòå ïðèæèìíóþ ëàïêó è íàæìèòå íà
ðû÷àã ïîçàäè äåðæàòåëÿ ëàïêè.
1 Ðû÷àã
Êàê ïðèñòåãíóòü ïðèæèìíóþ ëàïêó
Ðàñïîëîæèòå âûáðàííóþ ïðèæèìíóþ ëàïêó òàê,
÷òîáû ñòåðæåíü íàõîäèëñÿ ïðÿìî ïîä âûåìêîé
äåðæàòåëÿ.
Îïóñòèòå äåðæàòåëü ëàïêè è ïðèñòåãíèòå ëàïêó.
2 Âûåìêà äåðæàòåëÿ
3 Ñòåðæåíü ëàïêè
Êàê ñíÿòü è óñòàíîâèòü äåðæàòåëü ëàïêè
ÂÍÈÌÀÍÈÅ!
Ïåðåä ñìåíîé äåðæàòåëÿ ïðèæèìíîé ëàïêè
îòêëþ÷èòå ïèòàíèå.
×òîáû ñíÿòü:
Ïåðåâåäèòå èãëó â âåðõíþþ ïîçèöèþ.
Ïîâåðíèòå îòâåðòêîé âèíò ïðîòèâ ÷àñîâîé
ñòðåëêè è ñíèìèòå åãî.
×òîáû óñòàíîâèòü:
Ñîïîñòàâüòå îòâåðñòèÿ â äåðæàòåëå ëàïêè ñ
îòâåðñòèåì íà ïðèæèìíîì ñòåðæíå . Âñòàâüòå
âèíò â îòâåðñòèå. Îòâåðòêîé çàòÿíèòå âèíò ïî
÷àñîâîé ñòðåëêå.
1 Óñòàíîâî÷íûé âèíò
2 Äåðæàòåëü ëàïêè
3 Îòâåðñòèÿ â äåðæàòåëå ëàïêè
4 Îòâåðñòèå â ïðèæèìíîì ñòåðæíå
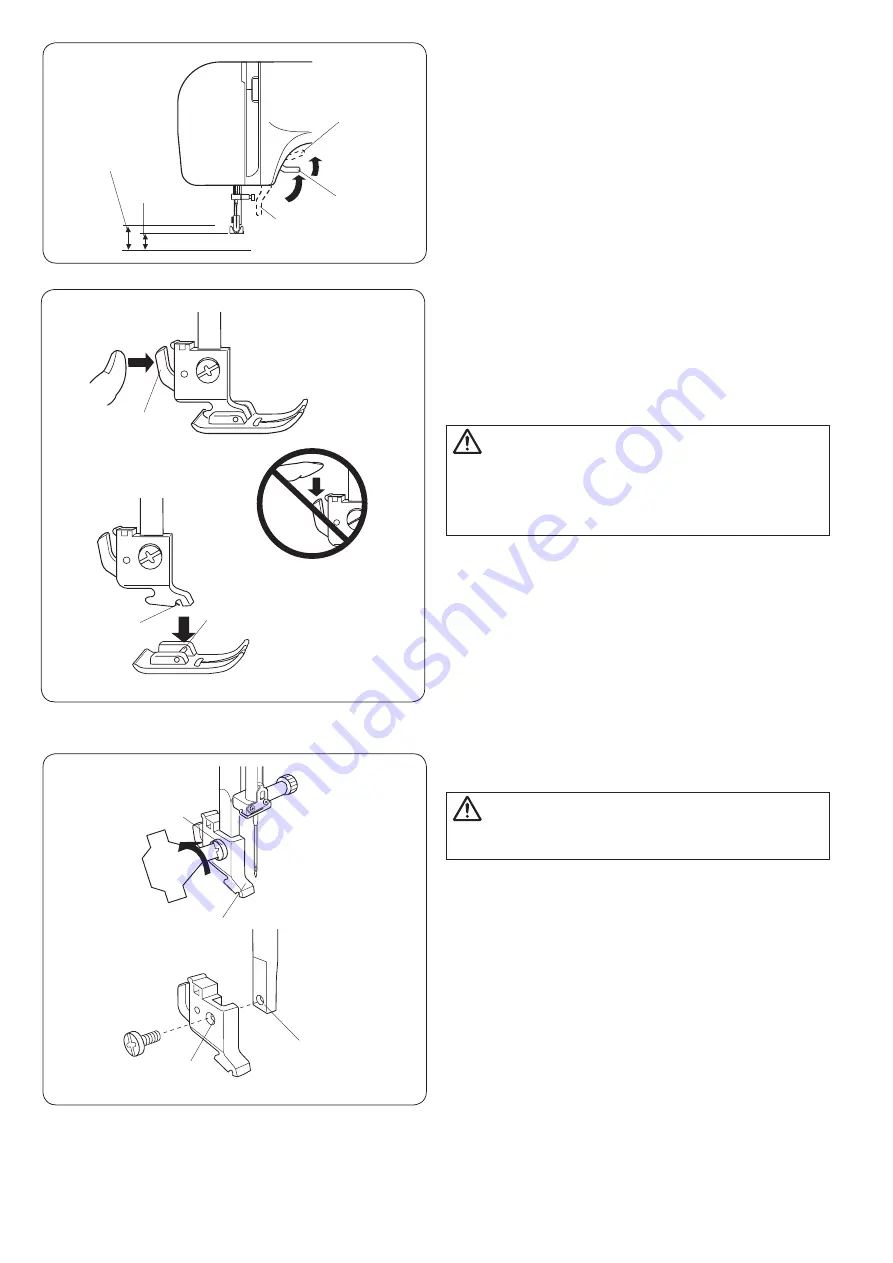
Raising and Lowering the Presser Foot
The presser foot lifter raises and lowers the presser foot.
You can raise the foot about 1/4˝ (0.6 cm) higher than the
normal up position for easy removal of the presser foot,
or to help you place heavy fabric under the foot.
q
Lowered position
w
Normal up position
e
Extra up position
Changing the Presser Foot
To remove:
Raise the needle to its highest position by turning the
handwheel counterclockwise. Raise the presser foot, and
press the lever on the back of the foot holder.
q
Lever
CAUTION:
Turn OFF the power switch before changing the foot.
Always use the proper foot for the selected pattern. The
wrong foot can cause the needle to break. Do not push
the lever down to prevent it from being broken.
To attach:
Place the desired presser foot, so that the pin on the foot
lies just under the groove on the foot holder. Lower the
presser foot lifter to lock the foot in place.
w
Groove
e
Pin
Removing and Attaching the Foot Holder
WARNING:
Turn OFF the power switch before detaching or
attaching the foot holder.
To remove:
Remove the setscrew by turning it counterclockwise with
a screwdriver and remove the foot holder.
To attach:
Match the hole in the foot holder with the threaded hole
in the presser bar. Fit the setscrew into the hole. Tighten
the screw by turning it clockwise with a screwdriver.
q
Setscrew
w
Foot holder
e
Hole
r
Threaded hole
q
w
w
e
e
w
e
q
w
e
r
q


