


21
12
1
3
2
Âûòÿãèâàíèå íèæíåé íèòè
1.
Ïîäíèìèòå ïðèæèìíóþ ëàïêó, ñëåãêà
óäåðæèâàéòå èãîëüíóþ íèòêó ëåâîé ðóêîé.
1 Èãîëüíàÿ íèòêà
2 Øïóëüíàÿ íèòêà
2.
Ïîâåðíèòå íà ñåáÿ ìàõîâîå êîëåñî è
ïîäíèìèòå èãëó è èãëîâîäèòåëü â íàèâûñøåå
ïîëîæåíèå. Ñëåãêà ïîòÿíèòå çà èãîëüíóþ íèòü.
Ñôîðìèðóéòå ïåòëþ èç íèæíåé íèòè.
3.
Âûòÿíèòå ïî 10–15 ñì îáåèõ íèòåé è
îòâåäèòå èõ íàçàä ïîä ïðèæèìíóþ ëàïêó.
1
2
1
1
2
Ïåòëÿ çà 4 øàãà
Óñòàíîâêè ìàøèíû
1 Âûáîð ñòðî÷êè:
2 Äëèíà ñòåæêàâ: 0,5- 1
3 Íàòÿæåíèå íèòè: 1- 5
4 Ïðèæèìíàÿ ëàïêà: ëàïêà äëÿ ïåòëè J
1.
Óñòàíîâèòå ðó÷êó âûáîðà ñòðî÷êè íà “ “.
Àêêóðàòíî îòìåòüòå äëèíó ïåòëè íà òêàíè.
Ðàñïîëîæèòå òêàíü òàê, ÷òîáû äàëüíÿÿ ïîïåðå÷èíà
áûëà ïðÿìî ïîä ëàïêîé (ïåòëÿ äîëæíà äâèãàòüñÿ
íà âàñ ). Îòâåäèòå îáå íèòè âëåâî. Ïåðåäâèíüòå
ïîëçóíîê íà ñåáÿ òàê, ÷òîáû îòìåòêà íà âåðõó (2)
ñîâïàäàëà ñ òî÷êîé íà÷àëà (1).
1 Òî÷êà íà÷àëà
2 Îòìåòêà íà âåðõó
3 Èãîëüíàÿ íèòü
4 Øïóëüíàÿ íèòü
ÏÐÈÌÅ×ÀÍÈÅ:
Øêàëà íà ïîëçóíêå ïðèâåäåíà â ñì.
2.
Ïðîøåéòå âïåðåä ïîêà íå äîñòèãíåòå îòìåòêè
Âàøåé ïåòëè.
Îñòàíîâèòå ìàøèíó íà ëåâîì ñòåæêå.
3.
Ïîäíèìèòå èãëó â âåðõíåå ïîëîæåíèå è
óñòàíîâèòå ðó÷êó âûáîðà ñòðî÷åê íà “ “
Ïðîøåéòå 5 ñòåæêîâ. Îñòàíîâèòå ìàøèíó íà
ïðàâîì ñòåæêå.
4.
Ïîäíèìèòå èãëó â âåðõíåå ïîëîæåíèå è
óñòàíîâèòå ðó÷êó âûáîðà ñòðî÷åê íà “ “.
Øåéòå âïåðåä, ïîêà íå äîñòèãíåòå äàëüíåé
îòìåòêå ïåòëè
5.
Ïîäíèìèòå èãëó â âåðõíåå ïîëîæåíèå è
óñòàíîâèòå ðó÷êó âûáîðà ñòðî÷åê íà “ “
Ïðîøåéòå 5 ñòåæêîâ è îñòàíîâèòåñü. Çàòåì
óñòàíîâèòå äëèíó ñòåæêà «0», à ðó÷êó âûáîðà
ñòðî÷åê íà ïðÿìîé ñòåæîê. Ïðîøåéòå íåñêîëüêî
çàêðåïëÿþùèõ ñòåæêîâ.
6.
Ïîäíèìèòå èãëó è ïðèæèìíóþ ëàïêó. Ñíèìèòå
òêàíü ñ ìàøèíû è îáðåæüòå íèòêè. Âíóòðü ïåòëè
âñòàâüòå áóëàâêó. Ïðîðåæüòå ïåòëþ
âñïàðûâàòåëåì.
Áóäüòå âíèìàòåëüíû, íå ðàçðåæüòå ñòåæêè.
5 Áóëàâêà
6 Âñïàðûâàòåëü
Èçìåíåíèå ïëîòíîñòè ïåòëè
Ïîâåðíèòå ðó÷êó èçìåíåíèÿ äëèíû ñòåæêà â
ïðåäåëàõ “ “ äëÿ èçìåíåíèÿ ïëîòíîñòè
ñòåæêîâ ïåòëè.
7 Ïëîòíàÿ ïåòëÿ
8 Ðûõëàÿ ïåòëÿ
21
1
5
6
6
2
3
4
1
7
8
2
3
4
5
1
2
3
4
1
1
2
3
4
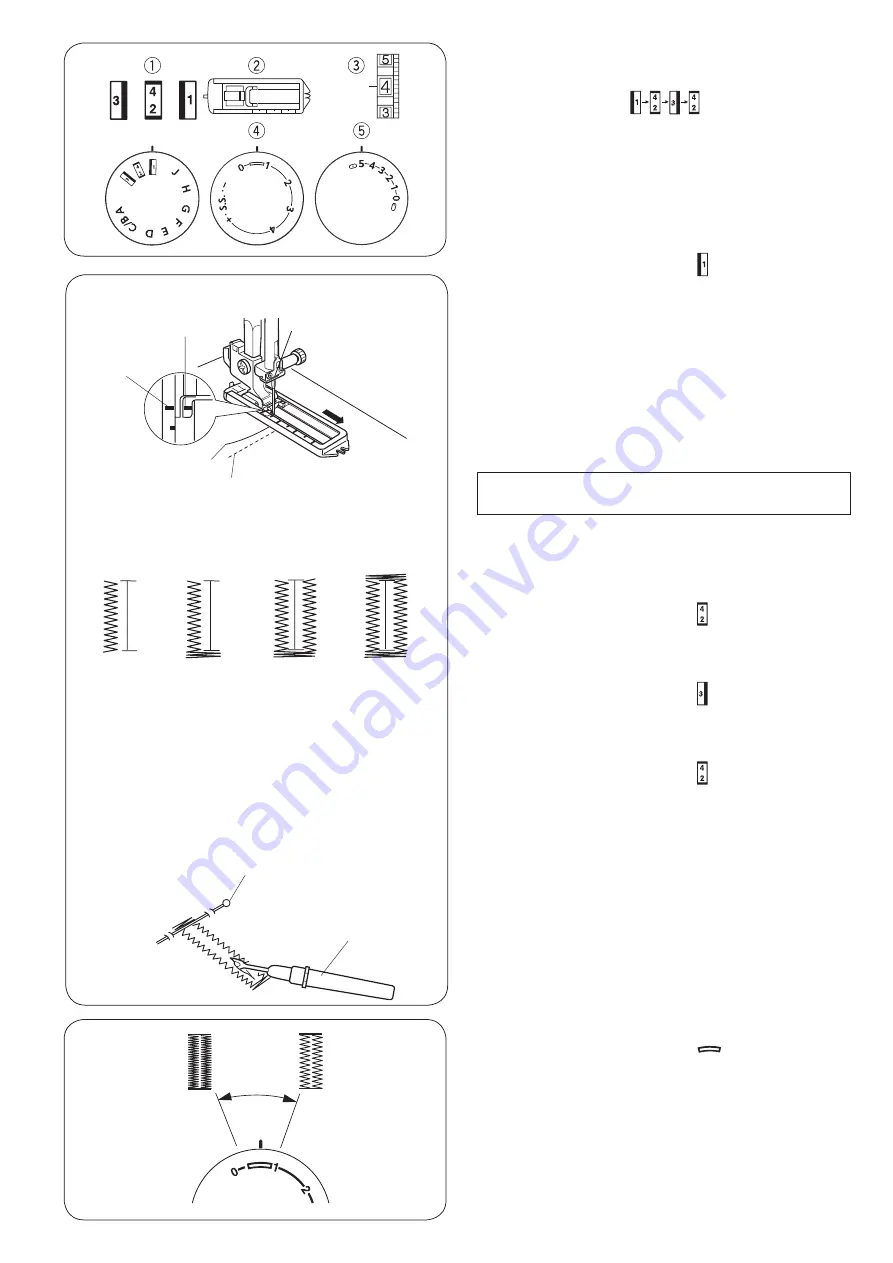
4-Step Buttonhole
Machine setting
q
Stitch pattern:
w
Presser foot:
Sliding buttonhole foot J
e
Thread tension:
1 - 5
r
Stitch length:
0.5 - 1
t
Stitch width:
3 - 5
z
Set the pattern selector dial at “ ”.
Carefully mark buttonhole length on fabric.
Place the fabric under the foot with the buttonhole
marking running toward you.
Draw both of needle and bobbin thread to the left.
Move the slider toward you so that the top mark
w
on
the slider meets the start mark
q
.
q
Start mark
w
Top mark
e
Needle thread
r
Bobbin thread
NOTE:
The scale on the slider is engraved in centimeters.
x
Sew forward until you reach the front marking of your
buttonhole. Stop sewing at a left stitch.
c
Raise the needle to its highest position.
Set the pattern selector dial at “ ”. Sew 5 stitches,
then stop sewing at a right stitch.
v
Raise the needle to its highest position.
Set the pattern selector dial at “ ”. Sew until the
needle reach the back marking of the buttonhole.
b
Raise the needle to its highest position.
Set the pattern selector dial at “ ”. Sew 5 stitches,
then stop sewing. Set the stitch length dial to “0” and
the pattern selector dial at straight sewing.
Sew a few locking stitches.
n
Raise the needle and presser foot. Remove the fabric
from the machine and cut the sewing thread. Insert a
pin inside the bartack.
Then cut the opening with a seam ripper.
Take care not to cut the stitches.
t
Pin
y
Seam ripper
To adjust buttonhole stitch density
Set the stitch length dial between “
12
1
3
2
Âûòÿãèâàíèå íèæíåé íèòè
1.
Ïîäíèìèòå ïðèæèìíóþ ëàïêó, ñëåãêà
óäåðæèâàéòå èãîëüíóþ íèòêó ëåâîé ðóêîé.
1 Èãîëüíàÿ íèòêà
2 Øïóëüíàÿ íèòêà
2.
Ïîâåðíèòå íà ñåáÿ ìàõîâîå êîëåñî è
ïîäíèìèòå èãëó è èãëîâîäèòåëü â íàèâûñøåå
ïîëîæåíèå. Ñëåãêà ïîòÿíèòå çà èãîëüíóþ íèòü.
Ñôîðìèðóéòå ïåòëþ èç íèæíåé íèòè.
3.
Âûòÿíèòå ïî 10–15 ñì îáåèõ íèòåé è
îòâåäèòå èõ íàçàä ïîä ïðèæèìíóþ ëàïêó.
1
2
1
1
2
Ïåòëÿ çà 4 øàãà
Óñòàíîâêè ìàøèíû
1 Âûáîð ñòðî÷êè:
2 Äëèíà ñòåæêàâ: 0,5- 1
3 Íàòÿæåíèå íèòè: 1- 5
4 Ïðèæèìíàÿ ëàïêà: ëàïêà äëÿ ïåòëè J
1.
Óñòàíîâèòå ðó÷êó âûáîðà ñòðî÷êè íà “ “.
Àêêóðàòíî îòìåòüòå äëèíó ïåòëè íà òêàíè.
Ðàñïîëîæèòå òêàíü òàê, ÷òîáû äàëüíÿÿ ïîïåðå÷èíà
áûëà ïðÿìî ïîä ëàïêîé (ïåòëÿ äîëæíà äâèãàòüñÿ
íà âàñ ). Îòâåäèòå îáå íèòè âëåâî. Ïåðåäâèíüòå
ïîëçóíîê íà ñåáÿ òàê, ÷òîáû îòìåòêà íà âåðõó (2)
ñîâïàäàëà ñ òî÷êîé íà÷àëà (1).
1 Òî÷êà íà÷àëà
2 Îòìåòêà íà âåðõó
3 Èãîëüíàÿ íèòü
4 Øïóëüíàÿ íèòü
ÏÐÈÌÅ×ÀÍÈÅ:
Øêàëà íà ïîëçóíêå ïðèâåäåíà â ñì.
2.
Ïðîøåéòå âïåðåä ïîêà íå äîñòèãíåòå îòìåòêè
Âàøåé ïåòëè.
Îñòàíîâèòå ìàøèíó íà ëåâîì ñòåæêå.
3.
Ïîäíèìèòå èãëó â âåðõíåå ïîëîæåíèå è
óñòàíîâèòå ðó÷êó âûáîðà ñòðî÷åê íà “ “
Ïðîøåéòå 5 ñòåæêîâ. Îñòàíîâèòå ìàøèíó íà
ïðàâîì ñòåæêå.
4.
Ïîäíèìèòå èãëó â âåðõíåå ïîëîæåíèå è
óñòàíîâèòå ðó÷êó âûáîðà ñòðî÷åê íà “ “.
Øåéòå âïåðåä, ïîêà íå äîñòèãíåòå äàëüíåé
îòìåòêå ïåòëè
5.
Ïîäíèìèòå èãëó â âåðõíåå ïîëîæåíèå è
óñòàíîâèòå ðó÷êó âûáîðà ñòðî÷åê íà “ “
Ïðîøåéòå 5 ñòåæêîâ è îñòàíîâèòåñü. Çàòåì
óñòàíîâèòå äëèíó ñòåæêà «0», à ðó÷êó âûáîðà
ñòðî÷åê íà ïðÿìîé ñòåæîê. Ïðîøåéòå íåñêîëüêî
çàêðåïëÿþùèõ ñòåæêîâ.
6.
Ïîäíèìèòå èãëó è ïðèæèìíóþ ëàïêó. Ñíèìèòå
òêàíü ñ ìàøèíû è îáðåæüòå íèòêè. Âíóòðü ïåòëè
âñòàâüòå áóëàâêó. Ïðîðåæüòå ïåòëþ
âñïàðûâàòåëåì.
Áóäüòå âíèìàòåëüíû, íå ðàçðåæüòå ñòåæêè.
5 Áóëàâêà
6 Âñïàðûâàòåëü
Èçìåíåíèå ïëîòíîñòè ïåòëè
Ïîâåðíèòå ðó÷êó èçìåíåíèÿ äëèíû ñòåæêà â
ïðåäåëàõ “ “ äëÿ èçìåíåíèÿ ïëîòíîñòè
ñòåæêîâ ïåòëè.
7 Ïëîòíàÿ ïåòëÿ
8 Ðûõëàÿ ïåòëÿ
21
1
5
6
6
2
3
4
1
7
8
2
3
4
5
1
2
3
4
” to adjust
the buttonhole stitch density.
u
Denser buttonhole
i
Coarser buttonhole
w
x
q
z
e
c
r
v
t
y
b
n
u
i


