JANE Nurse Protect Скачать руководство пользователя страница 19

19

GB

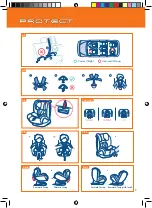
4.3 Adjusting the headrest

A. When using for Group 0 +, I (1-7 level use)

The shoulder straps are adjusted as follows: Loosen the shoulder straps of the child seat as much as 

possible.

Pull the headrest height adjuster until finding the correct height of the shoulder straps and release the 

adjuster to lock it into the correct position for the child.

B. When using for Groups II, III (7-10 level use)

When the child grows to a weight of 15 KG, the headrest should be used at the 7-10 height level.

Slide the belt loops off the fixed axle cog, slide the left shoulder belt first and then the right shoulder 

belt. Now you can remove the shoulder belt.

From the front part of the safety seat, remove the shoulder straps by passing them through the slots and 

place them under the fabric cover.

After removing them, pull the headrest height adjuster until finding the correct height of the shoulder 

straps and release the adjuster to lock it into the correct position for the child.

NOTE: A correctly adjusted headrest of the safety seat ensures maximum protection for the child:

The headrest must be adjusted so that the shoulder straps are at the same level as the child’s shoulders.

WARNING: The shoulder straps must never go behind the child’s back, or be at ear height or above.

4.4 Adjusting the length of the seat belt

A. How to tighten the seat belt

Pull the shoulder straps upwards and the lap belt will tighten, then pull the crotch strap to adjust the 

seat belt.

Tighten the seat belt as soon as possible.

The lap belt should be positioned as low as possible, nearer the child’s hips than his tummy.

Note: It may be dangerous if the seat belt is too loose. Check that the seat belt adjuster works correctly 

and then tighten the seat belt.

B. How to loosen the seat belt

Press the red button to loosen the seat belt.

With one hand press the sliding button and with the other hand hold the shoulder straps underneath the 

shoulder pad (do not hold on to the pad) to loosen the seat belt.

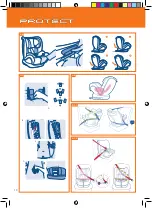
4.5 How to install the seat

A. In the rear facing position: For Group 0 +1 (0-18 KG) the seat should be used in the rear facing 

position.

Pull the reclining handle (a) and place the seat in opposite direction from the seat base (b). Then, adjust 

it to the fifth level for use with Group 0+ or 1.

B. Forward facing: For Group 1, 2, 3 (9-36 KG) the seat should be used in the forward facing position.

Pull the reclining handle (a) and place the seat in the same direction as the seat base (b). Then, adjust it 

to the correct level (first, second, third or fourth).

C. Withdraw the base: Pull the reclining handle (a) and the body of the seat at the same time.

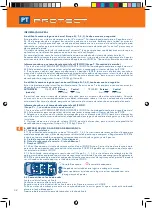
4.6 Adjusting the angle of the child safety seat

The safety seat can be set to 5 positions.

Before placing the child in the restraint system, the seat must be set to the reclining position if used in 

the rear facing position (fifth level) or in the sitting up position if used in the forward facing position. In 

this case, the seat can be set to 4 positions (see diagrams 1, 2, 3 and 4).

To set the seat to the required reclining position, use the handle located on the front of the child restraint 

system, between the seat and the base.

First level / Second level / Third level / Fourth level

In the rear facing position use the fifth level, as shown on page 13, diagram C (on the right).

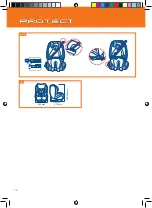
4.7 Removing the 5-point harness

Step 1: 

Remove the shoulder straps and pads and loosen the 5-point harness of the safety seat as much 

as possible. Remove the belt from the harness connector (diagram A). Take the fixed axle cogs out of 

the plastic part (diagram B). Lastly, place the surplus belt under the fabric cover. (Diagram C - Page 16).

Step 2: Removing the fastening buckle

Pull the fastening buckle downwards, push the metal plate vertically from the back of the seat (diagram 

D - Page 16) and then remove the fastener.

4.8 Removing the triangular pad

When the child weighs over 8 kg, remove the sleeping pad and the triangular pad.

Содержание Nurse Protect

Страница 1: ...INSTRUCCIONES GEBRAUCHSANWEISUNG INSTRU ES INSTRUCTIONS INSTRUCTIONS ISTRUZIONI GRUPOS GROUPS 0 1 2 3 0 36 kg...

Страница 2: ...NUNCA utilice la silla de seguridad sin la cubierta NUNCA sustituya la cubierta de la silla de seguridad o el arn s por otros que no sean los recomendados para este tipo de silla ya que intervienen e...

Страница 3: ...hicle seat belts if they are damaged or frayed NEVER use the safety seat without the cover NEVER replace the safety seat cover or harness with any other ones that have not been recommended for this ty...

Страница 4: ...e NIE die Hosentr ger oder Fahrzeuggurte wenn sie besch digt oder verschlissen sind Verwenden Sie den Autokindersitz NIE ohne Bezug Ersetzen Sie NIE den Bezug des Autokindersitzes oder den Hosentr ger...

Страница 5: ...u us es N utilisez JAMAIS le si ge auto sans sa housse Ne remplacez JAMAIS la housse du si ge auto ou le harnais par des mod les autres que ceux recommand s pour ce type de si ge auto car ils particip...

Страница 6: ...cados ou desgastados NUNCA utilize a cadeira de seguran a sem a cobertura NUNCA substitua a cobertura da cadeira de seguran a ou o arn s por outros que n o sejam os recomendados para este tipo de cade...

Страница 7: ...curezza senza il suo rivestimento NON sostituire il rivestimento del seggiolino di sicurezza o dell imbragatura con altri che non siano raccomandati per questo tipo di seggiolino dato che il rivestime...

Страница 8: ...FIX U Bouton ISOFIX V Rainure ceinture A Ranhura cinto B Cobertura cadeira C Acolchoado ombros D Cinto ombros E Seguran a do fecho F Bot o vermelho G Fecho H Acolchoado de entrepernas I Bot o J Correi...

Страница 9: ...9 en 4 4 4 3 4 1 4 2 CAUTION 4 5 a 4 5 b 4 5 c Forward Facin Forward Facin g g Rearward Facin Rearward Facin g g 5th level a b c Correct Right Incorrect Wrong...

Страница 10: ...10 4 6 4 7 4 8 5 1 1 5 1 2 A C B D...

Страница 11: ...11 5 1 2 5 2 1 5 2 2 CLICK...

Страница 12: ...12 5 2 2 8 22 CLICK 440mm 510mm 600 800mm...

Страница 13: ...fabricante del sistema de retenci n o en el punto de venta Informaci n sobre el sistema de retenci n infantil ISOFIX Grupo 0 1 sentido contrario a la marcha 1 Se trata de un SISTEMA DE RETENCI N INFAN...

Страница 14: ...de seguridad B C mo aflojar el cintur n de seguridad Para aflojar el cintur n de seguridad presione el bot n rojo Con una mano presione el bot n de deslizamiento y con la otra sujete los cinturones de...

Страница 15: ...n cuidado y hacia afuera del cintur n desde la parte trasera del lateral y tambi n tire de la secci n abdominal desde la ranura 3 de la base Un lado del cintur n diagonal a trav s del respaldo y la ra...

Страница 16: ...seguridad para los Grupos II y III retire el arn s de 5 puntos el acolchado para dormir y el acolchado triangular si necesita m s informaci n consulte el apartado 4 7 Coloque la silla del ni o hacia d...

Страница 17: ...rible La garant a se aplicar nicamente a los productos que no han sido modificados por el usuario En caso de que se presenten defectos el propietario deber devolver el producto al punto de venta El fa...

Страница 18: ...traint system manufacturer or at the point of sale Information on the ISOFIX child restraint system Group 0 1 rear facing 1 This is an ISOFIX CHILD RESTRAINT SYSTEM It is approved under Regulation No...

Страница 19: ...nd with the other hand hold the shoulder straps underneath the shoulder pad do not hold on to the pad to loosen the seat belt 4 5 How to install the seat A In the rear facing position For Group 0 1 0...

Страница 20: ...r point of the vehicle seat belt to tighten the lap section of the belt 5 1 2 2 Groups II III 15 36KG NOTE When using this safety seat for Groups II and III remove the 5 point harness the sleeping pad...

Страница 21: ...uding metal part of the seat belt into the buckle until you hear it click into place Follow the direction of the arrow to tighten the belt and put the surplus belt under the fabric cover Gently move t...

Страница 22: ...ze anderer Autos geeignet ist Sehen Sie in den entsprechenden Bedienungsanleitungen oder auf der Webseite nach um Informationen ber die passendste Liste der Automodelle zu erhalten Bei Fragen wenden S...

Страница 23: ...durch der Beckengurt wird gespannt wird Danach ziehen Sie am Schrittgurt um den Sicherheitsgurt einzustellen Sobald es m glich ist ziehen Sie am Sicherheitsgurt Der Beckengurt muss in der tiefstm glic...

Страница 24: ...dersitz nur entgegen der Fahrtrichtung und mit dem maximalen Neigungswinkel Liegeposition eingebaut werden Zur berpr fung des korrekten Einbaus des Autokindersitzes bewegen Sie ihn vor Gebrauch leicht...

Страница 25: ...okindersitz f r die Gruppen II und III verwendet wird entfernen Sie den 5 Punkt Gurt das Schlafpolster und das dreieckige Polster wenn Sie weitere Informationen ben tigen konsultieren Sie den Abschnit...

Страница 26: ...SUNGEN F R DEN AUTOKINDERSITZ Bewahren Sie ihn an einem sicheren und trockenen Ort auf fern von Hitze und direkter Sonneneinstrahlung Vermeiden Sie schwere Gegenst nde auf den Sitz zu stellen 7 GARANT...

Страница 27: ...pour obtenir des informations sur la liste de mod les de voiture recommand s En cas de doute veuillez consulter le fabricant du syst me de retenue ou vous adresser votre magasin Informations relative...

Страница 28: ...e plus bas possible plus pr s du bassin que du ventre Recommandation si le harnais n est pas bien tendu la s curit n est pas garantie V rifiez si le dispositif de r glage du harnais fonctionne correct...

Страница 29: ...pe I 9 18KG Installez le si ge auto vers l avant sur le si ge du v hicule face la route Tirez sur la section diagonale de la ceinture par la rainure 2 Introduisez la section abdominale de la ceinture...

Страница 30: ...un clic De chaque c t des barres de fixation le bouton passera sur le t moin vert indiquant une fixation s re NOTE si le si ge auto est utilis pour les groupes II et III retirez le harnais 5 points la...

Страница 31: ...garantie s appliquera uniquement aux produits qui n ont pas t modifi s par l utilisateur En cas de d fauts le propri taire devra retourner le produit au point de vente Le fabricant ne sera pas respons...

Страница 32: ...ergunte ao fabricante do sistema de reten o ou no ponto de venda Informa o sobre o sistema de reten o infantil ISOFIX Grupo 0 1 sentido contr rio ao da marcha 1 Trata se de um SISTEMA DE RETEN O INFAN...

Страница 33: ...sujeite os cintos de ombros por baixo do acolchoado de ombros n o agarrar o acolchoado para afrouxar o cinto de seguran a 4 5 Como montar a cadeira A Sentido contr rio ao da marcha Para o Grupo 0 1 0...

Страница 34: ...ar esta cadeira de seguran a para os Grupos II y III retire o arn s de 5 pontos o acolchoado para dormir e o acolchoado triangular se necessitar de mais informa o consulte o apartado 4 7 Coloque a cad...

Страница 35: ...PRECAU O A sec o diagonal do cinto deve mover se na diagonal para tr s poss vel ajustar o percurso do cinto com a pe a de regula o do cinto do ve culo em ambos os lados 6 CUIDADO E MANUTEN O Inspecio...

Страница 36: ...formazioni al fabbricante del sistema di trattenuta o presso il punto vendita Informazioni sul sistema di trattenuta per bambini ISOFIX Gruppo 0 1 senso contrario alla marcia 1 Si tratta di un SISTEMA...

Страница 37: ...mere il pulsante rosso Con una mano premere il pulsante mobile e con l altra afferrare le cinture pettorali sotto gli spallacci non afferrare gli spallacci per allentare le cinture di sicurezza 4 5 Co...

Страница 38: ...olo come indicato di seguito Tirare la parte inferiore della cintura diagonale verso l ancoraggio della cintura del veicolo per tendere la sezione addominale della cintura 5 1 2 2 Gruppi II III 15 36...

Страница 39: ...a per tendere la cintura e posizionare la cintura in eccesso sotto il rivestimento di tela Muovere leggermente il seggiolino di sicurezza per verificare che sia ben fissato PRECAUZIONE la sezione diag...

Страница 40: ...BABYNURSE S A Empresa perteneciente el Grupo Jan Mercaders 34 Pol Ind Riera de Caldes 08184 Palau Solit i Plegamans Barcelona Tel centralita 34 93 703 18 00 www nurse es nurse jane es IM 2075 00...

Отзывы: