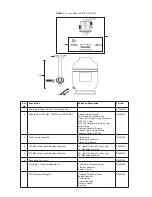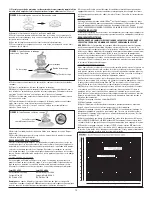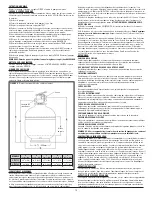
Standpipe
Manifold
FIGURE 1 -
Snap-Fit Detail
Snap Fit
Lateral
Table (installation in a private home)
FILTER MODEL
MAXIMUM FLOW RATE
gpm EU/sq. ft. (m3h/m
2
)
FILTRATION RATE
gpm (I/min)
SAND REQUIRED
WEIGHT LBS
(KILOGRAMS)
MAXIMUM
PRESSURE
PSI
SFTM22
25,0 (60)
66 (250)
250 (215)
35
SFTM25
25,0 (60)
83 (314)
350 (160)
35
TO BE LEFT WITH OWNER
Before installation be sure to read all instructions and warnings carefully.
Refer to product label(s) for additional operation instruction and specifi cations.
IMPORTANT:
This product has been carefully inspected and packed at our factory.
As the carrier has assumed full responsibility for its safe arrival, any claim for
damage to the shipment, either visible or concealed, must be made to the carrier.
Make sure that you have received the correct equipment for the installation.
PUMP SELECTION
A full line of pool pumps are available for installation with these fi lters. For those
installations where the equipment will be placed above the water level, a
self-priming pump should be selected. Ask your dealer to determine the proper
size and distance from pool or spa and friction losses (restrictions) of associated
equipment. The fi lter system is assembled at the site from a fi lter module and a
pump module. This method allows you to choose a pump providing an optimal
CIRCULATION RATE for a commercial installation (20 U.S. gallons per minute per
square foot of fi ltration surface) or for a residential installation (25 U.S. gallons per
minute per square foot of fi ltration surface or 61 cubic meters per hour per square
meter of fi ltration surface).
To reduce risk of injury, do not permit children to use this product unless they
are closely supervised at all times.
Locate the system at least fi ve feet (1.5 m) from the pool to prevent it being used
as a means of access to the pool by young children. (See ANSI/NSPI-8 1996
“Model Barrier Code For Residential Swimming Pools, Spas and Hot Tubs”).
The fi lter module is equipped with a dial valve which works as follows:
1). FILTER
gives a downward fl ow through the fi lter bed. Dirt accumulates in the
sand as fi ltering proceeds, and gradually restricts the fl ow of water until back-
washing is necessary. This position can also be used for vacuuming.
2). BACKWASH
gives an upward fl ow through the fi lter bed that removes the dirt
from the sand and carries it to the waste.
3). DRAIN
is for pumping water from the pool. It allows the fl ow from the pump to
bypass the fi lter and go directly to the waste. You can also use this position to
vacuum heavy concentrations of debris.
4). WHIRLPOOL
bypasses the fi lter to obtain the optimum performance from a
hydro-air fi tting fed by the fi lter pump. (No fi ltration occurs in this position).
5). WINTERIZE
allows air to leave or enter the tank to help priming and draining.
Only to be used when pump is off.
6). RINSE
gives a downward fl ow that settles the fi lter bed after backwashing and
carries any remaining loose dirt to the waste.
7). TEST
prevents only backfl ow of water from pool during pump maintenance if
fi lter is below water level.
FILTER SAND
The outstanding fi ltration and superior dirt-holding capacity of this fi lter depends
on the use of the proper grade of fi lter sand. It should meet the following specifi ca-
tions: The fi lter sand must be free of clay, loam, dirt and organic matter, and must
consist of hard, durable, rounded or sub-angular grains of silica sand with no more
than 1% of fl at or micaceous particles. The grains should have an effective size of
0.44mm with a uniformity coeffi cient of 1.35. DO NOT USE “SANDBOX” SAND. The
fi lter sand is NOT included in the fi lter module and must be purchased separately.
Refer to the table for the quantity required. Do not fi ll the tank with sand before
the fi lter is in its fi nal position. Keep the sand dry for easy installation. Use only the
approved fi lter sand, otherwise the system may not work satisfactorily.
INSTALLATION LOCATION
LOCATION : System should be installed in accordance with the standards and in-
structions in effect in your country or municipality, preferably in a dry, shaded, and
well-ventilated area (See previous warning). Locate the system on a hard, level
surface, preferably in a dry, shaded, and well-ventilated area. Give consideration
to the following: Position of suction, return, and waste connections; Access for
backwashing and servicing; Protection from the sun, rain, splashing, etc; Drainage
of fi lter room or pit; Ventilation and protection of the motor.
ASSEMBLY OF SYSTEM
1).
Place the empty tank in position on the base. Press the tank down until it
engages the base.
2).
If the laterals are not installed, hold the standpipe/manifold assembly so that
the manifold is located in the middle of the tank. Take one of the lateral fl ow tubes
in your other hand and lower it into the tank, sliding it down the tube and into one
of the grooves in the manifold until a snap-fi t is obtained. Repeat this action until
all eight lateral fl ow tubes are installed, then lower the complete assembly down
to the bottom of the tank. Press it down to ensure that the central tube is seated in
the depression in the base of the tank. See fi gure 1.
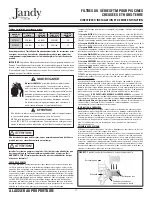
OPERATION/INSTALLATION INSTRUCTIONS
SFTM SERIES FILTERS FOR IN-GROUND AND
ABOVE-GROUND SWIMMING POOLS
NEVER
attempt to assemble, disassemble or adjust the fi lter
when there is pressurized air in the system.
Starting the pump while there is any pressurized air in the
system can cause product failure or also cause the dial
valve to be blown off, which can cause death, serious
personal injury or property damage.
Never start the pump while standing within fi ve (5) feet of
the fi lter.
To prevent the possibility of personal injury and equipment damage, always
turn the pump OFF before changing the position of a backwash valve.
DO NOT operate fi lter at water temperatures above 104º F (40º C). Water
temperature above the manufacturer’s recommendations will shorten the
life span of the fi lter and void the warranty.
4


