Jack C5 Скачать руководство пользователя страница 10


英文字母


English letter


U V W X Y Z         

数码管显示


Digital tube 

display


4


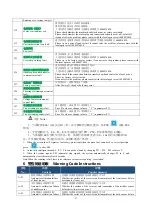
参数列表      Parameters list 

4.1


操作参数说明表   

Operating parameters Instructions 

序号


No 

功能参数


Function parameter 

范围


Range 

默认值


Default 

参数说明


Description 

用户区:按住

“P”

1.5

秒进入

User parameter mode,press 

P

button for 1.5 seconds


P1 

最高转速

   Max. speed  

500 - 7000 

6000 

RPM 

P2 

停针定位选择


Needle stop positioning 
selection 

0 - 3 

0

:不定位

    1

:上针位

      2

:下针位

3: 

下针位

(

踩不找上针位

0

no needle position     

1

up needle position       

2

down needle position 

3: down needle position(rear tread will not to find 
up needle position) 

P3 

起缝速度

 Starting speed 

500 - 7000 

6000

(砍刀


Thread trimmer


RPM 

4000

(侧吸

 Side 

suction


P4 

启动模式

 Start-up model 

0 - 1 

0

:自动模式

  1

:脚控模式


0

automatic mode   1

foot control 

P5 

模式选择


Sewing mode selection 

0 - 2 

0

:全电脑

      1

:半智能

      2

:全智能


0: Computerized  1:semi

automatic    

2:fully automatic 

P6 

语音音量调节


Voice volume adjustment 

0 - 3 

0

:关闭

          1-3

:开启


0

  off            1-3

on 

P7 

自动剪线


Auto trimming 

0 - 3 

0

:关闭

          1

:前剪


2

:后剪

          3

:前后剪


0

off  

1

trimmer before sewing 

2

trimmer after sewing      

3

trimmer both before and after sewing 

P8 

自动后吸气


Auto suction 

0 - 3 

1

(砍刀

Thread 

trimmer


0

:关闭

          1

:前剪线吸气开


2

:后剪线吸气开

  3

:前后剪线吸气开


0

:  

off     

1

suction on for start trimmer 

2

suction on for back trimmer   

3

suction on for start and back trimmer   

3

(侧吸


Side suction


P9 

反踏剪线开关


Counter pedal trimmer 

0 - 1 

0

:关闭

          1

:开启


0

off            1

on 

P10 

自动抬压脚


Auto press foot lifter 

0 - 3 

0

:关闭

          1

:前抬


2

:后抬

          3

:前后抬


0

off         

1

lifter before sewing 

2

lifter after sewing     

3

lifter both before and after sewing 

P11 

车缝中途停止时抬压脚


Press foot lifter when 
half-stopping 

0 - 1 

0

:关闭

          1

:抬压脚


0

  off            1

  presser foot lifter 

P12 

剪完线停止时抬压脚


Press foot lifter after trimming 

0 - 1 

0

:关闭

          1

:抬压脚


0

off              1

presser foot lifter 

P13 

半反踏抬压脚


Semi-counter presser foot 
lifter 

0 - 1 

0

:关闭

          1

:半反踏或反踏抬压脚


0

  off        1

Semi-counter presser foot lifter 

Содержание C5

Страница 1: ...C5 V1 8 Instructions of C5 overlock sewing machine panel operation 2020 6 1 EC5...

Страница 2: ...e Setting 4 2 9 LED light setting 4 2 10 Button lock setting 4 2 11 Voice quick switch 4 2 12 Sensor for anti cutting the cloth swift switch 5 2 13 Forced removal of cloth piece value 5 2 14 Fabric se...

Страница 3: ...ase the number within a parameter 5 Right button control machine head LCD light brightness Towards the right to choose parameter within a parameter 6 Sewing mode button Change the sewing mode 7 Presse...

Страница 4: ...be cycled as following three modes Automatic Semi automatic Full manual Press enter mode to confirm and save after finishing setting No Pressing for 5 seconds return to standby interface if user does...

Страница 5: ...ter button to save and confirm after finishing setting No Pressing for 5 seconds return to standby interface if user doesn t want to save every press enter the current trimmer status firstly and cycle...

Страница 6: ...ng users common parameters reset button for restoring users saving parameters before saving factory parameters are the same as users saving parameters P19 P20 version no Parameter P66 P67 P68 the duty...

Страница 7: ...rameter values to change then the P28 parameter is equal to the user saves parameter values 5 When entering the other interface without saving and don t press any key for 5 seconds will automatically...

Страница 8: ...h sensor enabled state changes the sensor will be automatically calibrated 2 16 Thick material voltage threshold setting 1 5 P U15 OK Er P 50 U16 PA2 1 1 5 Press the presser foot lifter for about 1 5...

Страница 9: ...er values of PA0 PA1 Note Normal sewing can be done during regular maintenance reminder 2 19 Short thread mode quick switch 3s OK P27 U25 Press the short thread button for 3 seconds to switch the shor...

Страница 10: ...erized 1 semi automatic 2 fully automatic P6 Voice volume adjustment 0 3 2 0 1 3 0 off 1 3 on P7 Auto trimming 0 3 3 0 1 2 3 0 off 1 trimmer before sewing 2 trimmer after sewing 3 trimmer both before...

Страница 11: ...n 0 250 0 0 100 ms Time when front suction off 0 is not off 100 ms P25 Back sensor switch 0 1 1 0 1 0 off 1 on P Technician parameter At the same time press the P button and the presser foot lifter bu...

Страница 12: ...r foot lifter 1 50 2 100ms P40 Start time after presser foot lifter 0 20 0 100 ms P41 Full output time of presser foot 1 50 10 10 ms P42 Periodic signal of presser foot output 0 50 15 10 ms 5MS Turn o...

Страница 13: ...tage value of the sensor P68 Adjusting gear of sensor for anti cutting the cloth 1 180 The greater the parameter values The greater the voltage value of the sensor P69 Unit number counting 1 50 10 1 S...

Страница 14: ...hread number closing P82 Synchronized suction back suction closed needle number 0 250 0 0 P82 0 Back suction and back trimmer synchronous closing Other when after front suction opening go by P82 threa...

Страница 15: ...Unit month 0 1 500 0 not enable 1 500 reminder time P102 Base enable of thick material 0 1 0 1 1 Automatic acquisition of base value when thickness enters the threshold setting of thick material P112...

Страница 16: ...function is turned off duty cycle decreases from 100 to U28 setting value uniformly in 1 U29 time duty cycle decreases from U28 to U31 setting value uniformly in 2 U29 time and 3 U28 duty cycle is con...

Страница 17: ...e Please try to restore the factory settings or restart the power supply If the above can not be solved please contact the local service provider or dial 4008876858 Pressing the P key or the voice key...

Страница 18: ...solve the problem please contact with the local agent or call 4008876858 E9 Pedal connection abnormal 4008876858 Please check whether the pedal plug is connecting with control box or not or loosening...

Страница 19: ...Voltage foot electromagnet control fault EA1 The ascending count is full P P71 5 Press P to clear or change value to 5 in parameter P71 EA2 The descending count is full P P71 5 Press P to clear or ch...

Страница 20: ...l and panel program to a matching program A 09 White grease regular maintenance warning A 10 Regular cleaning warning 7 Speed controller 1 4 ST4 8 2 Use four pieces ST4 8tapping screw Part No 2 to ins...

Отзывы: