


CHRONOTHERMOSTAT
[9]
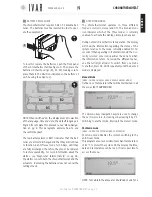
For help see ‘NAVIGATION MAP’ on pg. 22
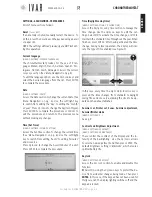
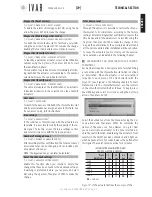
In this example, the temperature will be 68 degrees
from 18:00 to 20:00, 65 degrees from 20:00 to 21:30
and 62 degrees from 21:30 to 24:00.
FIG.
4
AUTOMATIC TEMPERATURE SETTING
Enable Automatic Mode (Automatic Mode)
[MENU
à
MODE
à
AUTOMATIC MODE
à
ENABLE AUTOMATIC MODE]
If Automatic mode is enabled, the chronothermostat
follows a weekly schedule to control the system.
It is therefore possible to set, for each of the 7 days,
during which time bands to offer the Comfort (T1), Sav-
ing (T2) or Limit (T3) temperature.
Access the Mode section and select Automatic Mode us-
ing the
Up/down
arrows (See ‘Menu Navigation’ on pg.
6 for further instructions).
Then press
ENTER
twice, to activate the option.
Winter/Summer Mode
[MENU
à
SETTINGS
à
WINTER/SUMMER MODE]
Enables the system to control heating and cooling, giv-
ing priority to the winter set or summer set, respectively
(For information on the sets see the following para-
graphs).
Access the
Winter/Summer Mode
and use the
Up/down
arrow to select
Winter
or
Summer
, then press
ENTER
.
‘Winter Set’ and ‘Summer Set’
[MENU
à
SETTINGS
à
WINTER SET]
[MENU
à
SETTINGS
à
SUMMER SET]
To define the 3 temperature ranges into which the in
7-DAYS Schedule Graph
is divided, proceed as follows
(the 3 ranges are represented by the horizontal lines of
the graph; see Figure-4 and ‘Managing the temperature
sets’ on pg. 23).
Access the
Winter Set
section or the
Summer Set
sec-
tion depending on the mode you wish to work in (see
‘Summer/Winter Mode’). Use the
Up/down
to highlight
the required field and then press
ENTER
.
Using the
Up/down
arrows, select
Set comfort
to cus-
tomize temperature T1,
Set saving
for T2, or
Set limit
for T3. By appropriately adjusting the Saving and Limit
temperatures, the user is able to perfect saving man-
agement.
Highlight a field and press
ENTER
. With every touch of
the
Up/down
arrows the temperature value increases or
decreases by 1 °F.
When finished, press
ENTER
.
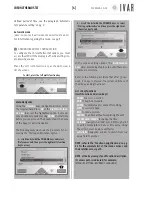
Zones - Weekly Schedule
[MENU
à
SETTINGS
à
ZONES]
When the WINTER mode is enabled, access the
Zones
section to customize the
7-DAYS Schedule Graph
of
any zone in the home (This section lists many zones, or
rather the number defined using the ‘Number of man-
aged zones’ option - see pg. 19).
The initial number of zones is 2 and this can be in-
creased to a maximum of 8). Select a zone with the
Up/down
arrows and press
ENTER
. Using the
Up/down
arrows select the day of the
week you wish to set and
press
ENTER
. Now use the
Left/right
buttons to high-
light the time bands to be
edited (48 vertical markers
divide the day into 30 min
intervals). Then press
Up/
down
to assign T1, T2 or T3
18
21
LINE 1 – e.g.: 68°
LINE 2 – e.g.: 65°
LINE 3 – e.g.: 62°
3
6
9
12
15
18
21
FR
OM 18:00
TO 20:00
FR
OM 20:00
TO 21:30
FR
OM 21:30
TO 24:00
7-DAYS SCHEDULE GRAPH
(EXAMPLE)
300546US-10-14
ENGLISH
Содержание Equicalor
Страница 46: ...300546US 10 14 ...
Страница 47: ...300546US 10 14 ...
Страница 48: ...300546US 10 14 W W W I V A R U S C O M EQUICALOR IT GB DE FR ES DE BE CZ NO ...