background image

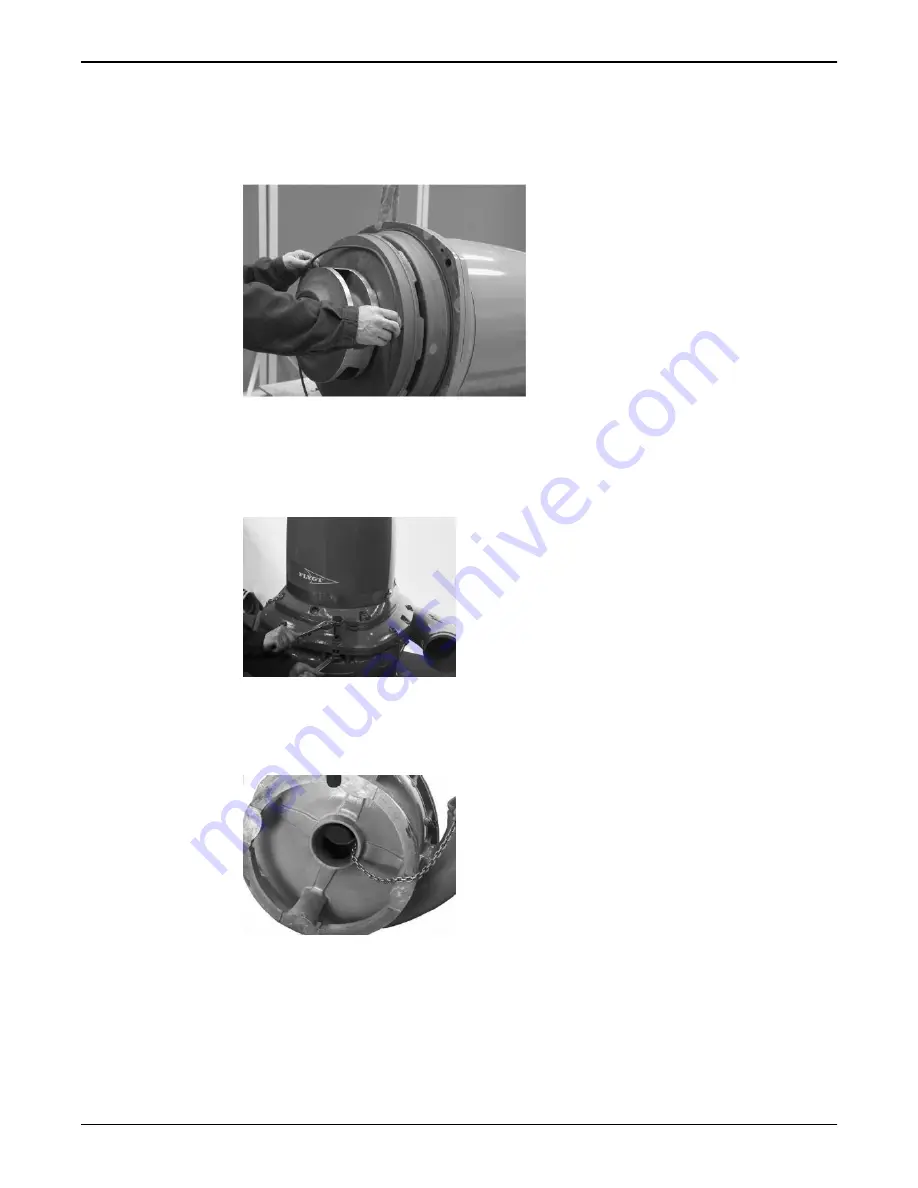
b) Fit the sleeve and the impeller to the shaft

If the impeller screw is not clean , and cannot easily be screwed back in the shaft, replace the screw.

c) Fit the washer and impeller screw onto the shaft.
d) Hand-tighten the impeller screw to prevent it from falling off.
e) Remove the sling and fit new O-rings to the wearing cover.

3. Mount the pump housing:

a) Grease the pump housing screws.
b) Place the drive unit in the pump housing.
c) Tighten the screws in a diagonal sequence.

Tightening torque, see 

Torque values

 (page 27).

4. Lock the impeller:

a) Place the pump in a horizontal position.
b) Thread a chain through the impeller and pump housing outlet.
c) Lock the chain so the impeller cannot rotate.

5. Adjust the impeller:

a) Remove the impeller screw.
b) Using a hexagon-bit adapter, turn the adjustment screw clockwise until the impeller makes contact

with the pump housing.

c) Tighten it a further 1/8 turn (45°).

Maintenance (Continued)

34

Flygt 5150.350, 5150.360 Installation, Operation, and Maintenance Manual

Содержание Flygt 5150.350

Страница 1: ...Water Wastewater Installation Operation and Maintenance Manual Flygt 5150 350 5150 360...

Страница 2: ......

Страница 3: ...ng 12 Monitoring equipment 12 Optional sensors 12 The data plate 13 Approvals 13 Product denomination 15 Installation 16 Install the pump 16 Authority regulation 16 Fasteners 16 Install with S install...

Страница 4: ...ajor overhaul 38 Service in case of alarm 38 Troubleshooting 40 Introduction 40 The pump does not start 40 The pump does not stop when a level sensor is used 41 The pump starts stops starts in rapid s...

Страница 5: ...if any parts have been damaged or are missing 3 If applicable unfasten the product by removing any screws bolts or straps For your personal safety be careful when you handle nails and straps 4 Contac...

Страница 6: ...nded use of the equipment please contact an ITT representative before proceeding Installation Operation and Maintenance manuals clearly identify accepted methods for disassembling units These methods...

Страница 7: ...ock or arc flash hazards Always bear in mind the risk of drowning electrical accidents and burn injuries Safety equipment Use safety equipment according to the company regulations Use this safety equi...

Страница 8: ...work done by untrained and unauthorized personnel Product and product handling requirements These are the product and product handling requirements for Ex approved products in potentially explosive a...

Страница 9: ...nes Always recycle according to these guidelines 1 Follow local laws and regulations regarding recycling if the unit or parts are accepted by an authorized recycling company 2 If the first guideline i...

Страница 10: ...hen handling the pump It must fulfill the following requirements The minimum height contact ITT for information between the lifting hook and the floor must be sufficient to lift the pump The lifting e...

Страница 11: ...table way or placed facing down so that any still remaining pumped liquid runs out If present the cooling jacket must be drained manually by opening the air vent screws at the top of the cooling jacke...

Страница 12: ...plication limits page 44 Spare parts Modifications to the unit or installation should only be carried out after consulting with ITT Original spare parts and accessories authorized by ITT are essential...

Страница 13: ...ooling jacket The motor is cooled by a closed loop system An integrated coolant pump circulates the coolant whenever the pump is operated The cooling jacket can also be used with a external cooling sy...

Страница 14: ...urce etc Contact your local ITT representative for more information Monitoring equipment The following applies to the monitoring equipment of the pump The stator incorporates three thermal contacts co...

Страница 15: ...13 Rated current 14 Rated speed 15 Maximum submergence 16 Direction of rotation L left R right 17 Duty class 18 Duty factor 19 Product weight 20 Locked rotor code letter 21 Power factor 22 Maximum am...

Страница 16: ...ambient temperature 14 Serial number 15 ATEX marking Figure 4 EN approval plate EN approval for cable entry Certificate number INERIS 02ATEX9008 U II 2 G or IM2 EEx d IIC or EEx dI FM This illustrati...

Страница 17: ...sts of nine characters divided into two parts This is an example of a product code and an explanation of its parts 3085 183 1 2 NP 1 Sales denomination 2 Version Serial number The serial number is use...

Страница 18: ...llation In S T and Z installations the pump must be equipped with cooling jacket Provide a suitable barrier around the work area for example a guard rail Check the explosion risk before you weld or us...

Страница 19: ...nformation see Check the impeller rotation page 25 Make the electrical connections General precautions Electrical Hazard A certified electrician must supervise all electrical work Comply with all loca...

Страница 20: ...damaged and must not have indentations or be embossed with markings etc at the cable entry The cable entry seal sleeve and washers must conform to the outside diameter of the cable The minimum bending...

Страница 21: ...ps are not used with the Y D start 4 Connect the motor conductors U1 V1 W1 and earth ground to the terminal board The earth ground conductor must be 150 mm 6 0 in longer than the phase conductors in t...

Страница 22: ...uipment For information about the phase sequence and the color codes of the leads see Cable charts page 20 4 Check the functionality of the monitoring equipment a Check that the signals and the trippi...

Страница 23: ...lors of the stator leads Stator connection Lead color U1 Red U2 Green U5 Red V1 Brown V2 Blue V5 Brown W1 Yellow W2 Black W5 Yellow SUBCAB 7GX 6 stator leads Y D connection This table shows the connec...

Страница 24: ...B AWG 2 motor cables 6 stator leads Y and D connections This table shows the connection diagrams for the SUBCAB 4GX SUBCAB AWG 3 phase power cables with Y and D connections Y connection D connection U...

Страница 25: ...ator leads Y and D connections This table shows the connection diagrams for the screened SUBCAB 4GX SUBCAB AWG 3 phase power cables with Y and D connections Y connection D connection 1 2 3 4 1 2 3 4 5...

Страница 26: ...values have a 10 tolerance Figure 10 FLS10 and Thermal contact 24 V AC DC R CC P C L2 L1 10 2 6 7 T1 T15 T2 FLS10 5 11 1 12 VDC 9 8 10S 4 3 C Pump contactor CC Control circuit L1 Caution light leakage...

Страница 27: ...tes according to this illustration The correct direction of impeller rotation is clockwise when you look at the pump from above 4 If the impeller rotates in the wrong direction transpose two phase lea...

Страница 28: ...nd the noise level requirements in the environment where the pump is installed Failure to do so may result in hearing loss or violation of local laws Start the pump WARNING If you need to work on the...

Страница 29: ...at the pump is isolated from the system and that pressure is relieved before you disassemble the pump remove plugs or disconnect piping Maintenance guidelines During maintenance and before reassembly...

Страница 30: ...2 5 4 4 9 3 6 9 22 16 44 32 76 56 120 88 187 138 Carbon steel and alloyed steel Torque Nm ft lbs 8 8 2 3 1 7 4 6 3 4 7 8 5 8 19 14 38 28 65 48 158 116 308 228 532 392 10 9 3 2 2 4 6 5 4 8 11 8 26 19...

Страница 31: ...out a cooling jacket Figure 15 With a cooling jacket b Pump out any coolant from the inspection chamber as shown here c Replace the inspection plug and O ring and tighten Tightening torque 44 Nm 33 ft...

Страница 32: ...prevent corrosion and be nonpoisonous generally recognized as safe by the FDA as food additives under part 184 and 182 NOTICE Clean water with an anti corrosive is an acceptable coolant when there is...

Страница 33: ...mp housing can have very sharp edges Wear protective gloves When laying the pump on its side do not allow the weight of the pump to rest on any portion of the impeller The impeller must not be allowed...

Страница 34: ...p housing e Remove the O rings 4 Secure the wearing cover a Place the drive unit horizontally WARNING When laying the pump on its side do not allow the weight of the pump to rest on any portion of the...

Страница 35: ...shaft end c Grease the conical sleeve the threads of the adjustment screw the washer and the impeller screw NOTICE The impeller can become loose Remove any surplus grease from conical and cylindrical...

Страница 36: ...drive unit in the pump housing c Tighten the screws in a diagonal sequence Tightening torque see Torque values page 27 4 Lock the impeller a Place the pump in a horizontal position b Thread a chain t...

Страница 37: ...76 Nm 57 ft lb c Tighten it a further 1 8 turn 45 d Fit the wear protection plug 7 Check that the impeller can rotate freely The clearance between the impeller and the pump housing should be 0 4 1 3...

Страница 38: ...r a chain to lock the impeller in place 2 Remove the wear protection plug 3 Remove the propeller screw 4 Remove the retaining ring and the washers 5 Remove the propeller from the propeller shaft a Put...

Страница 39: ...t the wear protective plug into the propeller 7 Check that the impeller can rotate freely Service the pump Type of service Purpose Inspection interval Inspection To prevent operational interruptions a...

Страница 40: ...tion and other protections Check the correct settings Personnel safety devices Check the guard rails covers and other protections Rotation direction Check the impeller rotation Seal housing2 1 Fill wi...

Страница 41: ...ain after one week of operation If leakage has occurred 1 Drain the fluid 2 Change the mechanical seal unit 3 Replace with new coolant The thermistor Thermal contact 1 Check the coolant level 2 Check...

Страница 42: ...s Contact the local ITT service shop The pump does not start automatically but can be started manually Check that The start level regulator is functioning Clean or replace if necessary All connections...

Страница 43: ...uence Cause Remedy The pump starts due to back flow which fills the sump to the start level again Check that The distance between the start and stop levels is not too small The non return valve s work...

Страница 44: ...gt Service Guide on the web or contact the local ITT service shop Always state the serial number of your pump when you contact ITT see Product Description page 10 The pump delivers too little or no wa...

Страница 45: ...riming the pump such as a foot valve If the problem persists refer to the Flygt Service Guide on the web or contact the local ITT service shop Always state the serial number of your pump when you cont...

Страница 46: ...d Voltage imbalance tolerance 2 Stator insulation class H 180 C 360 F Application limits Data Description Liquid temperature 40 C 104 F maximum Warm liquid version only with cooling jacket 70 C 158 F...

Страница 47: ......

Страница 48: ...ered in Sweden operates in some 140 countries across the world with own plants in Europe China and North and South America The company is wholly owned by the ITT Corporation of White Plains New York s...

Отзывы: