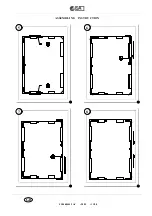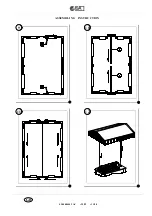
4 280 00444 2 AC • 21/29 • 11/98
GB
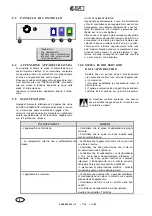
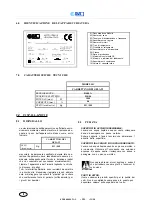
8.5 CONTROL PANEL
8.6 START-UP OF THE EQUIPMENT
10.0 SETTING THE REFRIGERATOR
OUT OF ORDER
If it were necessary to set the refrigerator out of order
after a long period of operation, be careful to:
1) Make it unusable (for example, cutting the supply
cable).
2) Remove any door or object that may result
dangerous to children.
The set contains substances ozone-damaging.
Therefore, is must be disposed of in proper centres
in accordance with local regulations.
TROUBLE
SHOOTING
• The appliance does not function
• Check that there is electrical current to the power
point.
• Check that the plug is correctly inserted into the
power point.
• The internal temperature is not low enough
• Check that the appliance is not adjacent to sources
of heat.
• Check that there is not excessive ice build up on
the internal walls.
• Check that the condenser is clean and free from
dust and that air can circulate freely around it. If after
all these checks the unit is still not well working, call
a qualified refrigeration engineer.
In default of mains supply, the preserved products
may undergo deterioration.
• The appliance is noisy
• Check that none of the fan blades is touching any
part of the appliance.
• Check that all bolts and screws are tightened.
• Check that the appliance is levelled.
Acoustic power level < 70 dB (A).
SUPPLY CABLE:
Check periodically the supply cable in order to detect
any damage.
In case of damage, do not use the set and not try to repair
it, call instead qualified assistance to replace it.
At least once every 30 days clean the condenser of any
dust or foreign particles which can accumulate between
the fans and the front surface of the condenser which
can obstruct the air flow.
A dirty condenser will inhibit the performance of the unit
thus causing extra energy consumption and possibly
causing the unit to fail.
Cleaning should be carried out with a soft brush or
preferably with a vacuum cleaner.
In order to keep the surfaces of the appliance in good
condition periodic cleaning should be carried out.
After completing operations as per "INSTALLATION"
instructions, plug the cabinet in.
It is advisable to equip the socket of your eletric system
with an omnipolar switch having minimum mm.3
opening between the contacts, rated for the load and
made accorting to the present norms.
Set the desired temperature by thermostat .
9.0 MAINTENANCE
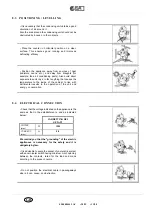
Any further adjustments on the refrigerator
NECESSARILY require the electric plug to be removed
and in any case, none of the protective elements (the
grill, the carter) must be removed by non-qualified
staff.
Absolutely avoid using the refrigerator without such
protection.
5
1
2
3
4
1
THERMOSTAT
2
DEFROSTING PILOT LIGHT
3
INPUT SWITCH
4
LIGHTING SWITCH
5
DEFROSTING TIMER
Содержание CARRETTINO DEI GELATI
Страница 2: ......
Страница 6: ...4 280 00444 2 AC 4 29 11 98 I 5 0 QUOTE TECNICHE P H L Lt 5 7 8 Lt 4 75 Lt 5 5 Lt 12 14...
Страница 11: ...4 280 00444 2 AC 9 29 11 98 ALLEGATO2 I SCHEMA DI MONTAGGIO PARAFANGHI E RUOTE...
Страница 13: ...4 280 00444 2 AC 11 29 11 98 SEQUENZA OPERAZIONI MONTAGGIO VETRI ALLEGATO4 I 2 1 4 3 6 5...
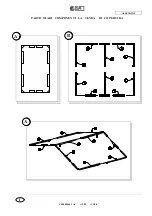
Страница 14: ...4 280 00444 2 AC 12 29 11 98 PARTICOLARI COMPONENTI LA TENDA DI COPERTURA ALLEGATO5 I A B A...
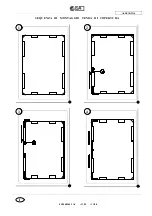
Страница 15: ...4 280 00444 2 AC 13 29 11 98 SEQUENZA DI MONTAGGIO TENDA DI COPERTURA ALLEGATO6 I 2 3 4 1...
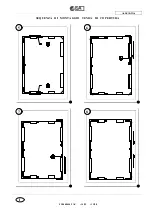
Страница 16: ...4 280 00444 2 AC 14 29 11 98 SEQUENZA DI MONTAGGIO TENDA DI COPERTURA ALLEGATO6 I 6 7 8 5...
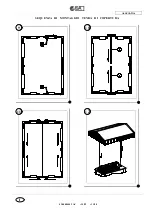
Страница 17: ...4 280 00444 2 AC 15 29 11 98 SEQUENZA DI MONTAGGIO TENDA DI COPERTURA ALLEGATO6 I 9 10 12 11...
Страница 20: ...4 280 00444 2 AC 18 29 11 98 GB 5 0 TECHNICAL DIMENSIONS P H L Lt 5 7 8 Lt 4 75 Lt 5 5 Lt 12 14...
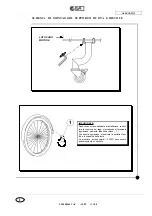
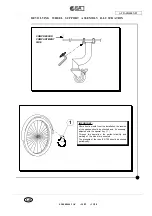
Страница 25: ...4 280 00444 2 AC 23 29 11 98 ATTACHMENT2 GB MUDGUARDS AND WHEELS ASSEMBLY ILLUSTRATION...
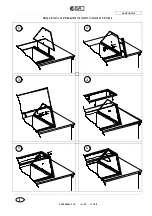
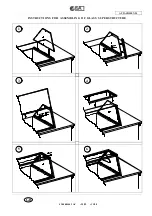
Страница 27: ...4 280 00444 2 AC 25 29 11 98 INSTRUCTIONS FOR ASSEMBLING OF GLASS SUPERSTRUCTURE ATTACHMENT4 GB 2 1 4 3 6 5...
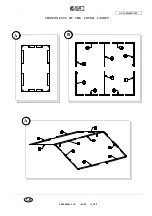
Страница 28: ...4 280 00444 2 AC 26 29 11 98 COMPONENTS OF THE COVER CANOPY ATTACHMENT5 GB A B A...
Страница 29: ...4 280 00444 2 AC 27 29 11 98 ASSEMBLING INSTRUCTION ATTACHMENT6 GB 2 3 4 1...
Страница 30: ...4 280 00444 2 AC 28 29 11 98 ASSEMBLING INSTRUCTION GB 6 7 8 5...
Страница 31: ...4 280 00444 2 AC 29 29 11 98 ASSEMBLING INSTRUCTION GB 9 10 12 11...
Страница 32: ...ISA S p A Via del Lavoro 5 06083 BASTIA UMBRA PG ITALY www isaitaly com...
Страница 36: ...4 280 00444 2 AC 4 29 11 98 I 5 0 QUOTE TECNICHE P H L Lt 5 7 8 Lt 4 75 Lt 5 5 Lt 12 14...
Страница 41: ...4 280 00444 2 AC 9 29 11 98 ALLEGATO2 I SCHEMA DI MONTAGGIO PARAFANGHI E RUOTE...
Страница 43: ...4 280 00444 2 AC 11 29 11 98 SEQUENZA OPERAZIONI MONTAGGIO VETRI ALLEGATO4 I 2 1 4 3 6 5...
Страница 44: ...4 280 00444 2 AC 12 29 11 98 PARTICOLARI COMPONENTI LA TENDA DI COPERTURA ALLEGATO5 I A B A...
Страница 45: ...4 280 00444 2 AC 13 29 11 98 SEQUENZA DI MONTAGGIO TENDA DI COPERTURA ALLEGATO6 I 2 3 4 1...
Страница 46: ...4 280 00444 2 AC 14 29 11 98 SEQUENZA DI MONTAGGIO TENDA DI COPERTURA ALLEGATO6 I 6 7 8 5...
Страница 47: ...4 280 00444 2 AC 15 29 11 98 SEQUENZA DI MONTAGGIO TENDA DI COPERTURA ALLEGATO6 I 9 10 12 11...
Страница 50: ...4 280 00444 2 AC 18 29 11 98 5 0 C TES TECHNIQUES F P H L Lt 5 7 8 Lt 4 75 Lt 5 5 Lt 12 14...
Страница 55: ...4 280 00444 2 AC 23 29 11 98 ANNEXE2 PLAN DE MONTAGE DES GARDE BOUES ET DES ROUES F...
Страница 57: ...4 280 00444 2 AC 25 29 11 98 SEQUENCE DES OPERATIONS DE MONTAGE DES VITRES F 2 1 4 3 6 5...
Страница 58: ...4 280 00444 2 AC 26 29 11 98 COMPANTS DELA TOILE DE CONVERTURE F A B A...
Страница 59: ...4 280 00444 2 AC 27 29 11 98 INSTRUCTION POUR LE MONTAGE F 2 3 4 1...
Страница 60: ...4 280 00444 2 AC 28 29 11 98 INSTRUCTION POUR LE MONTAGE F 6 7 8 5...
Страница 61: ...4 280 00444 2 AC 29 29 11 98 INSTRUCTION POUR LE MONTAGE F 9 10 12 11...
Страница 62: ...ISA S p A Via del Lavoro 5 06083 BASTIA UMBRA PG ITALY www isaitaly com...
Страница 66: ...4 280 00444 2 AC 4 29 11 98 I 5 0 QUOTE TECNICHE P H L Lt 5 7 8 Lt 4 75 Lt 5 5 Lt 12 14...
Страница 71: ...4 280 00444 2 AC 9 29 11 98 ALLEGATO2 I SCHEMA DI MONTAGGIO PARAFANGHI E RUOTE...
Страница 73: ...4 280 00444 2 AC 11 29 11 98 SEQUENZA OPERAZIONI MONTAGGIO VETRI ALLEGATO4 I 2 1 4 3 6 5...
Страница 74: ...4 280 00444 2 AC 12 29 11 98 PARTICOLARI COMPONENTI LA TENDA DI COPERTURA ALLEGATO5 I A B A...
Страница 75: ...4 280 00444 2 AC 13 29 11 98 SEQUENZA DI MONTAGGIO TENDA DI COPERTURA ALLEGATO6 I 2 3 4 1...
Страница 76: ...4 280 00444 2 AC 14 29 11 98 SEQUENZA DI MONTAGGIO TENDA DI COPERTURA ALLEGATO6 I 6 7 8 5...
Страница 77: ...4 280 00444 2 AC 15 29 11 98 SEQUENZA DI MONTAGGIO TENDA DI COPERTURA ALLEGATO6 I 9 10 12 11...
Страница 80: ...4 280 00444 2 AC 18 29 11 98 5 0 TECHNISCHE QUOTEN D P H L Lt 5 7 8 Lt 4 75 Lt 5 5 Lt 12 14...
Страница 85: ...4 280 00444 2 AC 23 29 11 98 BEIGEFUGT2 SCHEMA ZUM MONTIEREN DER KOTFL GEL UND DER RAEDER D...
Страница 87: ...4 280 00444 2 AC 25 29 11 98 RICHTIGES MONTIEREN DER GLASVERBAUUNG D 2 1 4 3 6 5...
Страница 88: ...4 280 00444 2 AC 26 29 11 98 BESTANDTEILE DACHABDECKUNG D A B A...
Страница 89: ...4 280 00444 2 AC 27 29 11 98 ANWEISUNGEN FUR DEN AUFBAU D 2 3 4 1...
Страница 90: ...4 280 00444 2 AC 28 29 11 98 ANWEISUNGEN FUR DEN AUFBAU D 6 7 8 5...
Страница 91: ...4 280 00444 2 AC 29 29 11 98 ANWEISUNGEN FUR DEN AUFBAU D 9 10 12 11...
Страница 92: ...ISA S p A Via del Lavoro 5 06083 BASTIA UMBRA PG ITALY www isaitaly com...
Страница 98: ...ISA S p A Via del Lavoro 5 06083 BASTIA UMBRA PG ITALY www isaitaly com...

