background image

P

AGE

 12 

A

SSEMBLY

 I

NSTRUCTION


A

SSEMBLY

 S

TAGE

 #6


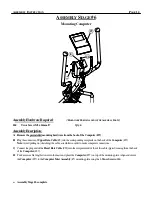
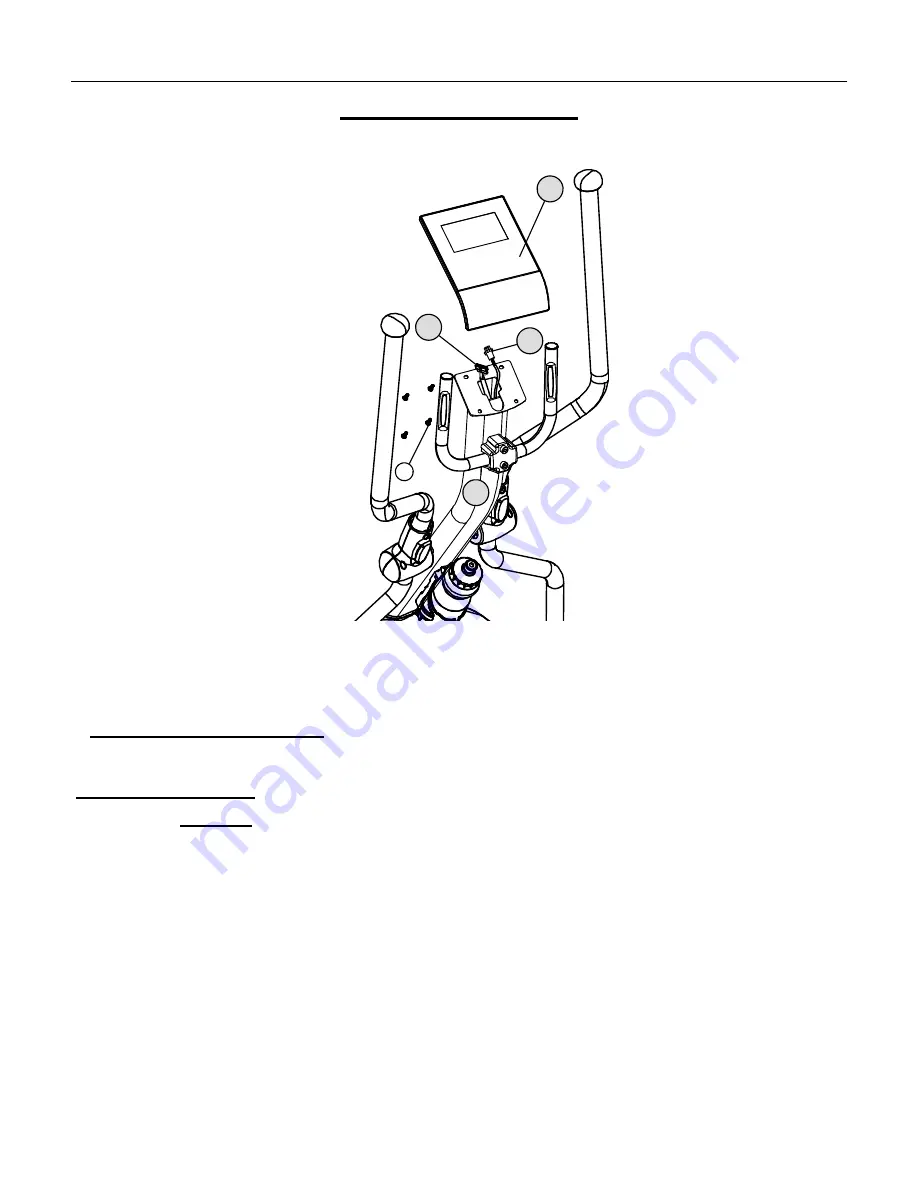
Mounting Computer 


Assembly Hardware Required

:


(*H

ARDWARE

 P

REINSTALLED


IN


THE

 A

SSEMBLY

 P

ARTS

#44 

Truss Screw M5 x 14mmL* 


Qty. 4      


Assembly Description:


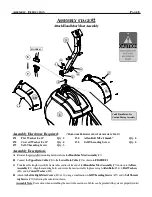
A)  Remove the preinstalled mounting hardware from the back of the Computer (#27) 

.


B) 

Plug the connector of 

Upper Data Cable 

(#8) into the corresponding receptacle on the back of the 

Computer

 (#27).                        

Note: 

Avoid pulling on (stretching) the cable assemblies in order to make computer connections. 


C) 

Connect the


plug end of the 

Heart Rate Cable 

(#22) into the receptacle end of the of the cable (pigtail) coming from the back 

of the 

Computer

 (#27). 


D) 

Tuck excess cable lengths down into the mast and  place the 

Computer 

(#27)


on top of the mounting plate.


Align and secure 

the 

Computer 

(#27) to the 

Computer Mast Assembly 

(#7) mounting plate using the 4-

Truss Screws 

(#44). 


♦ 

Assembly Stage #6  complete


44 


22 

27 

Содержание 1840

Страница 1: ...FORFUTUREREFERENCE S S S SAFETY AFETY AFETY AFETY PROPERLYWARMUPAND STRETCHBEFOREEXERCISING IFYOUFEELPAINORDIZZINESSAT ANYTIMEWHILE EXERCISING STOP IMMEDIATELYANDCONSULT YOURPHYSICIAN SERIAL NO SERIAL NO SERIAL NO SERIAL NO _____________________________________________ PURCHASE DATE ____________________ PURCHASE DATE ____________________ PURCHASE DATE ____________________ PURCHASE DATE ___________...

Страница 2: ...nit 7 Allowproperspace for useand setup of theequipment Usecarewhen mounting and dismounting equipment 8 It s recommended to placeanexercise product matbeneath theequipment foradded protectionoffloorsorcarpets 9 Inspectproductona frequentbasis Tighten loose assembliesorhardware as needed Replace wornordamaged parts 10 Wearproperworkout apparel Avoid wearing looseclothing ordangling shoe lacesdurin...

Страница 3: ...Note Afterassemblyiscompleted allow aminimalof 2 3ft ofspaceoneachsideofunitforuseraccessanddismounting Thebasictoolsforassemblingthisproductareincludedwithmainassemblyhardware Donotdisposeof anypackagingmaterialsuntilassemblyoftheproductiscompleted If youexperienceproblemswithoperationoftheequipmentafterassembly pleasereviewthe troubleshootingreferencepageinthismanual Makesuretocompletelyfill out...

Страница 4: ...8 Right Upper Swing Arm 1 16 IM05774 Right Front Swing Arm Cover 1 17 IM05775 Right Rear Swing Arm Cover 1 18 IM05776 Left Front Swing Arm Cover 1 19 IM05773 Left Rear Swing Arm Cover 1 20 IM23764 Left Pedal Arm 1 21 IM23766 Right Pedal Arm 1 22 12262 Handlebar Assembly 1 23 IM3106809 HR Strap 1 24 IM13019 2 Plastic Handle Bar Mount Cover 1 25 IM3106709 Water Bottle Cage 1 26 IM31000 Water Bottle ...

Страница 5: ...mL 6 37 01026 Self threading Screw M4 x 50mmL 3 38 02284 Wave Washer 2 39 01748 Flat Washer 10 x 26 x 2t 2 40 01030 Hex Bolt M8 x 20mmL 2 41 01749 Carriage Bolt M8 x 40mmL 4 42 01747 Nylon Nut M8 8 43 01586 Self threading Screw M3 x 14mmL 4 44 01043 Truss Screw M5 x 14mmL 8 45 01764 Flat Washer 8 x 16 x 1t 2 46 02172 1 Allen Bolt M8 x 70mmL 2 47 02281 Shoulder Bolt M8 x 64mmL 2 48 IM13019 Handleba...

Страница 6: ...lyisrequired Pleasereferencetheindividualassembly stepsandmakenoteofallpreinstalledhardware Socket Head M7 x 22 Lock Washer 7 x 2t Flat Washer 7 x 1t Handlebar Clamp Multi Tool Allen Wrench Allen Bolt M8 x 20 Self threading Screw M3 x 14 Allen Bolt M8 x 16 Curved Washer 8 x 2t Self threading Screw M4 x 50 Flat Washer 8 x 2t Hex Bolt M8 x 20 Self threading Screw M4 x 20 Nylon Nut M8 Hex Bolt M8 x 5...

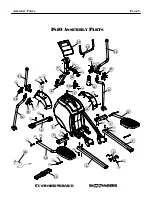
Страница 7: ...Y P PARTS ARTS 15 50 C CUSTOMER USTOMER S SERVICE ERVICE 1 1 877 877 788 788 9991 9991 51 16 17 35 42 22 49 48 7 13 26 37 11 8 25 44 38 39 40 14 44 18 10 19 43 12 31 30 36 2 1 28 46 45 42 20 3 31 33 42 31 32 4 6 34 35 5 31 21 3 33 32 47 9 41 24 23 27 ...

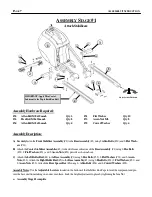
Страница 8: ...asshown above C Attachthe LeftRollerRail 4 totheBaseAssembly 1 using2 HexBolts 32 2 FlatWashers 31 and2 Acorn Nuts 33 Attach theRight RollerRail 5 totheBaseAssembly 1 using2 HexBolts 32 2 FlatWashers 31 and 2 AcornNuts 33 Attach theRearSpacerBar 6 using 4 AllenBolts 34 and4 CurvedWashers 35 AssemblyNotes UsetheAdjustableLevelers locatedonthebottomoftheStabilizer End Capsto levelthe equipmentandpre...

Страница 9: ...n inFIGURE 1 C Tuckthecable lengths insidetheframe tubesandinserttheend oftheHandlebarMastAssembly 7 down ontotheBase Assembly 1 Alignthe mountingholes and securethe mast assemblyin placeusing6 AllenBolts 34 2 FlatWashers 31 and 4 CurvedWashers 35 D Attachthe Left RightMastCovers 10 11 usinga combination 6 Self ThreadingScrews 37 and 3 Self Thread ingScrews 37 followingthe orientationshown Assembl...

Страница 10: ...nd1 HexBolt 40 perside ReferenceFIGURE 1 Note Applyaliberalamountofgreaselubricanttothepivotshaftandbushingstoensuresmooth quietoperationoftheswing arms B InstalltheLeftUpperSwingArm 14 ontotheLeftLowerSwingArm 12 andsecureusing2 CarriageBolts 41 2 CurvedWashers 35 and2 NylonNuts 42 ReferenceFIGURE 2 C RepeatstepBfortheRightUpperSwingArm 15 mounting D InstalltheRightFrontSwingArmCover 16 totheRigh...

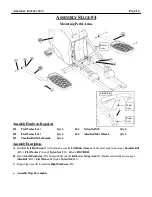
Страница 11: ...erbracketovertheLeftRollerArmpivottubeandsecurelyfastenusing1 ShoulderBolt 47 1 FlatWasher 31 and1 NylonNut 42 RefertoFIGURE 1 B InserttheLeftPedalArm 20 frontpivottubeintotheLeftLowerSwingArm 12 bracketandsecurelyfastenusing1 AllenBolt 46 1 FlatWasher 45 and1 NylonNut 42 C RepeatStepsAandBtoinstalltheRightPedalArm 21 AssemblyStage 4 complete ASSEMBLY INSTRUCTION PAGE 10 20 21 42 45 46 47 31 42 Ro...

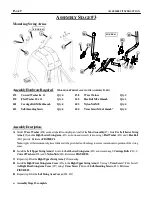
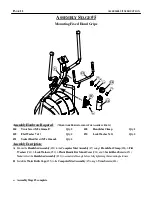
Страница 12: ...bly Description A MounttheHandlebarAssembly 22 totheComputerMastAssembly 7 using1 HandlebarClamp 48 2 Flat Washers 49 2 LockWashers 50 1 PlasticHandleBarMountCover 24 and2 SocketHeadScrews 51 Note AdjusttheHandlebarAssembly 22 toacomfortableanglebeforefullytighteningthe mountinghardware B InstalltheWaterBottleCage 25 totheComputerMastAssembly 7 using2 TrussScrews 44 AssemblyStage 5 complete ASSEMB...

Страница 13: ...e 8 intothecorrespondingreceptacleonthebackoftheComputer 27 Note Avoidpullingon stretching thecableassembliesinordertomakecomputerconnections C ConnecttheplugendoftheHeartRateCable 22 intothereceptacleendoftheofthecable pigtail comingfromtheback oftheComputer 27 D Tuckexcesscablelengthsdownintothemastand placetheComputer 27 ontopofthemountingplate Alignandsecure theComputer 27 totheComputerMastAss...

Страница 14: ...dapter 28 into thereceptaclelocated on front oftheMain BaseAssembly shroud B PlugtheAC Adapterinto an availablewall outlet SAFETYNOTE Foradded safetyaround children unplugthe AC Adapterfrom the wall when bikeis not in use Helpful Reminders Beforeusingthethis product pleasetakethetimeto reviewtheadditional information regardingcomputer operation product maintenance and related warrantyinformation N...

Страница 15: ...IONSWILLCOUNTUPFROM 0 RESISTANCE BIKEISEQUIPPEDWITHANADJUSTABLERESISTANCEMECHANISM THISFEATURE WILLALLOWAUSERTOCHOOSEFROM1 16LEVELSOFVARIEDRESISTANCE A USERCANADJUSTRESISTANCEATANYTIMEDURINGATRAININGMODEBY PUSHINGTHE UP or DOWN BUTTON EXCEPTINTARGETHEARTRATEMODE BUTTONFUNCTIONS ENTER SELECTS SETSDISPLAYFUNCTIONS START STOP ACTIVATES STOPSCOMPUTERFUNCTIONS UP SELECTSPROGRAMMODE ADJUST INCREASES DIS...

Страница 16: ...INKING HEART SYMBOL NUMERIC READING WILLBE DISPLAYED ONTHE COMPUTER AS LONG AS A USER S HANDS ARE LOCATED ONTHEGRIP SENSORS READINGS WILL APPEAR WITHIN 30 SECONDS TO1 MINUTE OF CONSISTENT GRIP CONTACT READINGS WILLBECOME INCONSISTENT IF AUSER FAILS TO LEAVE BOTHHANDS IN CONTACT WITHTHEGRIP SENSORS PRESET ATARGETHEARTRATE ATARGET HEART RATE WILLBEPRESET WHENUSING ONE OFTHEFOURTARGET HEART RATEPROGR...

Страница 17: ...ess the Enter button 3 Press the UP DOWNbuttons to presetyour age press the ENTERbutton 4 Select a heartrate training zone referenced below 5 Press the START STOP button to begin training oruse the UP DOWN buttons to adjust the training target time Setting aHRTraining Zone Zone training is based on exercising within a set percentage ofa usersmaximum heart rate Ausers maximum heart rate isbased on ...

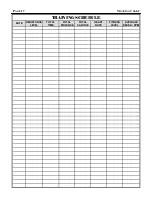
Страница 18: ...PAGE 17 TRAINING CHART TRAININGSCHEDULE DATE RESISTANCE LEVEL TOTAL TIME TOTAL DISTANCE TOTAL CALORIE HEART RATE FITNESS LEVEL AVERAGE SPEED RPM ...

Страница 19: ...idesurfacesofbothbaserails Liftpedalanduseasoftclothtospreadlubricantevenlyovertrackingsurfaceofthebaserails Afterapplication movethepedalsbackforthoverthebaserailsandwipeoffanyexcesslubricant RecommendedLubricants Note Avoidusingproductsthatactmoreasarustinhibitor insteadofanactualsurfacelubricant Werecommendusingadrysiliconbasedlubricant Householdcarwax mayalsobeused butthismayrequiremorefrequen...

Страница 20: ... 4 PIVOTARM FOOTPEDAL WOBBLE 4 1 CHECK TO MAKE SURE ALL CORRESPONDING PIVOT MOUNTING HARDWARE HAS BEEN SECURELY TIGHTENED 4 2 REVIEW ASSEMBLY STEPSAND MOUNTING HARDWARE 5 ROLLERNOISEOR TRACKING PROBLEM 5 1 LUBRICATETHETOP OFTHE BASE RAILS WITH SILICON LUBRICANT 6 ERRATICHEARTRATE 6 1 MAKE SURE PALMS OF HAND ARE CENTERED ON GRIP SENSORS 6 2 CHECK CABLE CONNECTIONS FROM HANDLE BAR ASSEMBLYTOTHE COMP...

Страница 21: ...els carefullylifttherearstabilizertubeandsteertheequipmenttothedesiredlocation Donotpullonpivotarmsorcomputertomoveequipment T TRAINING RAINING T TIPS IPS How youstart an exercise programdepends onyour physicalcondition Ifyou havebeeninactive for awhile or you have pre existing health condition you should start slowly Initially you may only be abletoexercisefora shortamountoftimeusing minimalresis...

Страница 22: ...t allow limitations on how long an implied warranty lasts or the exclusion or limitation of incidental or consequential damages so the preceding exclusions or limita tions may not apply The stated warranty gives you specific legal rights and you may have other rights that vary state to state Star Trac Health Fitness Inc neither assumes or authorizes anyone to assume for it any other express warran...

Страница 23: ... _________________________________________________ PRODUCT INFORMATION Model ________________________________________________________ Product Type __________________________________________________ Home Gym Upright Bike Free Weight etc Serial Number _________________________________________________ Date of Purchase _______________________________________________ Month Day Year Purchased From _____...

Страница 24: ...E ENVELOPE www ironmanfitness com S S STAR TAR TAR T T TRAC RAC RAC H H HEALTH EALTH EALTH F F FITNESS ITNESS ITNESS I I INC NC NC 1844 N 1844 N 1844 NELSON ELSON ELSON R R ROAD OAD OAD S S SUITE UITE UITE D D D L L LONGMONT ONGMONT ONGMONT CO 80501 CO 80501 CO 80501 ...

Отзывы: