A
SSEMBLY
S
TAGE
#3
Mounting Swing Arms
Assembly Hardware Required
:
(*H
ARDWARE
P
REINSTALLED
IN
THE
A
SSEMBLY
P
ARTS
)
#35
Curved Washer 8 x 2t
Qty. 4
#38
Wave Washer
Qty. 2
#39
Flat Washer 10 x 2t
Qty. 2
#40
Hex Bolt M8 x 20mmL
Qty. 2
#41
Carriage Bolt M8 x 40mmL
Qty. 4
#42
Nylon Nut M8
Qty. 4
#43
Self-threading Screw
Qty. 4
#44
Truss Screw M4 x 14mmL*
Qty. 4
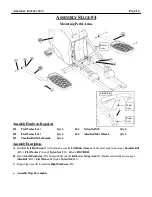
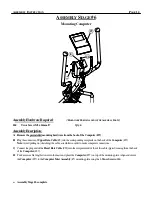
Assembly Description:
A)
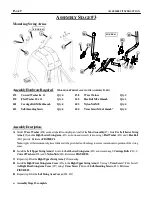
Slide 1-
Wave Washer
(#38) each onto the left and right pivot shaft of the
Mast Assembly
(#7). Install the
Left Lower Swing
Arm
(#12) and the
Right Lower Swing Arm
(#13) as shown and securely fasten using 1-
Flat Washer
(#39) and 1-
Hex Bolt
(#40) per side. Reference
FIGURE #1
Note:
Apply a liberal amount of grease lubricant to the pivot shaft and bushings to ensure smooth, quiet operation of the swing
arms.
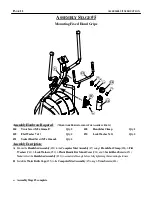
B)
Install the
Left Upper Swing Arm
(#14) onto the
Left Lower Swing Arm
(#12) and secure using 2-
Carriage Bolts
(#41), 2-
Curved Washers
(#35) and 2-
Nylon Nuts
(#42). Reference
FIGURE #2.
C)
Repeat step B for the
Right Upper Swing Arm
(#15) mounting.
D)
Install the
Right Front Swing Arm Cover
(#16) to the
Right Upper Swing Arm
(#15) using 1-
Truss Screw *
(#44). Install
the
Right Rear Swing Arm Cover
(#17) using 1-
Truss Screw
(#44) and 2-
Self-threading Screws
(#43). Reference
FIGURE #2.
E)
Repeat step D for the
Left Swing Arm Covers
(#18, #19).
♦
Assembly Stage #3 complete
A
SSEMBLY
I
NSTRUCTION
P
AGE
9
13
12
38
40
39
7
FIGURE #1
FIGURE #2
14
18
44
43
19
15
17
16
41
44
35
42


