background image

IPico™ WN400 Integrated Access Device

User Guide

User Guide © 2001 Lucid Voice

13

Any incoming call to telephone lines that are connected to IP

ico

 FXO will 

automatically be routed to the matching port number on the FXS. For 
example, if Port 0 on the FXO is connected to telephone line 212-555-
6353, any calls made to this number will be directed to the telephone 
connected to Port 0 on the IP

ico

 FXS.

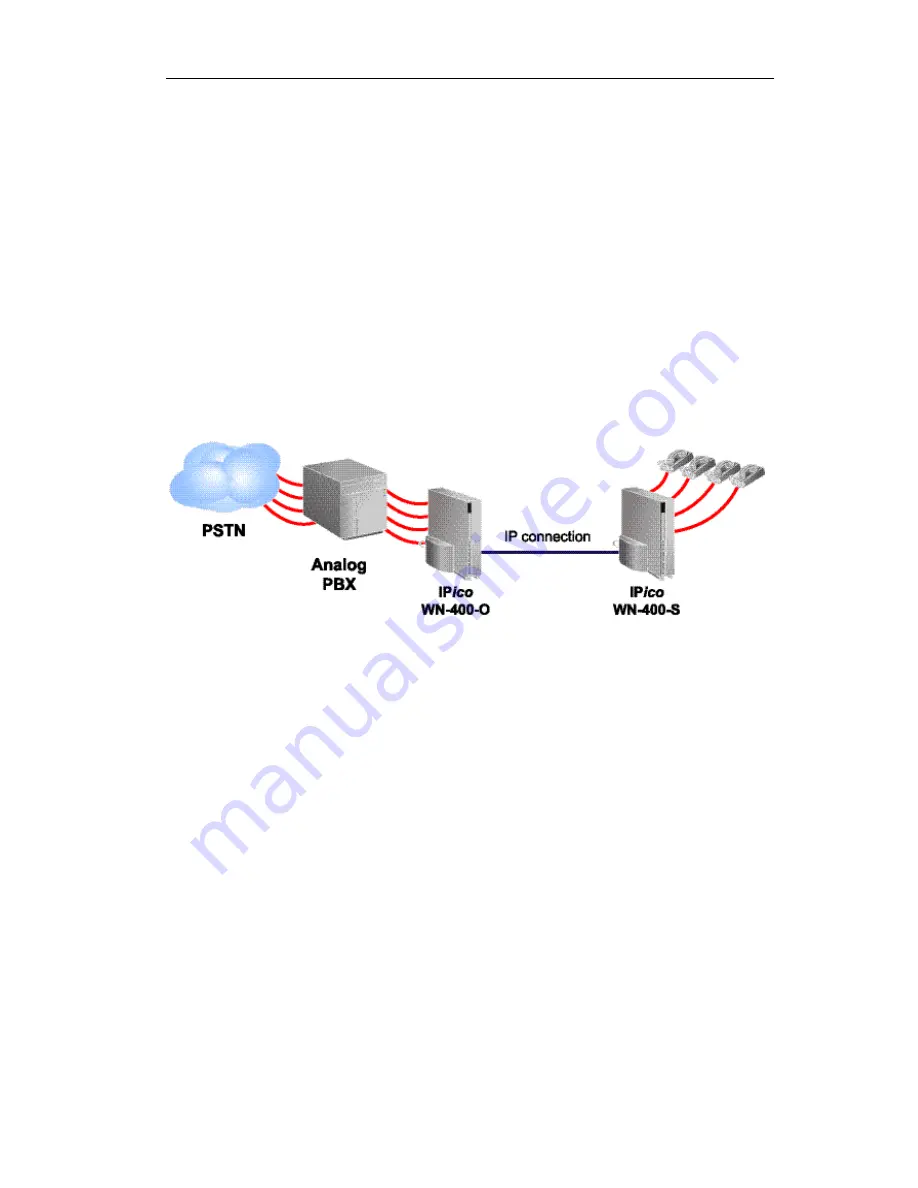
R e m o t e   P B X   E x t e n s i o n

Setup

Figure 7

Connect Ports 0-3 of the WN400-S (FXS) IP

ico

 unit to the extension 

lines of the PBX (left side in diagram), and connect analog telephones to 
Ports 0-3 of the WN400-S (FXS) IP

ico

 unit. 

Note:

It is not necessary to attach a telephone or fax machine to 
each port; you may use as many or as few as you wish.

Содержание WN400-O

Страница 1: ......

Страница 2: ...Support 2 Package Contents 3 Required Accessories 4 Quick Installation 5 Network Topology 6 Placing Calls 7 Inter site Telephony Connection 7 Setup 7 Placing a Call 8 Remote PBX Connection 8 Setup 8 P...

Страница 3: ...Interfaces and Controls 20 Product Capabilities 20 Voice Support 21 Management Features 21 Security Features 21 Interfaces 21 Standards and Protocols Supported 22 Troubleshooting 22 Dialing and Placi...

Страница 4: ...hannel Because IPico prioritizes voice over data it guarantees toll quality voice communications using advanced real time protocols RTPs IPico s patented QoS guarantees optimal use of multiple voice a...

Страница 5: ...m by phone 972 3 575 7488 Contact our U S support team by phone 212 686 7797 E mail us at support lucidvoice com You can also fill out our support form at www lucidvoice com support htm Lucid Voice ke...

Страница 6: ...IPico WN400 Integrated Access Device User Guide User Guide 2001 Lucid Voice 5 Package Contents 1 IPico unit 2 Power supply 3 Power supply bracket 4 Power cord Figure 1...

Страница 7: ...sories You will need Two IPico units Two power supplies Two power supply brackets Two or more analog dual tone multifrequency DTMF telephone units not supplied Two Category 5 Ethernet RJ 45 cables and...

Страница 8: ...panel of the IPico and tighten the bolt 5 Connect the power supply unit to the power connector 6 Turn power supply switch to ON 7 Turn on the IPico unit by pushing the ON OFF button on the back panel...

Страница 9: ...ther IPico should be set as Slave All IPico WN 400 S devices are shipped as Master and all IPico WN 400 O devices are shipped as Slave Use the IPico Web Manager Configuration tool to change between Ma...

Страница 10: ...ort number as shown in Figure 4 You may change the leading numbers of the IP ico devices Please refer to the section titled Web Manager Configuration Tool to learn how to change the leading digits Int...

Страница 11: ...ce and dial the leading digits 200 followed by the port number 0 For example to reach the extension on Port 3 attached to the IPico unit on the right dial 3003 Remote PBX Connection Setup Figure 5 Con...

Страница 12: ...n To place a call from extensions connected to the PBX to an extension connected to an IPico device dial the extension of the outside line connected to the IPico unit assigned by the PBX and then dial...

Страница 13: ...rt you may use as many or as few as you wish Placing a Call To place a call from the IPico WN400 S to the PSTN lift the handset and dial any outside number you wish to reach There is a one to one rela...

Страница 14: ...to telephone line 212 555 6353 any calls made to this number will be directed to the telephone connected to Port 0 on the IPico FXS Remote PBX Extension Setup Figure 7 Connect Ports 0 3 of the WN400...

Страница 15: ...X documentation for PBX configuration information Configuration Web Manager Configuration Tool Accessing the unit 1 Connect your PC to the IPico WAN port either by plugging both your PC and the IPico...

Страница 16: ...nd WN400 O FXO Figure 8 LAN IP Address This address must be assigned to the IPico unit if you are using the IPico unit to route data from workstations on your LAN This address should be unique and mus...

Страница 17: ...from the IPico WAN interface to the wireless link You should assign a value that matches the true link capacity throughput while considering the fact that the traffic usually flows in both directions...

Страница 18: ...from one FXS port to another each FXS port is identified by a four digit number The four digit number is comprised of the IPico leading digits three digits and the port number one digit between 0 and...

Страница 19: ...oid conflicts with other nodes on your network this address must not be assigned to any other node on your WAN or LAN including the Slave Slave IP Address Enter the IP address of the Slave IPico WAN i...

Страница 20: ...atus All Ok Use the Logout button to exit the Web Manager Configuration Tool Figure 10 In order to commit your configuration changes when the All Ok status appears you must type reload at the login pr...

Страница 21: ...rs to the default settings or to any other required value Note changes are saved and take effect immediately after new settings are entered 1 Using a crossover serial cable connect a laptop or a works...

Страница 22: ...Appendix A After you authenticate you will see this screen Figure 11 1 Press 1 to enter the new LAN IP and LAN Netmask 2 Press 2 to enter the new WAN IP and WAN Netmask 3 Press 3 to enter the IP addr...

Страница 23: ...Pico TM to the office LAN WAN interface on the rear panel RJ 45 PCMCIA is used to connect the IPico TM to the IP link wireless modem The telephone ports 4 x RJ 11 are used to connect the IPico TM as f...

Страница 24: ...djustable jitter buffer length to accommodate delayed voice packets Management Features Web based management system ASCII terminal Network manageable Remote upgradeable software Security Features Adva...

Страница 25: ...itization Troubleshooting Dialing and Placing Calls 1 I do not hear a dial tone WN400 S only Make sure you waited 60 seconds after reboot Verify that the telephone set is properly connected to your IP...

Страница 26: ...ialing does not ring Using the Web Manager verify that you are using the correct leading digits of the extension you are trying to reach Verify that you are dialing the correct port number of the exte...

Страница 27: ...COMmander Verify that you are using the COMmander password as your password login see Appendix A 3 I encountered the following system error SIOCADDRT Network is unreachable What do I do You probably e...

Страница 28: ...IP address must be on either the LAN subnet or the WAN subnet 4 Changes do not take effect After saving your new settings and logging out you did not log back in using reload as password login Try re...

Страница 29: ...h the Web Manager You will need to use COMmander to reset your IP address configuration Please refer to the section titledIP Address Configuration Using COMmander Quality of Service QoS 1 Voice qualit...

Страница 30: ...ter will be ignored and will not be saved This warning indicates that although the changes were saved they were not executed This is caused when you use the WWW Manager over a network Changing IP addr...

Страница 31: ...224 0 0 0 and are not allowed Invalid mask address The mask you entered is invalid A valid mask is a mask that when converted to binary contains a series of ones followed by a series of zeros read fr...

Страница 32: ...ers Passwords Master Slave WAN IP 192 168 1 253 192 168 1 254 LAN IP 192 168 7 1 192 168 8 1 WAN Netmask 255 255 255 0 255 255 255 0 LAN Netmask 255 255 255 0 255 255 255 0 Leading digits 200 300 Para...

Страница 33: ...warranty of 6 months from date of replacement or repair or until end of Original Warranty Period whichever is the later 4 Software Warranty LUCID warrants with respect to software that the software p...

Страница 34: ...rol such as chemical electro mechanical or electrical influences and damages or by accident fire or other hazards This warranty shall not cover defects due to interference or operating of the System b...

Страница 35: ......

Отзывы:

Похожие инструкции для WN400-O