background image


Without the Write 

Key, the NDAS disk 

can only be 

accessed with 

‘Read Only’ permit. 


The Device ID can 

be found on a 

sticker either on the 

outside or the inside 

of your enclosure. 


The device ID and 

Write Key do not 

contain the letter O. 

Please use the 

number 0 for all 0’s. 


After adding a new 

device, the Found 

New Hardware 

Wizard may appear. 

Let is search for 

and install the 

drivers 

automatically. 


Chapter 4 - NDAS Setup 

Driver installation on a PC 

  Insert the driver CD and select your Operating System. 

  If installation does not start automatically, browse and 

double-click on the ‘NDASSetup’ file. 

  Follow the installation wizard and install the driver. 

  Accept any warning of missing signature or logo testing. 

  Restart your system when prompted to do so. 


Driver installation on a Mac 

  Insert the driver CD. 

  Browse for the ‘NDAS Install’ package and execute it. 

  Follow the installation wizard and install the driver. 

  After finishing the installation, restart your computer. 


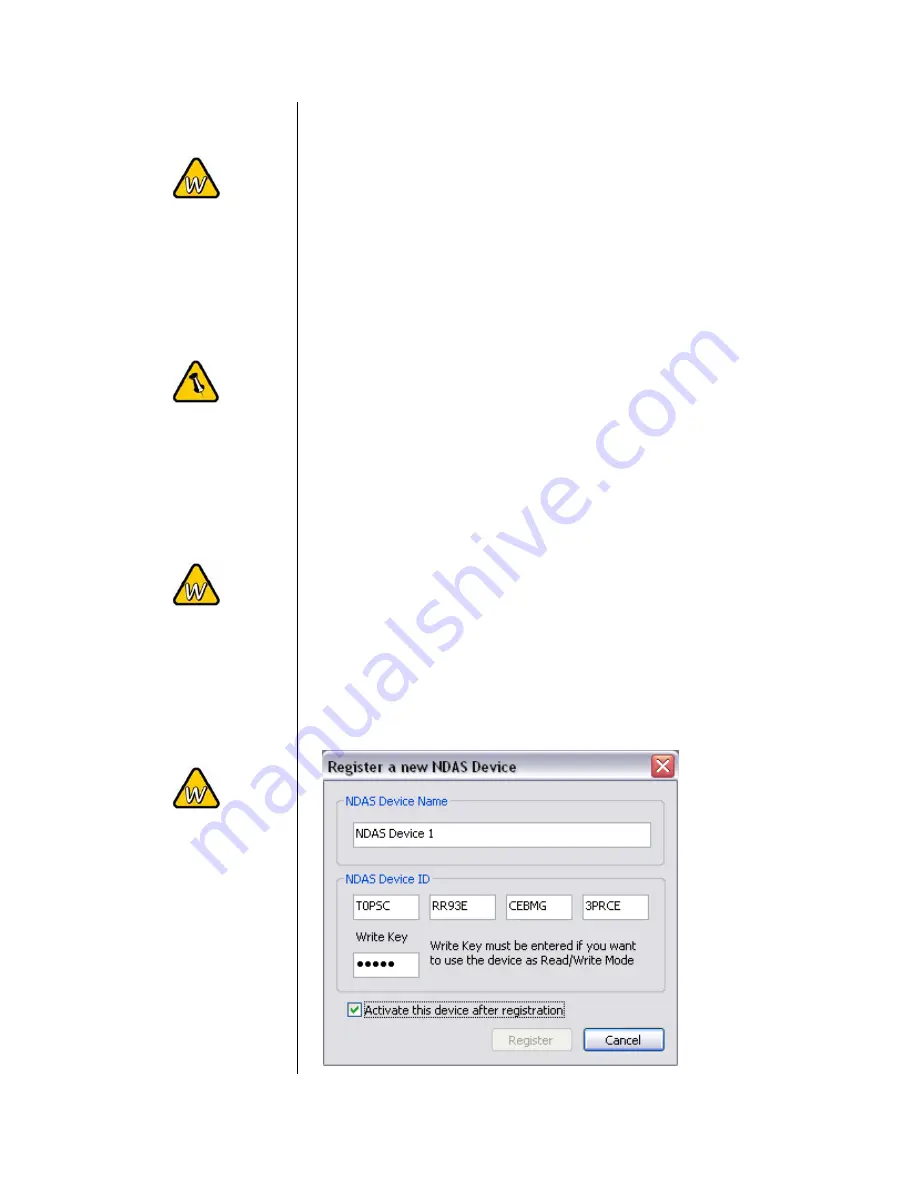
Registering a new device on a PC 

  Click on the NDAS Device Management icon on the taskbar. 

  Select ‘Register a New Device’. 

  Depending on your setup under Options/Advanced/Menu, 

you can use the registration wizard or do it manually. 

  Enter a name for your NDAS disk or use the default name. 

  Add your NDAS device ID and if you also want to write to 

the disk, enter the Write Key (last 5 digits). 


- 8 - 

Содержание External Storage Enclosure for 3.5" IDE Hard Drives

Страница 1: ...EN Pleiades NDAS External Storage Enclosure for 3 5 IDE Hard Drives User Manual v1 2...

Страница 2: ...ATION 2 MOUNTING THE NDAS DISK ON A MAC 10 SHARING THE NDAS DISK ON THE LAN 11 CHAPTER 2 INSTALLING THE HDD 3 NDAS DEVICE MANAGEMENT ON A PC 12 DEVICE STATUS MODES 13 PREPARING THE ENCLOSURE 3 NDAS UT...

Страница 3: ...high performance using NDAS technology for you to share your disk on the local network whilst keeping it as simple as a standard Plug and Play device Extending your storage space has not only just be...

Страница 4: ...pped PC Win98SE WinME Win2000 WinXP Mac Requirements Minimum Apple G3 processor PowerPC 64MB RAM USB 1 1 equipped Mac Mac OS 9 2 or above USB 2 0 equipped Mac Mac OS 10 2 10 3 or above 100Mbps or 10 1...

Страница 5: ...read the warranty and any other notes from your vendor carefully before doing so as this could void your warranty Chapter 2 Installing the HDD Preparing the Enclosure Remove the 4 screws on the bottom...

Страница 6: ...rd and your hard drive before closing the case Hard Drive Assembly Connect the ATA cable and the power line to your hard drive Install the hard drive and fasten the screws Align the top cover with the...

Страница 7: ...the network can use the NDAS disk as if it were a local drive In USB 2 0 High Speed mode the Pleiades NDAS is directly attached to a single computer using the USB port A few tips on how to connect yo...

Страница 8: ...Connect the Pleiades NDAS via USB 2 0 and turn it on Let Windows search for and install the driver automatically Open My Computer to see your external hard drive For factory new drives and more info a...

Страница 9: ...Ethernet cable is disconnected Connect the Pleiades NDAS and turn it on No driver installation required The external drive will mount and show up on your desktop For factory new drives and more info a...

Страница 10: ...the NDASSetup file Follow the installation wizard and install the driver Accept any warning of missing signature or logo testing Restart your system when prompted to do so Driver installation on a Mac...

Страница 11: ...ac Locate the NDAS Utility found inside your Applications folder under Utilities and open it Under Management select Register a New Device Enter a name for your NDAS disk or use the default name Add y...

Страница 12: ...hard drive see Formatting the HDD Mounting and using your NDAS disk Mounting the NDAS disk on a PC Click on the NDAS Device Management icon on the taskbar Select your new NDAS device which should now...

Страница 13: ...cess the drive you have the following options to limit or allow the access Read Only Users can only read from the disk Read Write Users can read and write to the disk and can also delete any files cre...

Страница 14: ...n the taskbar All registered NDAS devices will be displayed on the menu Register a New Device Registers a new NDAS device to your computer Refresh Status Updates status of your NDAS devices About Disp...

Страница 15: ...Mounted RO Users can only read from disk Blue Read Write Mounted RW Users can read and write to disk White Connected Disk is ready to be mounted Black Disconnected Device is registered but not connect...

Страница 16: ...thout the Write Key the Read Write mode will be disabled Configuration Selection to Mount and Unmount the device using either Read Only or Read Write mode Sign Register a New Device Management Both th...

Страница 17: ...ption to run the NDAS software from a command line interface Open the command line and type following cd C Program Files NDAS System Folder may vary depending on driver being used Type ndascmd exe whi...

Страница 18: ...only It is recommended to format the hard drive using the interface you will most likely be accessing the drive with Chapter 5 Formatting the HDD Be aware that this will destroy all your existing data...

Страница 19: ...party software PC running Win2000 or WinXP Disk Management Program Right click on My Computer and choose Manage Select Disk Management Choose the drive you want to format and right click on it for fur...

Страница 20: ...e partitions on an external drive To do that you would need to purchase additional 3rd party software connect the drive to the internal IDE bus or upgrade to OS X For Mac OS X use the Disk Utility to...

Страница 21: ...ement Close all windows that may be accessing the NDAS device About this Manual This manual covers all versions of the Pleiades NDAS Images firmware and descriptions may therefore slightly vary betwee...

Отзывы: