Troubleshooting
6-2
3800 Vital Signs Monitor Service Manual
Revised October 2004
Troubleshooting Action(s):
1.
Connect the monitor to mains AC power. Power-cycle the monitor. If the monitor
now starts, then the battery needs to be recharged. Leave the monitor connected to
mains AC power for a minimum of 4 hours. If the monitor does not start, then
continue on.
2.
Disassemble the monitor according to the monitor disassembly procedure, up to
the point where the battery pack is removed from the rear case assembly.
3.
Connnect the power cable into the back of the monitor.
4.
If the monitor now runs through its complete power-up sequence and displays the
“Normal” screen, then the battery needs to be replaced. If the monitor still exhibits
the problem, continue on.
5.
Continue to disassemble the monitor according tothe monitor disassembly
procedure, up to the point where the monitor rear case assembly is unscrewed from
the monitor front bezel assembly (but the internal connectors are still attached).
6.
Ensure that the 32-pin ribbon display cable is firmly attached to the main board
and LCD display in the monitor front bezel assembly.
7.
At this point, connect the power cable into the back of the monitor. (The battery
pack need not be reattached.)
8.
Confirm that the monitor runs through its complete power-up sequence and
displays the “Normal” screen. If so, disconnect the power cable from the monitor
and re-assemble the monitor according to the monitor reassembly procedure.
9.
Otherwise, the display may need to be replaced. See the replacing the display
section of the Repair chapter for details.
6.1.3 Monitor Only Displays the Power-Up (“Invivo)MDE M8”) Banner
Description:
Upon power-up, the power-up banner is displayed and a single beep tone is
generated. At this point, the power-up sequence stalls and the main monitoring “Normal” screen
is never displayed.
Possible Cause(s):
1.
Internal Compact Flash card or interface board has become unseated.
2.
Bad Compact Flash card.
Troubleshooting Action(s):
1.
Disassemble the monitor according to the monitor disassembly procedure.
2.
In the middle of the Master Processor (Bitsy board) is an adapter board that
contains a Compact Flash card. Ensure that the card is firmly seated in the adapter
board. Ensure that the adapter board is fully seated in the Bitsy board.
3.
Reattach the keypad, display speaker and Power LED connectors to the main
board.
4.
At this point, connect the power cable into the back of the monitor. The battery
pack need not be reattached.
5.
Confirm that the monitor runs through its complete power-up sequence and
displays the “Normal” screen. If this doesn’t occur, then the Compact Flash card
may need to be replaced. This can be obtained as a replacement part (see Spare
Parts chapter).
6.
If the power-up sequence now works, disconnect the power cable from the monitor
and re-assemble the monitor according to the monitor reassembly procedure.
Содержание Escort M8
Страница 1: ......
Страница 2: ......
Страница 26: ......
Страница 32: ......
Страница 34: ......
Страница 44: ......
Страница 55: ...Repair Revised October 2004 3800 Vital Signs Monitor Service Manual 7 11 Figure 7 10 Input Panel Assembly View...
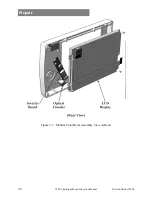
Страница 56: ...Repair 7 12 3800 Vital Signs Monitor Service Manual Revised October 2004 Figure 7 11 Recorder Subassembly View...
Страница 60: ......
Страница 66: ......
Страница 72: ......
Страница 78: ......
Страница 80: ......

