InTouch IT7340 Скачать руководство пользователя страница 23


16


Clock and Calendar 

Setting up the Calendar 

1. On 

the 

Home Screen

, tap the 

 button. 

2. Next, 

on 

the 

Main Menu

 screen, tap the 

Settings

 icon. 

3.  Then on the 

Settings

 screen, tap the 

 button.   

4. The 

Settings > Date / Time

 screen will appear. 

Set the Date 

1. On 

the 

Date

 line, tap the 

 button. 

2. The 

Date / Time > Date

 screen appears. 

3. Tap 

the 

up

 and 

down arrows

 to set the day, month, and year. 

4. Tap 

Yes

 to save the settings or 

No

 to cancel the settings.  You will be 

returned back to the 

Settings > Date / Time

 screen. 

Set Date Format 

1. On 

the 

Date Format

 line, tap the 

 button. 

2. 

A pop-up will appear displaying the available date formats. 




MM / DD / YYYY 




DD / MM / YYYY 




YYYY / MM / DD 

3. 

Tap the desired format.  To exit the pop-up without selecting a format tap 

the 

 button. 

4. 

You will be returned to the 

Settings > Date / Time

 screen.   

5. 

The selected format will now be displayed on the 

Date Format

 line. 


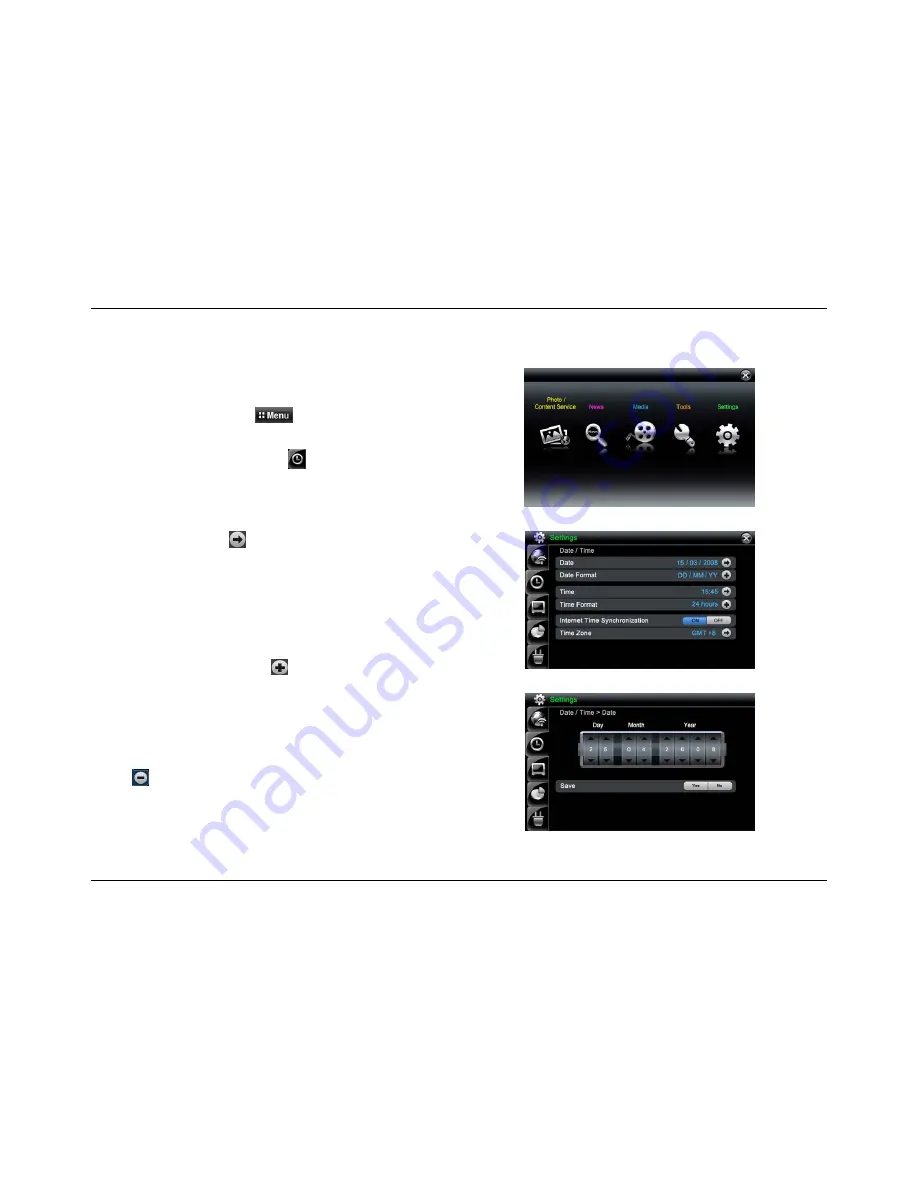
Main Menu screen 


Settings > Date / Time screen  


Date / Time > Date screen 

Содержание IT7340

Страница 1: ...Intouch IT7350 IT7340 Version B User Guide Version 0 1...

Страница 2: ...or property damage h Hold and pull out the plug by its body when disconnecting it from the outlet as pulling the plug out by the cord may cause it to be damaged Failing to do so may cause fire or the...

Страница 3: ...wireless internet frame and equipment basic safety precautions should always be followed to reduce the risk of fire electric shock and injury to persons including the following h Do not use this produ...

Страница 4: ...r there is no guarantee that interference will not occur in a particular installation If this equipment does cause harmful interference to radio or television reception which can be determined by turn...

Страница 5: ...11 Wi Fi icon 12 News Bar 12 Wallpaper Settings 13 For a still picture as wallpaper 13 For a slide show as the wallpaper 14 Slide Show Control Buttons 15 Clock and Calendar 16 Setting up the Calendar...

Страница 6: ...s 36 Motion Sensor Model IT7350 only 37 Screen Taps Sound 37 Power Management 38 Sleep Mode 38 Interval Time Sleep Interval Time 38 Battery Profile 39 Photo Content Service 40 Photo Player Main Page c...

Страница 7: ...eader Screen 62 News Setup 63 Set General Settings 63 Add Edit RSS News Feeds Support RSS2 0 Format only 64 Get RSS News Feed Address from Internet 64 Add a new RSS News Feed 65 Edit a RSS News Feed 6...

Страница 8: ...se check to make sure that the following items are included in the box Item Quantity Wireless Internet Frame 1 AC DC Power Adaptor 1 Quick Start Guide 1 Customer Support Contact Sheet 1 CD ROM include...

Страница 9: ...2 Wireless Internet Frame Overview Front panel Motion Sensor ON OFF indicator light Only for IT7350...

Страница 10: ...3 Back panel DC power jack DC 5V 3 0A Battery Mode button Press to display On Screen buttons USB port Insert a USB flash drive here that contains stored pictures music and video to access...

Страница 11: ...ash card slot Insert a compact flash here that contains stored pictures music or video that you would like to access PC mini USB port Connect to PC with provided USB cable Reset button Restart your fr...

Страница 12: ...ormally when connected to your digital photo frame try to connect it to your PC If it still does not work normally after re connecting to your PC then contact a service center for that external device...

Страница 13: ...ion Icon Button Name Function Submenu button Enter into submenu Select option button Select option Select file button Select file Delete button Delete some setups Keyboard button Input characters More...

Страница 14: ...ds at the same time to release the locking mechanism Calibrate the Touch Screen 1 Slide the OFF ON switch to ON 2 There are five 5 points needed to tap to calibrate the touch screen The first point is...

Страница 15: ...t 2 Next tap OK The Home Screen will appear EULA To not accept the EULA 1 If you do not want to accept the terms of the EULA then tap the check box next to I do not accept the terms in the license agr...

Страница 16: ...calendar WiFi indicator Indicates the network connection status News Bar Tap to open the news article works when connected to the internet Wallpaper area Tap to open the Home Settings screen to change...

Страница 17: ...To add background music or change other settings for the slide show in the Home Screen please go to the Photo Setup section 4 User can play a slide show from internal memory or card only Web or Home...

Страница 18: ...s you to turn the Home Screen calendar on or off News Bar Allows you to turn the News Bar display on or off in the Home Screen News Bar is disabled when slide show is selected Home Display screen Powe...

Страница 19: ...rks only when the frame is connected to the internet Please refer to the RSS News Reader section for more detailed instructions on how to set up the news feed The news feed on the Home Screen is pulle...

Страница 20: ...screen will appear 5 Tap Frame or Disk to select the picture location 6 Double tap the picture you want The picture you selected should appear in the Still Picture line in the Home Settings screen 7...

Страница 21: ...splay area The picture you selected should appear in the Play Slide Show from line in the Home Settings screen 7 Tap the button on the Home Setting screen The picture and the photo set that you select...

Страница 22: ...move to next picture by shaking his hand in front of the sensor Tap the screen the control button will appear Motion sensor is effective either when slide show is being played or being paused Only fo...

Страница 23: ...h and year 4 Tap Yes to save the settings or No to cancel the settings You will be returned back to the Settings Date Time screen Set Date Format 1 On the Date Format line tap the button 2 A pop up wi...

Страница 24: ...se the buttons listed below to change the calendar view Month button change to month display Day button change to day display Today button jump to today display Next button Go to next day next month o...

Страница 25: ...e Time screen 6 The selected format will now be displayed on the Time Format line Select Internet Time Synchronization h If you select ON the system time of your device would be synchronized with netw...

Страница 26: ...tton to open the Alarm Settings Edit screen 6 On the Title line tap the button to open the Keyboard Type in the title of the alarm Tap OK when you are finished 7 To set the alarm time tap the button o...

Страница 27: ...hange Repeat the above step to change the alarm settings 3 To exit the Alarm Settings screen tap the button 4 To exit the Clock tap the clock s face and then tap the button Alarm Settings Edit Alarm T...

Страница 28: ...Tools button to open the Tools screen It includes two applications h Clock The clock application lets you add change delete and control an alarm You can set up a maximum of 4 alarms For more details o...

Страница 29: ...information it will be displayed in the top half of the keyboard button tap to accept your input button tap to exit the Keyboard without saving your input Additional keys Special Additional Characters...

Страница 30: ...2 Press Mode button again or tap the Home Screen wallpaper area to close the OSD Bar Note The OSB Bar can only be accessed in some applications OSD Bar Description Home Screen with On Screen Display O...

Страница 31: ...ess selected Adjust Volume Level using OSD Bar 1 Tap the icon or icon once to open the Volume OSD buttons 2 Tap the icon or icon to adjust the volume level 3 Tap the icon to mute the speaker The icon...

Страница 32: ...The Settings screen appears Network button configure your wireless network Date Time button configure the Home Screen clock and calendar Display button make screen settings System button make system...

Страница 33: ...ll available Access Points AP All the available access points and their signal strength are listed in Network Search screen If the access point has a network key the icon will be displayed 4 On the SS...

Страница 34: ...connection and clear all of the settings in current AP including the network key 11 If connection fails a pop up message Network Connection Failed will appear Tap OK and try connecting to the access p...

Страница 35: ...Fi line tap the On button to turn on WiFi 3 On the Manual Edit Wi Fi Network line tap button The Network Edit screen appears 4 Tap to open the Keyboard screen Type in your Wi Fi AP SSID name and then...

Страница 36: ...key mode you want 6 On the Authentication Type line tap the button A pop up list will appear Tap on the Authentication Type you want If Network Key Mode is WPA or WPA2 the Authentication Type and Tra...

Страница 37: ...FF the frame will use a fixed IP address to connect to the access point 3 If the DHCP is OFF then you need to input the following settings IP Address Subnet Mask Default Gateway DNS Server 4 Tap to op...

Страница 38: ...m 11 A Connecting dialog box appears 12 After successfully connecting to the access point you should see a green checkmark icon next to AP SSID name 13 If connection fails a pop up message Network Con...

Страница 39: ...er sensitivity 1 Tap the button to start calibrating the screen 2 There are five 5 points needed to tap to calibrate the touch screen The first point is in the middle of the screen and there is one 1...

Страница 40: ...functions of the frame are disabled For example Alarm Sleep mode Auto check firmware upgrade won t work 2 When the demo video is played tap the screen The video will be paused and will display two ic...

Страница 41: ...g a language tap the button 3 You will be returned to the System screen and the selected language will now be displayed on the Language line Firmware Upgrade Manual Firmware Upgrade 1 On the System sc...

Страница 42: ...new firmware will be automatically installed next time the frame is turned on Please wait while the firmware installs Warning When the new firmware is installing user can t shut off the frame 6 Tap O...

Страница 43: ...Details You can review system details using the System Show Details screen Details that can be displayed are h Software Version displays the software version installed h MAC Address Wireless displays...

Страница 44: ...s recognized successfully If user taps the screen slide show will be paused and control bar will appear User can also switch to next picture by shaking his hand in front of the sensor and there will b...

Страница 45: ...s screen tap the button 2 Tap the button to select a sleep mode Off turns Sleep Mode off Once activates Sleep Mode once Everyday activates Sleep Mode every day Interval Time Sleep Interval Time This f...

Страница 46: ...by AC adaptor 1 On the Settings page tap the button to open the Battery Profile Settings screen 2 On the Power Save Mode line select either ON or OFF 3 On the Turn Off Backlight line tap the button to...

Страница 47: ...Player application on the Home Screen tap the Menu button to open the Main Menu page 2 Next tap the Photo Content Service icon to open the Photo Content Service application Photo Player Main Page cont...

Страница 48: ...open the Main Menu page 2 Next tap the Photo Content Service icon to open the Photo Content Service screen 3 Tap the Photo icon to enter into the photo screen Frame The Frame is the internal memory of...

Страница 49: ...cts the Motion Sensor on when playing slide show in Photo application user can also control to move to next picture by shaking his hand in front of the sensor Tap the screen the control button will ap...

Страница 50: ...networks 1 For wireless connection access to shared folders on the PC when connected via the Wi Fi network 2 The procedure assumes you are using the Microsoft Windows firewall If you are using a diffe...

Страница 51: ...Add to Library Windows Media Player Library drop down menu 4 In the Add To Library screen under the Select the folders to monitor section select My personal folders 5 Click Add a pop up dialog Add Fol...

Страница 52: ...ount of pictures you have stored on your computer in a timely matter it is recommended that you do the following 1 On your computer in the My Documents folder create a new folder with only those pictu...

Страница 53: ...ich is under the symbol at the top left to Pictures Windows Media Player Category drop down menu 2 Under Library select All Pictures Keywords Date Taken Rating Folder settings 3 Check whether the adde...

Страница 54: ...ick on Media Sharing 2 If your network is a Private network then the Available Device list and the Settings button will be displayed in the Library Sharing window Media Sharing dialog box 3 In the Ava...

Страница 55: ...or a required rating under the Default Settings section 7 To add a device or computer to connect automatically to the library check the Allow new devices and computers automatically not recommended c...

Страница 56: ...Slide Show You can show a slide show on the Home Screen or within the Photo application For detailed instructions on how to setup the slide show please refer to For a slide show as the wallpaper Slid...

Страница 57: ...epeat feature 10 On the Shuffle line tap ON to have all the photos in the current folder played randomly Tap OFF to turn off the Shuffle feature 11 On the Background Music line tap ON to select a musi...

Страница 58: ...only needs to input username For Other you need to input the whole RSS link in Link Note If the User Name entered contains invalid characters then a pop up dialog will appear to prompt you re enter t...

Страница 59: ...Account 1 On the Windows Live FrameIt screen tap the Account button to display all account folder currently registered to the frame 2 Double tap the Account folder to display some folders about the p...

Страница 60: ...r finish website sign in or sign up tap the Continue button to continue 7 Server will send a Device ID after user taps Continue button If fail to get the Device ID the frame will appear a pop up scree...

Страница 61: ...ap the button A pop up dialog box appears asking Do you want to delete the link Tap Yes to delete or No to cancel without deleting Add an account screen Content Service Framechannel 1 To open the Phot...

Страница 62: ...e frame will automatically slide show Framechannel screen Framechannel account screen Setup Framechannel Account On the Photo screen tap the button The Setup drop down menu appears Tap the Setup icon...

Страница 63: ...edit Delete the Framechannel Account 1 On the Add an account screen tap the button A pop up dialog box appears asking Do you want to delete the link Tap Yes to delete or No to cancel without deleting...

Страница 64: ...reen tap the location where the photo is that you want to delete 2 Select the photo you want to delete Tap the button a drop down menu will appear 3 Tap Delete One to delete your selected photo 4 Tap...

Страница 65: ...News Feed is sorted in each category You can add a RSS feed to a specific category See the News Setup section RSS News Feed Control Buttons Icons All button shows all RSS News feeds Local World Busin...

Страница 66: ...icon Text icon the RSS News is text based with photo or without photo The unread news is in white color The read news is in grey color If it s today news it displays Today in date display The time is...

Страница 67: ...n that closes the News Media Player area which then enlarges the News Text Content to full screen Up arrow button page up the news content Down arrow button page down the news content News Media Playe...

Страница 68: ...area 3 Tap the News List button to go back to the RSS News List screen News Text Content full screen Refresh Delete News Note If your RSS news can t be refreshed successfully it might be because the R...

Страница 69: ...lete All to remove all news headlines of the one feed Delete All RSS News Read Headlines 1 On the RSS News List screen tap the button to open the drop down menu 2 Tap on Delete All Read in grey color...

Страница 70: ...ature when reading the news Keeps News For You can choose how many days you want to keep the news history Tap the button on the Keep News For line to open the drop down list You can select from one 1...

Страница 71: ...be used for demonstrating how to add a RSS News Feed 1 On your PC connect to http www yahoo com 2 Click on News 3 Scroll down to News Services usually located near the bottom of the page 4 Click on 5...

Страница 72: ...d Enter the RSS news feed address link Tap OK to save The RSS news feed address will now appear in the Link line 4 On the Title line tap the button to open the Keyboard Enter a title for the RSS news...

Страница 73: ...s link Tap OK to save The updated RSS news feed address will now appear in the Link line 4 On the Title line tap the button to open the Keyboard Make your changes to the RSS news feed title Tap OK to...

Страница 74: ...he RSS News General screen tap the button The News Feeds screen will appear 2 On the news feeds line that you want to delete tap the button 3 A pop up dialog box will appear asking Do you want to dele...

Страница 75: ...reen Playback Control Buttons Search button only the internet radio stations supplied by vTuner can be searched Now Playing button switches from Play List screen to Now Playing screen List button swit...

Страница 76: ...l please see Home Network section To access and play music or videos 1 On the Media screen Tap Music to open the Music screen Tap Video to open the Video Screen 2 Tap once on the file disk folder you...

Страница 77: ...tap on the station to begin play 3 If the content does not load immediately then a Loading prompt will appear Wait for the Loading prompt to close 4 When you are connected to a station the Now Playing...

Страница 78: ...Setup to open the Music Video Setting screen Repeat Mode 1 On the Music Video Setting screen tap the button A pop up menu will appear 2 Select the repeat mode for media playback Selection are None Rep...

Страница 79: ...ard Using the Keyboard you can input the following internet radio station information Title Link Country Genre Language 4 Enter in the information you want then tap OK when you are finished 5 To save...

Страница 80: ...the Keyboard you can change the following internet radio station information Title Link Country Genre Language 3 Enter in the information you want then tap OK when you are finished 4 The updated infor...

Страница 81: ...or file copy 4 Tap your destination memory 5 Tap Yes to confirm the copy or No to cancel Copy One Media screen Copy All 1 In the left side of the Media screen tap the location where the media files ar...

Страница 82: ...ap Yes to confirm the deletion or No to cancel Delete All 1 In the left side of the Media screen tap the location where the media files are that you want to delete 2 Select any media file Tap the butt...

Страница 83: ...Fixed IP Network Channels Support 1 14 channels subject to country regulation Standard USB2 0 Full Speed USB Port USB port Host and Mini USB port Slave 4 in 1 Card Slot Support SD MMC MS MS Duo XD Sug...

Страница 84: ...ry Voltage 3 7V Language English French Spanish German Italian Dutch and Portuguese Photo JPEG BITMAP GIF Audio WMA Internet Radio WMA Video WMV MPEG1 320x240 25fps Format RSS News RSS2 0 standard Pho...

Страница 85: ...is connected to the same wireless network with your PC 2 Make sure you have added some photos Media files to your sharing center through Windows Media Player11 and have allowed the Wireless Internet F...

Страница 86: ...sure the Wireless Internet Frame has been connected to a network which can access the internet and the network is in a good status 2 Make sure the internet radio format is supported The internet radio...

Страница 87: ...ion and require user to power reset 2 Under the influence of electrostatic phenomenon the product may malfunction and require user to power reset 3 Under the environment with Voltage Dips and Interrup...

Страница 88: ...81...

Отзывы: