Interalia SBX2 Скачать руководство пользователя страница 58

CHAPTER 5 | 

Nodes & Program Configurations 
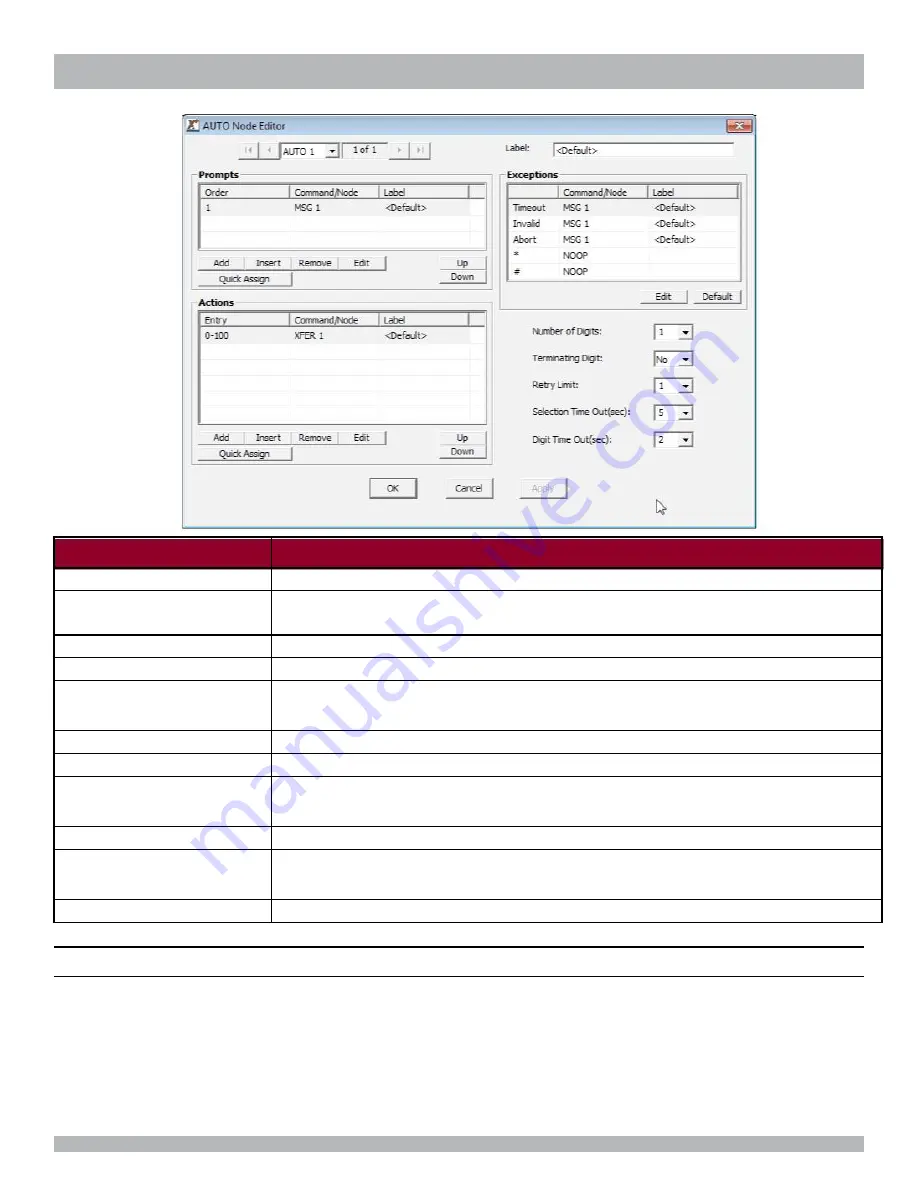


Field Tag 

Description 

Prompts 

Specifies the prompts message(s) that are played to the caller. 

Timeout 

Specifies the action taken when the caller does not make a selection. Enter No Operation 


(NOOP) 

Invalid 

Specifies the action taken when a selection is made that is not defined in the Action Table. 

Abort 

Specifies the action taken when the retry limit has been reached. 

Action 

Table The left side of the Action Table is made up of digits that can be entered by the 


caller. The right side of the table contains the XMU+ action instructions. 

Number of Digits 

Specifies the number of digits to be collected, from one to seven digits. 

Terminating Digits 

Specifies the optional terminating digit, # or *. 

Selection Timeout (sec) 

Specifies the digit collection timeout period, one to sixty seconds. The default is 5 


seconds. 

Digit Timeout (sec) 

Specifies the inter-digit timeout value in seconds, one to 15. 

Retry Limit 

Specifies the number of retries that are allowed, one to five, if invalid selections or 


timeouts occur. 

DTMF Clear 

Erases the DTMF buffer. Options are Yes or No; not applicable to AUTO Nodes. 


Note: 

Click on the Edit buttons to view the options available to each node. 


Interalia 

|

 SBX

2


System Manual


Page 52 


Содержание SBX2

Страница 1: ...SBX2 Installation Operation Manual Interalia SBXSBX2 SystemOperationManualManual...

Страница 2: ...tely as possible however we do not make any guarantees or warranties regarding its content Trademarks Interalia is a registered trademark of Interalia Inc SBX2 is a registered trademark of Interalia I...

Страница 3: ...rface Table Conventions and Abbreviations 9 Matching SBX2 Cables and Connectors 10 SBX2 Port Descriptions and Cabling Instructions 11 Connecting the SBX2 to a PC with XMUCOM Software 12 To connect to...

Страница 4: ...ng System Requirements 22 Installing Microsoft Dial Up Networking 22 Installing XMUCOM Software 23 To install XMUCOM Software 23 To start XMUCOM 23 Understanding the XMUCOM Application Interface 25 XM...

Страница 5: ...ing Messages to the SBX2 38 To send messages from your PC to SBX2 Unit 39 Receiving Messages from SBX2 40 To receive messages from SBX2 to your PC 40 CHAPTER 5 Nodes Program Configurations 42 About Ba...

Страница 6: ...ages 73 To Remotely Access The SBX2 73 To Disconnect From The SBX2 73 To record a message remotely 73 To Play A Message Remotely 73 To Delete A Message Remotely 74 To Change The Default Language Of SB...

Страница 7: ...you get started in installing and using the SBX2 In This Chapter About the SBX2 Announcement and Call Processing System on page 2 Who Uses SBX2 on page 2 About the XMUCOM Application on page 2 SBX2 Pr...

Страница 8: ...Public Announcements Interactive Auto Attendants Call Processing and Transferring See Typical Applications on page 3 for more information about each of the above functions About the XMUCOM Applicatio...

Страница 9: ...eir name into the telephone key pad DTMF Call Processing System An SBX2 can be used as a DTMF Call Processing system Typical uses include Call Centre routing with either front ending or back ending AC...

Страница 10: ...w This chapter also introduces you to the fundamentals of the XMUCOM application interface CHAPTER 4 Recording Playing Transferring Messages The techniques and methodology for preparing generating and...

Страница 11: ...power cord is the disconnect for the SBX2 ensure that the AC receptacle is near the unit Caution The installation of an SBX2 unit should only be completed by a qualified telecommunications electronic...

Страница 12: ...rements SBX2 power consumption is 21 Watts maximum See Detailed SBX2 Technical Specifications on page 80 for more power consumption information To meet SBX2 power requirements ensure that the necessar...

Страница 13: ...ntifies the current system configuration You should watch the information displayed on the LCD to ensure that the SBX2 is working correctly Record the system details since the system configuration inf...

Страница 14: ...with the soft stop option Scroll through to select ALL lines should you wish to enable soft stop on every line Press enter Press the right arrow key to reach Lines Soft Stop Press Enter Press Enter a...

Страница 15: ...stand PBX operating modes See About SBX2 Operating Modes on page 17 Preparing to Cable the SBX2 To properly cable the various communication port connections as well as to wire and connect SBX2 analog...

Страница 16: ...mote RJ45 Program messages from RJ45 Mating connector and Connector a remote location using a twisted pair cable telephone keypad Alarm RJ45 Connect alarm circuitry RJ45 Mating connector and Connector...

Страница 17: ...utput to PA and or PBX 7 Audio Out2 600 Ohm output to PA and or PBX 8 Audio In Streamed audio input 9 Remote Message management utilizing DTMF 10 Qty 8 Analog Extensions Analog Key PBX Extensions Note...

Страница 18: ...is method is effective for organizations that have existing LAN WAN networks operating at all SBX2 sites Ethernet connections require A network port must be available on the XMUCOM PC Both the PC and...

Страница 19: ...provides a remote telephone access port which is accessed through the REMOTE RJ45 connector on the SBX2 See SBX2 Port Descriptions and Cabling Instructions on page 11 for more information An analog li...

Страница 20: ...ows regular programming to be overridden by a pre recorded message in case of an emergency To Wire The Alarm Connector When the system is powered up and running normally there is a closed circuit betw...

Страница 21: ...o the punch block 3 Punch down wires from SBX2 to the punch block 4 Cross connect the wires in the punch block as per the following PBX table Call Processing Auto Attendant Applications on page 16 Pin...

Страница 22: ...trex Line The colors used are for 25 pair cables not CAT5 Always follow the diagram on page 15 See Cabling SBX2 Analog Ports on page 15 for more information PABX Announcer Line 1 Line 2 Line 3 Line 4...

Страница 23: ...continuously to the line independent of what is happening on other lines The CP contacts toggle position for approximately 250 msec at the start of the message Synchronized Continuous Play SCP The mes...

Страница 24: ...l is removed The message plays repeatedly until the start signal is removed Level Start Level Return Single Play LS LR SP The message plays in response to a start signal The CP contacts toggle positio...

Страница 25: ...nect RB Ring Start without Loop Current Check RN Will disconnect after four cycles of busy tone The message plays in response to a Loop or Ground Start signal The line will not disconnect until the me...

Страница 26: ...o learn about the XMUCOM interface In This Chapter Overview on page 21 About the Installation Process on page 21 Meeting System Requirements on page 22 Installing XMUCOM Software on page 23 Understand...

Страница 27: ...ons quickly and easily There is little guesswork on the part of the user since the pull down menus and pop up windows only present programmable options Note Administrator privileges are required to in...

Страница 28: ...tly Microsoft Dial Up Networking must be installed on your PC Dial Up Networking enables you to connect one computer to another by using a modem connection Installation and implementation of Dial Up N...

Страница 29: ...computer s CD ROM drive 2 CD will auto run skip to step 6 If not go to step 3 3 Choose Start Run 4 Click Browse and select the Setup exe file on the XMUCOM CD 5 Click OK to begin the installation 6 F...

Страница 30: ...ration with which you want to work Navigate to the folder where your existing SBX2 configurations are stored Select the Configuration you want to work with and press Open 4 Use the XMUCOM menu options...

Страница 31: ...ariety of functions The following illustration shows some of the key components of the XMUCOM interface and uses the Site Book and Edit Site windows as examples Menu Bar Tool Bar Site List window Edit...

Страница 32: ...so that you can send or receive system configurations SBX and messages to and from the SBX2 unit This window also lets you schedule retrieval and resetting of statistics for each SBX2 unit XMU Card SB...

Страница 33: ...t version of XMUCOM into a backup file Communicate Enter and manage uploads and downloads of configurations to and from the SBX2 These tabs allow you to identify the elements to be downloaded or uploa...

Страница 34: ...Display a text based view of your current system configuration This file provides summary information about all the partitions cards default nodes program nodes commands and messages that make up you...

Страница 35: ...s for storage of these files Windows XP C Program Files XMUCOM CONFIGS C Program Files XMUCOM MSGS C Program Files XMUCOM STATS Windows Vista and Windows 7 Professional C Users Public Documents Intera...

Страница 36: ...for a site are downloaded to the default directory specified in the File Handling section of the Site Book window You must set up a default directory for each SBX2 site where CSV statistic files can b...

Страница 37: ...Site drop down list box 3 Click Apply SchedulerPlus submits your retrieval request to the selected SBX2 site and waits for SBX2 to return the requested information to XMUCOM A successful communicatio...

Страница 38: ...s them to SchedulerPlus to execute them when the scheduled time arrives The ReScheduler window is accessed from the Communication menu Your PC must remain on and active for ReScheduler and SchedulerPl...

Страница 39: ...s Chapter About SBX2 Music and Messages on page 34 SBX2 Message Administration Methods on page 34 About WAV Message and Music Files on page 34 Naming Message Files on page 34 About Recording and Playi...

Страница 40: ...t Messages can be administered and managed from SBX2 Front Panel XMUCOM Application Remote Telephone Access Interalia s Message Manager About WAV Message and Music Files All music and message files us...

Страница 41: ...n which you plan to use them Copy all the messages and music to an easily accessible directory for development of program configurations Store a backup copy of all messages and music files in an area...

Страница 42: ...ges in a Studio 1 Prepare a list of messages or music that you need for your program configurations 2 Detail the contents of each message in written text format and specify the name of the file you wa...

Страница 43: ...ss 1 Identify the message number you want to play 2 Remotely access the SBX2 3 Press 8 when the SBX2 responds Enter Command 4 Press the message number nnn you want to play followed by SBX2 plays the m...

Страница 44: ...age number you want to delete 2 Remotely access the SBX2 3 When the SBX2 responds Enter Command press 39 4 Press the message number nnn you want to delete followed by 5 The SBX2 responds with Done Sen...

Страница 45: ...o send from the Available Nodes list box and click Add XMUCOM displays a list of all the messages in the current configuration The filename for each message is defined within the message nodes of the...

Страница 46: ...a specific partition or for the entire SBX2 unit When you receive and store message files from the SBX2 onto your PC XMUCOM will Place all uploaded messages in the default directory defined in the Sit...

Страница 47: ...5 Click View SBX2 to retrieve a list of messages that reside on the selected SBX2 and partition 6 Select the messages you want to retrieve from the Available Nodes list box and click Add 7 Click OK t...

Страница 48: ...XMUCOM application recommended and most intuitive method or from the Front Panel of the SBX2 only recommended for very simple configurations The remainder of this guide provides a brief overview of e...

Страница 49: ...building blocks that are linked together to create a program configuration or program to control the actions that SBX2 performs The actions performed by each node are based on specific commands and pa...

Страница 50: ...fer calls to a different extension for weekends and holidays Calls arriving outside of the specified ranges are ignored by the Date Node allowing the call flow to move on to the next command DATE and...

Страница 51: ...is action List nodes can call MSG nodes to play a list of messages and to set modes of operation all rotate and skip MOH Nodes Group instructions that configure the SBX2 into a Music on Hold source fo...

Страница 52: ...ion is run on multiple ports VOX Nodes Provide a menu node that responds to voice prompts instead of DTMF prompts It allows rotary callers to use speech to select their option from the menu The SBX2 l...

Страница 53: ...ng the following modes Time Date Month Day Weekly Hourly Monthly Calendar DBN range NIS range match EWT The table node contains a mode of operation an invalid the table does not apply instruction and...

Страница 54: ...A command node may be configured to play a series of messages to screen for times and dates before playing a message or presenting a menu to callers Any combination of nodes and commands may be progra...

Страница 55: ...ring a specified time frame Time node or on a specific day or date Date node When the call makes a match the Time or Date node takes control of the call The SBX2 follows the commands configured in tha...

Страница 56: ...5 Nodes Program Configurations DATE Nodes Day and Date configurations Select Date Day then configure the Start and Stop fields Configure the action using the Edit button Interalia SBX2 System Manual...

Страница 57: ...fies the action taken on the DTMF digit s collected The action will only be executed If the DTMF digits collected match the programmed range of digits The range must have a beginning and an end Note D...

Страница 58: ...ht side of the table contains the XMU action instructions Number of Digits Specifies the number of digits to be collected from one to seven digits Terminating Digits Specifies the optional terminating...

Страница 59: ...on Table The entry consists of two items a prompt and an action The Action Table specifies the action taken based on the VOX selection Beep Specifies whether or not a BEEP is presented to the caller a...

Страница 60: ...lf second delay X Style Specifies the XFER STYLE Node to be referenced when transferring a call Hold Specifies the message to play to the caller prior to transferring the call MOH Specifies the messag...

Страница 61: ...o configure the Transfer Disconnect and Retrieve fields 0 9 and are DTMF entries that can be used in a dial string An exclamation mark is the entry used to represent a Hook Flash The duration of the H...

Страница 62: ...t blank Retrieve Specifies the dial string used to perform a retrieve function default Busy Retry sec Specifies the duration between call transfer retries on a busy condition one to 30 seconds Num Ret...

Страница 63: ...tone if configured Rather than listen to the message callers can enter any DTMF digit and skip to the next message or node in the call flow The default setting is ignore Backup to Flash Memory default...

Страница 64: ...PBX will be configured in the same way as it would be when a stand alone MOH source is installed When the PBX connects a caller to a MOH port the caller hears music or music and messages from the MOH...

Страница 65: ...nstruction may be used as the starting node for a channel configured in PAAS mode When a contact closure is received on the channel it will execute the starting instruction Since the starting node is...

Страница 66: ...after the current PAAS node Multiple PAAS Triggers If multiple triggers are received they will follow the rules as stated previously If a node is queued up the following rules apply to the order in wh...

Страница 67: ...flow the contents of the Table are checked and if any of the entries match the Action is executed If none of the entries match the SBX2 executes the Invalid instruction Field Tag Description Mode The...

Страница 68: ...e start or after going off hook Hybrid line card The digits are captured into a NIS buffer the call flow is directed using a TABLE node to decode portions of the NIS buffer Field Tag Description Numbe...

Страница 69: ...to allow the DBN node to accept first name only last name only first then last names last then first name etc It also allows the number of digits required from the caller to range between one 1 to ni...

Страница 70: ...n within the specified time limit The Invalid field instructs the SBX2 what to do if the caller enters a selection that isn t recognized Selection Time Out set the time limit in seconds for the caller...

Страница 71: ...odify this node Starting Prompt Set the message number you wish your directory prompts to start from This message will typically contain the person s name and will be played out when the Play Name fie...

Страница 72: ...rements 2 Plan your call flow order Begin by determining what should happen when a call is first received and proceed to call completion in a logical fashion through all the options and paths that the...

Страница 73: ...ne we will connect you to the service you dialled Thank you for your call Timeout XFER 2 Invalid MSG 4 I m sorry that selection is invalid please try again Abort MSG 99 1 XFER 1 XFER 2 MSG 99 MSG 6 Pl...

Страница 74: ...SBX2 Remote Telephone Access on page 69 Setting Up SBX2 Remote Telephone Access optional on page 69 To Set SBX2 Remote Telephone Access Mode on page 70 To Change the Default Remote Telephone Access Co...

Страница 75: ...ss to specific messages This code can be shared by one or in the SBX2 A message access code more messages Message access only allows changes to messages with codes cannot be the same as the that acces...

Страница 76: ...authorized telephone access to your system 1 Press Enter to access the Main Menu 2 Press the Right Arrow until you reach System on the Main Menu and press Enter 3 Press Enter hit the right arrow key E...

Страница 77: ...mpts system then prompts the user to the the user to the next step or option next step or option where they again enter the command and The SBX2 will give the user 10 seconds to enter the message numb...

Страница 78: ...Counts 2 then xy 2xy Switch Partition 0 nnn Obtain line counts for all lines on a 2 then x then 0 2x0 card Clear all line counts 299 Terminate Remote Access and Re 00 start Disconnect 0 0 Change Remot...

Страница 79: ...e following message Error Invalid Command or Error No or Invalid Message To Disconnect From The SBX2 1 Complete the command 2 Press 0 followed by The SBX2 responds Done and disconnects the line Note I...

Страница 80: ...ys in English Enter Access Code The language it responds with from that point is also English unless the language of operation is changed to French Spanish German With single or multi partitioned SBX2...

Страница 81: ...grades Keycodes CHAPTER 7 Upgrades Keycodes Read this chapter to understand how to perform system upgrades by entering keycodes In This Chapter About SBX2 Keycodes on page 76 Interalia SBX2 System Man...

Страница 82: ...nit via the front panel Upgrades include additional memory and features Visit the Interalia web site at www interalia com for more information on available upgrades To Enter Keycodes The front panel o...

Страница 83: ...enter key 5 This screen automatically displays the units part number and serial number 6 From this screen you will need to press the right arrow key until you reach the Add feature Press Enter screen...

Страница 84: ...des are case sensitive It is important to use upper or lower case characters where required Holding down the left or right arrow key will allow you to scroll through all available characters quickly 9...

Страница 85: ...rds that SBX2 conforms with Safety approvals SBX2 compliance with safety standards Telecom approvals SBX2 compliance with telephone network standards Emissions SBX2 compliance with radiated and conduc...

Страница 86: ...20 Watts 160 BTU hr maximum Note BTU hr Consumption in Watts x 3 415 Environmental Temperature 0 C 40 C 32 F 104 F temperature range Adequate cooling or heating must be provided to guarantee this rang...

Страница 87: ...Kbps V 34 14 4Kbps V 32 other modes V 42 LAPM and MNP 2 4 error correction V 42bis and MNP 5 data compression Connector RJ45 Alarm Input contact closure or applied DC voltage up to 60V Outputs dry rel...

Страница 88: ...mA limiting Off Hook Loop Voltage 40VDC maximum Control Relay Current 100 mA maximum 60 VDC maximum Start Input Voltage Sense 10 mA at 48 VDC 60 VDC maximum Start Input Contact Closure 5 mA maximum Ri...

Страница 89: ...pment Standard US ESTI TS 103 021 TBR 21 Terminal Equipment Standard CE AS ACIF S002 Terminal Equipment Standard Australia Emissions Approvals FCC Part 15 Radiated Emissions Class A North America FCC...

Отзывы: