36
Your NAS-2.6 is capable of playing different music in several rooms
simultaneously. This chapter explains how the Audio Network Server
can be integrated into a multiroom environment and how users in
different rooms can access music from the library.
Basic Configuration
When the Audio Network Server is not part of a larger multiroom
control system you can access the music library from remote rooms
by displaying the TV user interface in the room where you are located.
The TV display is able to automatically switch to controlling the
output appropriate to your location by configuring the Audio Network
Server remote control with a
default output
. More information about
configuring your remote is given in the section below.
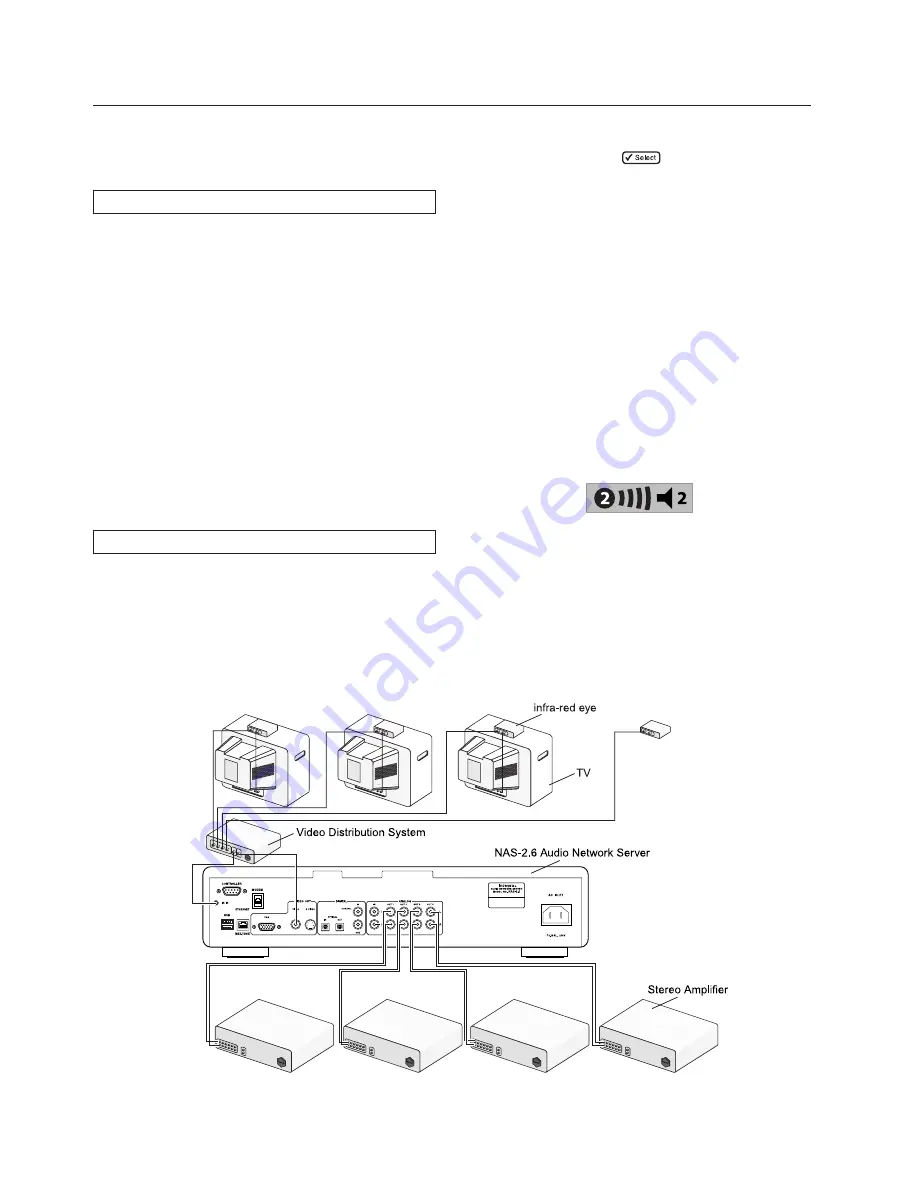
The diagram below shows the connections required in a basic
multiroom configuration:
•
Video Out
is connected to an RF Video distribution system to
allow the TV user interface to be viewed on all televisions around
the home.
• Infrared remote control information is received at a separate
receiver eye placed in each room - information from this device
is then transmitted via the RF Video distribution system to the
IR Receiver
connection.
•
Analogue Out 1, 2, 3 & 4
are each connected to the stereo input
of an amplifier.
Multiroom Remote Control Use - TV Interface
Your Audio Network Server remote control can be configured so that
every button press indicates to the system which output is to be controlled.
This means that whenever infrared is received by the Audio Network
Server the TV display will automatically switch to controlling the
appropriate output.
To configure the remote with a default output
• Press
the
HDD Audio
and
buttons simultaneously; hold
them down for 1 second.
The
HDD Audio
button will remain lit for 20 seconds; the configuration
process must be completed during this time.
• Enter the 3 digit code corresponding to the output you would like to
control (output 1:
001
, output 2:
002
, output3:
003
, output 4:
004
).
For example, to set output 2 as your default output press:
0
,
0
,
2
• Press
the
HDD Audio
button again.
The
HDD Audio
button will blink twice to indicate that the
configuration has been accepted. If the
HDD Audio
button does not
blink twice begin the process again, taking care to enter the number
correctly.
If the Audio Network Server is switched on during the configuration
process the
Enter Standby?
prompt will appear once configuration is
complete; pressing any navigation key on the remote should now cause
the Audio Network Server to switch to the correct output. In the
example above the status icons will display the following:
The number inside the circle indicates the default output of your
remote. The bar to the right of this indicates how long the user has
before the TV user interface is available for other users to access.
The number next to the loudspeaker symbol indicates which output
this remote is currently controlling.
Using Your Audio Network Server in a
Multiroom System (NAS-2.6 only)
Содержание NAS-2.3
Страница 40: ......


