


18
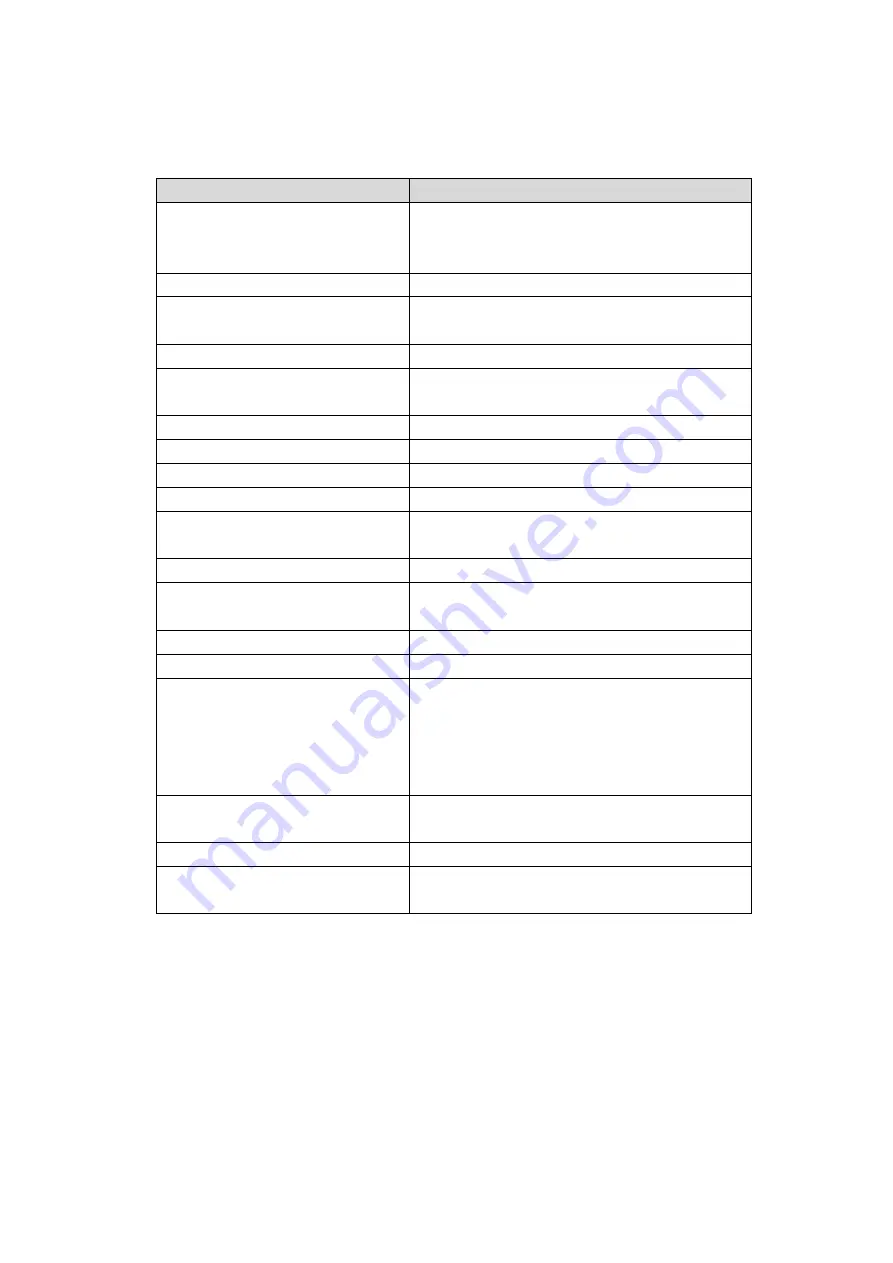
The following table lists parameters and descriptions.
Table 3-1 Parameters and Descriptions
Parameter
Description
Main Menu
The main menu of the RAID controller card,
which includes all operations on the RAID
controller card.
Help
Obtains the help information.
Status
The current working status of the RAID
controller card.
Backplane
The number of backplanes.
CacheValut
Indicates whether the super-capacitor
module is in place.
Enclosure
The number of drive backplanes.
Drives
The number of drives mounted.
Drive Groups
The number of existing drive groups.
Virtual Drives
The number of existing virtual drives.
View Server Profile
Views or manages RAID controller card
properties.
View Foreign Configuration
Views or manages foreign configurations.
Configure
Provides an interface for deleting
configurations.
Set Factory Default
Restores to factory settings.
Update Firmware
Updates firmware.
Silence Alarm
Enables/Disables the onboard buzzer. This
parameter is not available to
3408iMR/3508MR/9560 cards that are not
configured with buzzers. The 9460 series
cards have buzzers.
Virtual Drive Operations in
Progress
Indicates whether any virtual disk operation
is being performed in the background.
MegaRAID xxx
Enables/Disables advanced features.
Manage MegaRAID Advanced
Software Options
Manages advanced features.
3.3
Creating RAID Arrays
This section guides you on how to create RAID arrays after entering CU screen of
Inspur SAS3508 RAID controller card.
Содержание 3408 Series
Страница 62: ...57 Figure 3 52 Selecting the Drive to be Configured Figure 3 53 Operation Screen ...
Страница 68: ...63 Figure 3 59 Operation Screen 3 Delete the HS drive a Set Operation to Unassign Hot Spare Drive ...
Страница 78: ...73 Figure 3 73 Setting Choose Profile to 13_PD64 NVMe4 ...
Страница 83: ...78 Figure 4 6 Checking I Accept the License Terms 9 Select Custom advanced and press Enter as shown below ...
Страница 84: ...79 Figure 4 7 Selecting Custom advanced 10 On the screen shown select Load Driver and press Enter ...
Страница 85: ...80 Figure 4 8 Selecting Load Driver 11 On the screen shown click Browse and press Enter ...
Страница 86: ...81 Figure 4 9 Clicking Browse To install the driver 1 Select GHOST C as shown below ...
Страница 89: ...84 Figure 4 12 Loading the Driver 4 On the screen shown click Next ...
Страница 91: ...86 Figure 4 14 Selecting a System Partition 6 Click OK to enter the OS installation screen as shown below ...
Страница 93: ...88 Figure 4 16 Installing Windows 8 Create an administrator password and press Enter to enter the OS ...


