Insignia NS-PDP42 Скачать руководство пользователя страница 6

7

Insignia NS-PDP42/50-09 42" and 50" Plasma TV

www.insignia-products.com

Installing remote control batteries

To install the remote control batteries:
1

Remove the battery cover.

2

Insert two 1.5 V AAA batteries into the 
battery compartment. Make sure that you 
match the + and – symbols on the batteries 
with the + and – symbols in the battery 
compartment.

3

Replace the cover.

Using the remote control

To use the remote control:

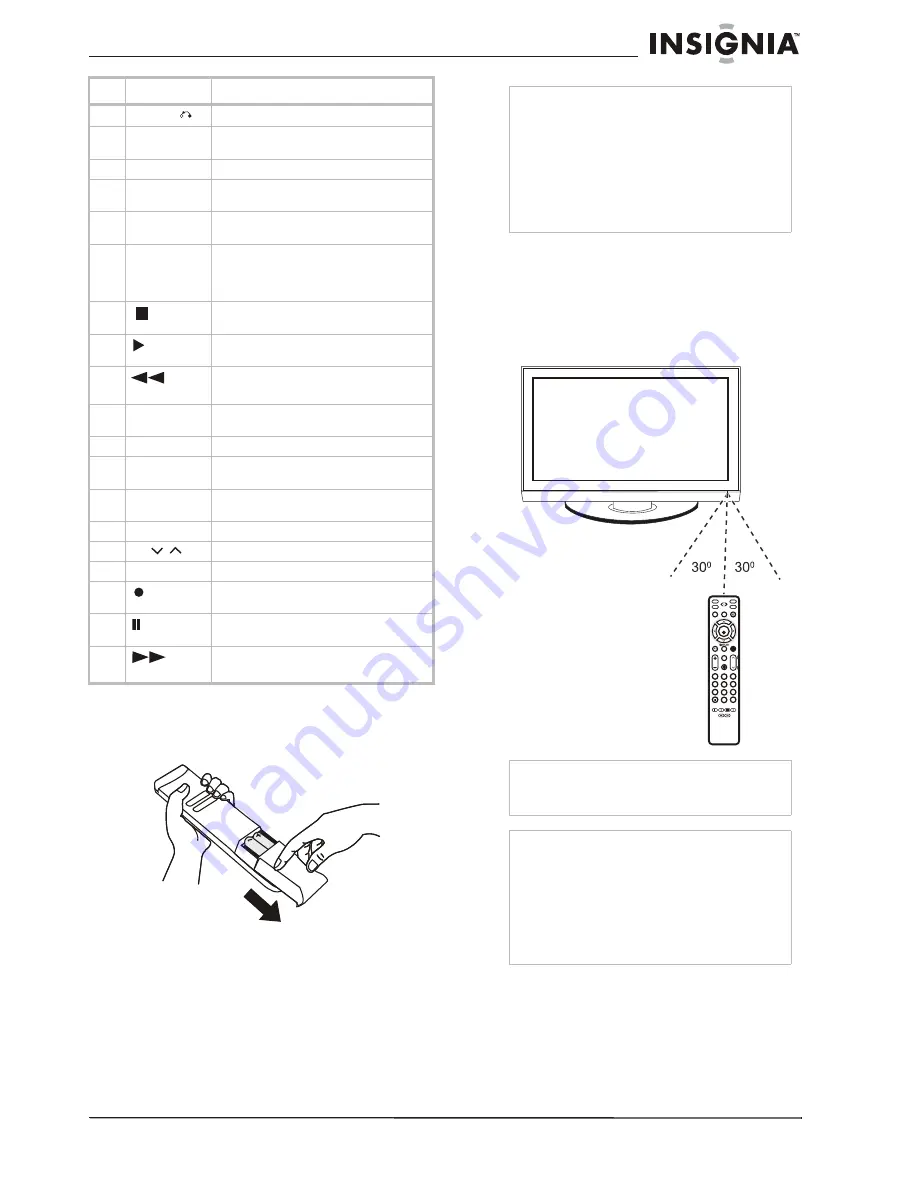
Point the remote control directly at your TV, 
within a 60° angle horizontally (30° to either 
side) and within 30° vertically of the remote 
control sensor on the front of your TV, and 
within 26.25 feet (8 m) of your TV.

8

RETURN

Press to return to the previous menu.

9

Simplink

Press to open the Simplink menu, showing 
a list of AV devices connected to your TV.

10

VOL +/-

Press to adjust the volume.

11

MUTE

Press to mute the sound. Press again to 
restore the sound.

12

Number 
buttons

Press to enter channel numbers.

13

-

Press to view digital sub-channels. First 
enter the main channel number, then press 
this button, then enter the sub-channel 
number.

14

(Stop)

Press to stop DVD, VCR, or CD playback 
with Simplink.

15

 (

Play)

Press to play a DVD, VCR, or CD with 
Simplink.

16

(Fast 

Reverse)

Press to fast reverse a DVD, VCR, or CD 
with Simplink.

17

SLEEP

Press to set the amount of time before 
your TV turns off.

18

PICTURE

Press to change the preset picture mode.

19

INPUT

Press to cycle through the available source 
inputs.

20

AV MODE

Press to cycle through the available preset 
AV modes.

21

FAV

Press to display your favorite channels list.

22

CH /

Press to change the channel.

23

FLASHBK

Press to return to the previous channel.

24

Press to record a DVD, VCR, or CD with 
Simplink.

25

(Pause)

Press to pause a DVD, VCR, or CD with 
Simplink.

26

(Fast 

Forward)

Press to fast forward a DVD, VCR, or CD 
with Simplink.

#

Button

Description

Notes

Do not mix batteries of different types.

Do not mix old and new batteries.

Remove batteries when the charge is depleted.

Battery chemicals can cause a rash. If the 
batteries leak, clean the battery compartment 
with a cloth. If chemicals touch your skin, wash 
immediately.

If the remote control is not going to be used for 
an extended period of time, remove the 
batteries.

Caution

Do not expose the remote control to liquids, direct 
sunlight, or shock. Do not mix batteries of different 
types.

Notes

Objects between the remote control and the 
remote control sensor may block the remote 
control signal.

The range of the remote control may be 
diminished if direct sunlight or other strong light 
is shining on the remote control sensor. In this 
case, change the angle of the lighting, move 
your TV, or operate the remote control closer to 
the remote control sensor.

INPUT

FAV

MUTE

RATIO

S

OUND

PO

W

ER

Q

.

 MENU MENU

AV MODE

RETURN

ENTER

VOL

CH

1

2

3

4

5

6

7

8

0

9

FLA

S

H

B

K

P

A

G

E

S

LEEP

PICTURE

Содержание NS-PDP42

Страница 1: ...42 and 50 Plasma TV Spanish NS PDP42 50 09 User Guide Gu a del Usuario...

Страница 2: ...ing and use instructions Water and moisture Do not use your TV near water For example do not use it near a bath tub wash bowl kitchen sink laundry tub in a wet basement or near a swimming pool Warning...

Страница 3: ...storm or when it is left unattended and unused for long periods of time unplug it from the power outlet and disconnect the antenna or cable system This helps prevent damage to your TV from lightning...

Страница 4: ...pecialized companies can dismantle the discarded TV to concentrate the reusable materials and to minimize the amount of materials to be disposed of Dispose of your old TV according to local regulation...

Страница 5: ...jack 9 AV IN 1 S Video composite video and L R audio Connect a video cable analog composite video 480i or an S Video cable better quality 480i to the appropriate jack Connect L R audio cables to the...

Страница 6: ...ns off 18 PICTURE Press to change the preset picture mode 19 INPUT Press to cycle through the available source inputs 20 AV MODE Press to cycle through the available preset AV modes 21 FAV Press to di...

Страница 7: ...or the 50 TV hold the cable management clip with both hands and pull it backward Note to reviewers Please explain The source document was not clear on this process Mounting the TV on a wall This TV ac...

Страница 8: ...ye bolts or brackets are tightened securely 4 Use a sturdy rope or cable not provided to secure the TV We recommend that you tie the rope or cable so that it becomes horizontal between the wall and th...

Страница 9: ...ack of your TV or the AV IN 2 AUDIO L white and AUDIO R red jacks on the side of your TV 3 Turn on your TV 4 Press INPUT press or to select AV1 or AV2 then press ENTER to confirm Connecting external e...

Страница 10: ...UT press or to select Component 1 or Component 2 then press ENTER to confirm Supported resolutions Connecting external equipment using HDMI or DVI digital This connection can be used to connect a digi...

Страница 11: ...tion on how to make these connections see Connecting external equipment using composite video good an alog on page 10 Notes To get the best picture quality adjust your PC graphics card to 1360 768 Dep...

Страница 12: ...GB DVI jack on the back of your TV 4 Turn on your TV and the PC 5 Press INPUT press or to select RGB PC then press ENTER to confirm Connecting to an external digital audio device You can connect your...

Страница 13: ...ns 3 Press or to select SCREEN RGB PC then press ENTER The SCREEN menu opens 4 Press or to select Auto config then press ENTER 5 Press or to select YES then press ENTER Auto configuration begins If th...

Страница 14: ...CH or CH on the remote control To enter a channel number directly Press the number buttons on the remote control In digital TV mode a main major channel can have one or more sub minor channels Press t...

Страница 15: ...rogram you are watching Caption Turns Closed Captioning On or Off Multi Audio Changes the audio language digital signal SAP Selects MTS sound analog signal Sleep Timer Selects the amount of time befor...

Страница 16: ...ER The sub menu for that item opens 4 Press or to select the setting you want 5 Press RETURN to return to the previous menu or press MENU to return to normal viewing Memorizing and setting up channels...

Страница 17: ...can create two types of channel lists in memory based on the default channel list created from the Auto Tuning channel search These channel lists are the Custom List and Favorite Channel List A Custom...

Страница 18: ...ent2 RGB PC HDMI1 HDMI2 and HDMI3 To change the input label see Changing the input label on page 19 3 Press ENTER to confirm your choice Note to reviewers Page 38 of the source document indicates that...

Страница 19: ...device TV automatically turns on To turn Simplink on or off 1 Press MENU on the remote control then press or or or to select OPTION The OPTION menu opens 2 Press ENTER to enter the OPTION menu 3 Pres...

Страница 20: ...he Q MENU opens 2 Press or to select Aspect Ratio then press or to cycle through the various aspect ratios 3 Press or to select Close then press ENTER to return to normal viewing Selecting preset pict...

Отзывы: