Insignia NS-PDP42 Скачать руководство пользователя страница 11

12

Insignia NS-PDP42/50-09 42" and 50" Plasma TV

www.insignia-products.com

* Only RGB-PC mode

Connecting a VCR to your TV

To avoid picture noise (interference), leave an 

adequate distance between the VCR and TV.

Enable the ISM feature in the 

Option menu (See 

çPreventing ghost images on your TVé on page 

23) to avoid having a fixed image remain on the 

screen for a long period of time. If the 4:3 picture 

format is used, the black bars on the sides of the 

picture may could get burned into the screen. 

This phenomenon is common to all TVs and is 

not covered by warranty.

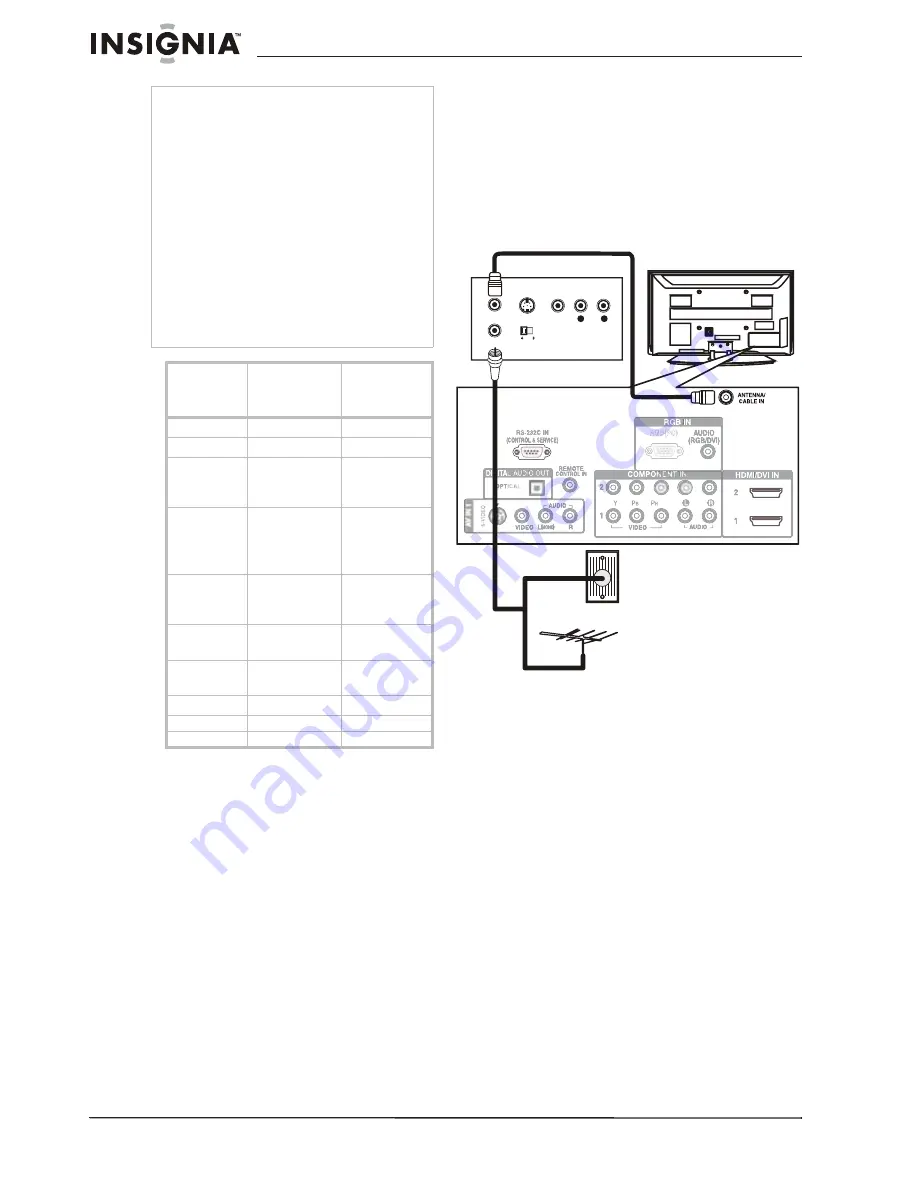
To connect the antenna through your VCR:

1

Remove the port cover from the back of your 

TV.

2

Plug the 75 ohm antenna cable from an 

antenna, cable TV, or satellite receiver into 

the 

ANTENNA IN

 jack on the back of your 

VCR.

3

Plug the 75 ohm RF cable from the 

ANTENNA OUT

 jack on the back of your 

VCR to the 

ANTENNA/CABLE IN

 jack on the 

back of your TV.

4

Replace the port cover on the back of your 

TV.

5

Turn on your TV, then set the VCR output 

switch to 

3

 or 

4

 and tune the TV to the same 

channel.

6

Make the video and audio connections using 

either composite or S-Video. For information 

on how to make these connections, see 

çConnecting external equipment using 

composite video (goodÑan alog)é on page 

10.

Notes

Ä To get the best picture quality, adjust your PC 

graphics card to 1360 

 768.

Ä Depending on your graphics card, DOS mode 

may not work if you use an HDMI-to-DVI cable.

Ä In PC mode, there may be noise associated 

with the resolution, vertical pattern, contrast, or 

brightness. If noise is present, change the PC 

output to another resolution, change the 

refresh rate to another rate, or adjust the 

brightness and contrast on the PICTURE menu 

until the picture is clear.

Ä Avoid keeping a fixed image on the screen for a 

long period of time. The fixed image could 

become permanently imprinted on the screen.

Ä The synchronization input form for horizontal 

and vertical frequencies is separate.

Ä Depending on your graphics card, some 

resolution settings may not allow the image to 

be positioned on the screen correctly.

Resolution

Horizontal 

frequency 

(kHz)

Vertical 

frequency 

(Hz)

640 x 350

31.468

70.09

720 x 400

31.469

70.08

640 x 480

31.469
37.500
37.861

59.94
75.00
72.80

800 x 600

35.256
37.879
46.875
48.077

56.25
60.31
75.00
72.18

1024 x 768

48.363
56.476
60.023

60.00
70.06
75.02

1280 X 768

47.776
60.289*

59.87
74.893*

1280 X  1024

63.981
79.976

60.02
75.025

1360 X 768

47.712

60.015

1600 X  1200

75.00

60.00

1920 X  1080

67.50

60.00

L

R

Содержание NS-PDP42

Страница 1: ...42 and 50 Plasma TV Spanish NS PDP42 50 09 User Guide Gu a del Usuario...

Страница 2: ...ing and use instructions Water and moisture Do not use your TV near water For example do not use it near a bath tub wash bowl kitchen sink laundry tub in a wet basement or near a swimming pool Warning...

Страница 3: ...storm or when it is left unattended and unused for long periods of time unplug it from the power outlet and disconnect the antenna or cable system This helps prevent damage to your TV from lightning...

Страница 4: ...pecialized companies can dismantle the discarded TV to concentrate the reusable materials and to minimize the amount of materials to be disposed of Dispose of your old TV according to local regulation...

Страница 5: ...jack 9 AV IN 1 S Video composite video and L R audio Connect a video cable analog composite video 480i or an S Video cable better quality 480i to the appropriate jack Connect L R audio cables to the...

Страница 6: ...ns off 18 PICTURE Press to change the preset picture mode 19 INPUT Press to cycle through the available source inputs 20 AV MODE Press to cycle through the available preset AV modes 21 FAV Press to di...

Страница 7: ...or the 50 TV hold the cable management clip with both hands and pull it backward Note to reviewers Please explain The source document was not clear on this process Mounting the TV on a wall This TV ac...

Страница 8: ...ye bolts or brackets are tightened securely 4 Use a sturdy rope or cable not provided to secure the TV We recommend that you tie the rope or cable so that it becomes horizontal between the wall and th...

Страница 9: ...ack of your TV or the AV IN 2 AUDIO L white and AUDIO R red jacks on the side of your TV 3 Turn on your TV 4 Press INPUT press or to select AV1 or AV2 then press ENTER to confirm Connecting external e...

Страница 10: ...UT press or to select Component 1 or Component 2 then press ENTER to confirm Supported resolutions Connecting external equipment using HDMI or DVI digital This connection can be used to connect a digi...

Страница 11: ...tion on how to make these connections see Connecting external equipment using composite video good an alog on page 10 Notes To get the best picture quality adjust your PC graphics card to 1360 768 Dep...

Страница 12: ...GB DVI jack on the back of your TV 4 Turn on your TV and the PC 5 Press INPUT press or to select RGB PC then press ENTER to confirm Connecting to an external digital audio device You can connect your...

Страница 13: ...ns 3 Press or to select SCREEN RGB PC then press ENTER The SCREEN menu opens 4 Press or to select Auto config then press ENTER 5 Press or to select YES then press ENTER Auto configuration begins If th...

Страница 14: ...CH or CH on the remote control To enter a channel number directly Press the number buttons on the remote control In digital TV mode a main major channel can have one or more sub minor channels Press t...

Страница 15: ...rogram you are watching Caption Turns Closed Captioning On or Off Multi Audio Changes the audio language digital signal SAP Selects MTS sound analog signal Sleep Timer Selects the amount of time befor...

Страница 16: ...ER The sub menu for that item opens 4 Press or to select the setting you want 5 Press RETURN to return to the previous menu or press MENU to return to normal viewing Memorizing and setting up channels...

Страница 17: ...can create two types of channel lists in memory based on the default channel list created from the Auto Tuning channel search These channel lists are the Custom List and Favorite Channel List A Custom...

Страница 18: ...ent2 RGB PC HDMI1 HDMI2 and HDMI3 To change the input label see Changing the input label on page 19 3 Press ENTER to confirm your choice Note to reviewers Page 38 of the source document indicates that...

Страница 19: ...device TV automatically turns on To turn Simplink on or off 1 Press MENU on the remote control then press or or or to select OPTION The OPTION menu opens 2 Press ENTER to enter the OPTION menu 3 Pres...

Страница 20: ...he Q MENU opens 2 Press or to select Aspect Ratio then press or to cycle through the various aspect ratios 3 Press or to select Close then press ENTER to return to normal viewing Selecting preset pict...

Отзывы: