Innovative Neurotronics The WalkAide System Скачать руководство пользователя страница 9

14

15

The cuff must be positioned on the leg correctly to achieve effective and efficient stimulation. 

Use the Orange visual indicator as a reference for accurate placement of the cuff. Only use 

the latch to secure and remove the WalkAide. The Velcro strap is adjusted to an optimal level 

by your clinician at the initial visit and should not be altered. 

For proper skincare and maximum effectiveness, the electrodes should be replaced every 1 to 
2 weeks or immediately upon excessive visible wear. When replacing the electrodes, be sure 
NOT to alter the placement of the Black and Red Electrode Locators. 

2.6  Electrode Replacement

Disconnect the black and red leads between the WalkAide and the electrodes then remove 
the electrodes from the Electrode Locator. Place new electrodes on the Electrode Locators 
and feed the leads through the holes toward the outside of the cuff. The BLACK lead is 
connected to the electrode on the BLACK Electrode Locator. The RED lead is connected to 
the electrode on the RED Electrode Locator. Feed the excess wires in the strap pouch as 
indicated in the image below. 

Washing Instructions: To wash the WalkAide Cuff fabric liner; first remove the electrodes, and 

then remove the liner from the cuff. Do NOT remove the Black and Red Electrode Locators. 
Make sure to Hand Wash, do not use bleach and line dry only.

Sizing Note for Clinicians: To achieve the minimum size, the strap can be folded multiple 

times and secured using the double-sided Velcro provided.

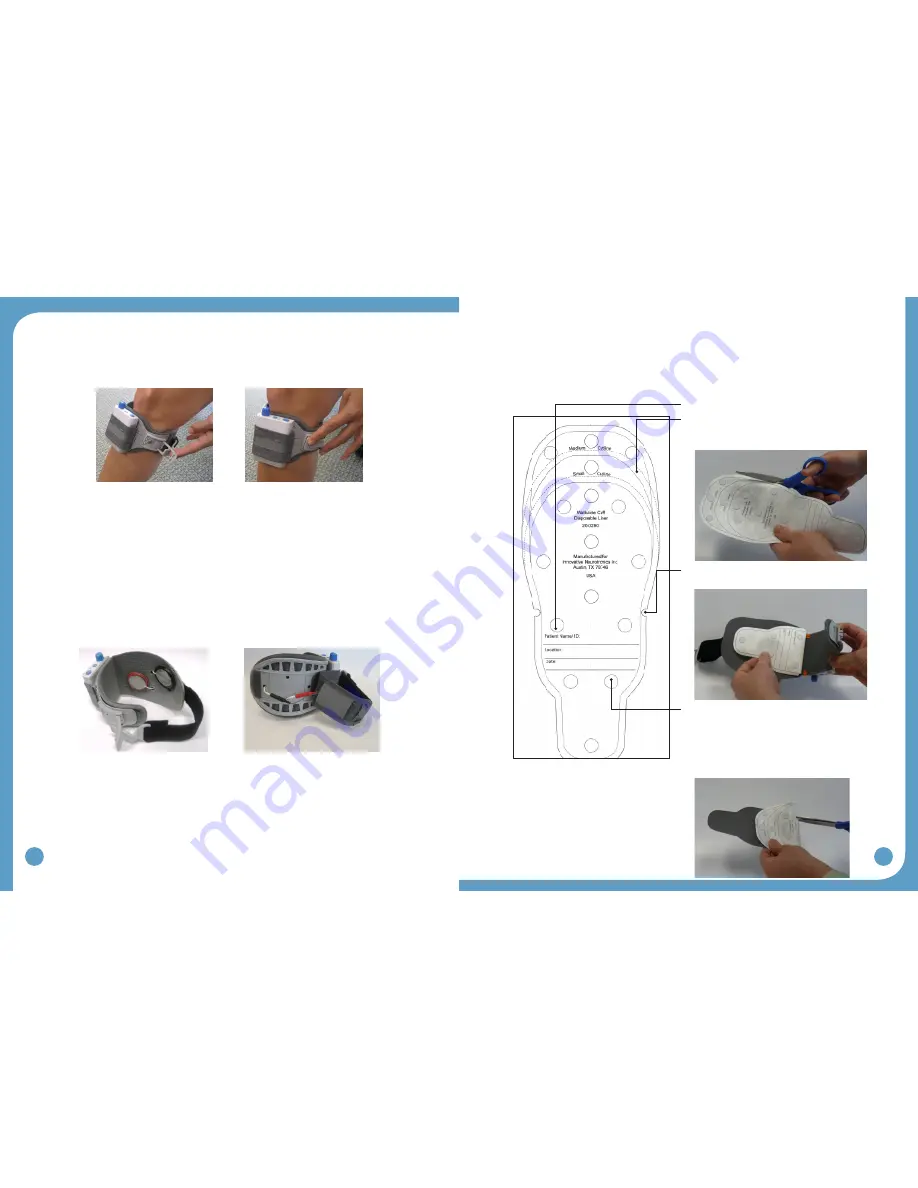
2.7  WalkAide Cuff Disposable Liner

The purpose of the Disposable Liner is to provide a hygenic barrier between patient and the 
cuff.  Additionally, it can shorten preparation time in follow up visits.  Each Disposable Liner 

must be cut to fit the patient’s Cuff.  The electrodes placement remains on the liner for return 

visits.  Remember to place a protective sheet over the electrodes to prevent drying.

Figure 10

Figure 11

Figure 12

Figure 13


1. Write Patient Info Here.

2. Cut along the Cutlines to the desired size 

with Scissors for Medium and Small. The 
Default size is Large.

3. Align with the Orange Visual Indicator on the 

Cuff’s Liner.

4. Velcro dots secure the Disposable Liner onto 

the Cuff’s existing liner. The grey fabric side 
of the Disposable Liner should face out.

5. Once the Electrodes’ position is determined, 

cut in small holes to pass the Electrode 
Wires through.

Figure 14: WalkAide Cuff Disposable Liner

Содержание The WalkAide System

Страница 1: ...physician LM06 R6 2013 Innovative Neurotronics All rights reserved All trademarks and registered trademarks are the property of their respective holders No part of this manual may be reproduced in an...

Страница 2: ...9 4 1 Configuring initial set up process Pairing 19 5 0 Fitting Process 20 5 1 Pre screening with the Peripheral Nerve Stimulator 20 5 2 Electrode Placements and System Preparations 22 5 3 Fitting a N...

Страница 3: ...ions Do not use on persons with implanted demand type cardiac pacemakers or defibrillators Do not place the electrodes in the carotid sinus region throat Laryngeal or pharyngeal spasms may occur when...

Страница 4: ...to operate the equipment 1 5 Precautions Heart Disease Use caution in applying electrical stimulation to persons suspected of having heart disease More clinical data is needed to show that such person...

Страница 5: ...Glossary AutosetWalkAide Parameters This calculation process adjusts the threshold settings to more closely match the individual data collected Audible Beep Optional Biofeedback Feature Audible signal...

Страница 6: ...d Stims Per Day information since log was last cleared Restore Original Reverses Autoset Optimize functions and manual adjustments returning thresholds and control times to original values Save and An...

Страница 7: ...video One free USB port for the Bluetooth Adapter Windows XP with SP2 or Windows 7 A peripheral nerve stimulator can be purchased separately The peripheral nerve stimulator uses a 9 volt battery to op...

Страница 8: ...mode A non audible alarm with only a red blinking light indicates hibernation mode Establish a Bluetooth connection with WalkAnalyst to automatically clear hibernation mode If the hibernation mode do...

Страница 9: ...Washing Instructions To wash the WalkAide Cuff fabric liner first remove the electrodes and then remove the liner from the cuff Do NOT remove the Black and Red Electrode Locators Make sure to Hand Wa...

Страница 10: ...click on Setup exe and choose Run as Administrator Follow the set up instructions that will appear 4 The WalkAnalyst program will be installed in the Program Files Innovative Neurotronics directory un...

Страница 11: ...to the WalkLink This is called the pairing process Following the guidelines below to accomplish this process Plug in your USB Bluetooth adapter with the computer powered ON Start the WalkAnalyst appl...

Страница 12: ...ot close to a neutral alignment 3 Clean the skin in the area around the head of the fibula with soap and water and wipe dry Failure to adequately prepare the skin may cause improper contact and provid...

Страница 13: ...de lead cable Make sure the BLACK lead negative is connected to the BACK electrode and the RED lead positive is connected to the FRONT electrode Figure 26 5 Turn the WalkAide ON by turning the blue In...

Страница 14: ...nt Profile Add basic information patient ID location primary diagnosis etc and save the patient file Select Program During the initial fitting you have the following programming options Rapid Program...

Страница 15: ...rrow Upon releasing the mouse the WalkAide settings are calculated and an optimization error is displayed An optimization error of less than 20 is recommended Press the Next button to program the Walk...

Страница 16: ...e Log to set the internal date time stamp and start a new 69 day tracking sequence For an existing user Select Retrieve Usage Log to download the most recent walking activity data This Usage Log will...

Страница 17: ...the Data Data processing involves following the sequence of icons from left to right displayed above the Tilt data graph Zoom Autoset and Optimize are the first three steps involved in processing the...

Страница 18: ...cise settings Figure 41 Usage Logs Select Usage Logs tab to view and or clear usage data Figure 42 Preferred Setting You can use the checkbox Set as Preferred Setting to tag a setting as preferred set...

Страница 19: ...ual Users should proceed through the daily wearing schedule and increase wearing time only if no skin irritation and or muscle soreness is present Figure 55 ON Time OFF Time Days 1 3 15 60 minutes 30...

Страница 20: ...performance improvement and justify medical necessity of WalkAide Evaluation options Collect Walking Data No Device When collecting walking data with no assisted device attach the WalkAide on a cuff...

Страница 21: ...de is to be stored for an extended period of time and not used remove the battery from the battery compartment When the alkaline batteries become depleted please dispose of properly in accordance with...

Страница 22: ...of the leg The stimulation is optimized if it enters at the motor nerve and exits after traveling in the direction of the muscle Electrode position varies with each patient Conductivity is enhanced b...

Страница 23: ...poorly timed on and off cycles that may occur with abnormal tibial motion during swing usually from ataxia Adjustment to the Min Time also addresses periods of faster walking or faster steps when the...

Страница 24: ...e testing to prevent possible overstimulation of the user Recommended for pediatric or more sensitive patients a low Pulse Width may provide a less forceful stimulation and allow for a softer contract...

Страница 25: ...ur methods to re optimize the user s walking program These are outlined below with clinical descriptors of when each method may be most indicated Option 1 Rapid Adjustment Adjust stimulation parameter...

Страница 26: ...trial listed below Save WalkAide Settings and make any clinical comments relevant to this walking program Click on 4 Verify WalkAide Settings and change the Stimulation Mode to Hand Send Parameters to...

Страница 27: ...nutes of non use Turn the WalkLink off for a few seconds and then turn it on again Click on the Bluetooth icon in the upper right corner of the screen and Search for Previously Connected WalkLinks Che...

Страница 28: ...f another Bluetooth driver software is causing the conflict you may need help from your IT support team Call the Innovative Neurotronics technical support team if you have trouble resolving this probl...

Страница 29: ...Reference Part Numbers 20 1000 WalkAide Patient Kit 21 1000 WalkAide Patient Kit Japan 20 1000 WalkAide Patient Kit Reprocessed 20 0100 WalkAide 21 0100 WalkAide Japan 20 0100R WalkAide Reprocessed 2...

Отзывы: