


23
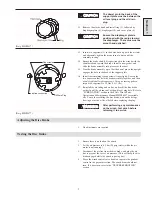
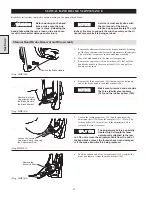
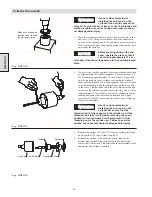
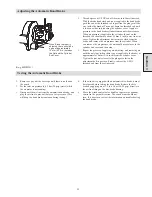
WARNING
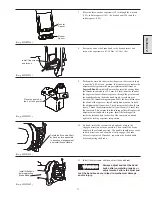
Before troubleshooting the
band brake, remove the wire
rope from the winch drum.
Failure to remove the wire rope before working on the
winch can cause mechanical damage and/or injury.
There are two ways that the band brake can cause problems:
1.
It might not release
2.
It might not hold the load
If one of the above problems is present check the following before
removing any brake components from the winch:
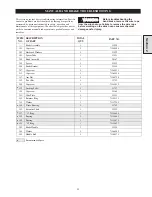
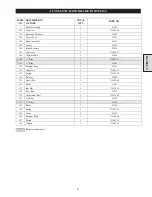
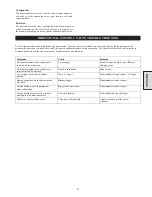
AUTOMATIC BAND BRAKE TROUBLESHOOTING
Check the following before removing any brake components from the winch:
Symptom
Cause
Remedy
The brake does not
release.
The air line is not connected to the brake.
Make sure the air line is connected to the brake.
The air line is blocked, pinched, or torn.
Make sure that the air line is not blocked, torn or
pinched. Replace the air line if necessary.
The brake is not adjusted properly.
Adjust the brake.
The band brake does not
hold the load.
The brake band (104) has worn past safe
limits.
Adjust the brake band (refer to proper section). Replace
the band if it measures less than 1.5 mm (1/16 inch)
thick anywhere on the band lining, or if it can no longer
be adjusted.
The adjustment bolt (120) is not locked in
position.
Check the adjustment bolt lock nuts, and tighten them if
needed.
The three anchor capscrews (101) are loose.
Inspect the anchor capscrews. If necessary, torque them
to 45-50 Nm (33-36 ft lbs.)
The three tubular spacers (103) have collapsed
or are worn.
Inspect the tubular spacers. They should measure
between 28.3 and 28.8 mm (1.115 and 1.135 inches).
If they have collapsed or are worn, replace them.
The brake activation components in the winch
control valve are out of adjustment, or the
control handle is not returning to neutral.
Refer to the manual for instructions on troubleshooting
and adjusting the brake actuation components in the
winch control valve.
The orifice and dump valve assembly are not
relieving air pressure from the brake.
To check, operate the winch control valve handle or
pendant control, while feeling and listening for air
escaping from the dump valve. If no air is, detected,
replace the orifice and dump valve assembly.
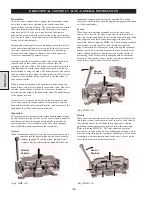
Section 3
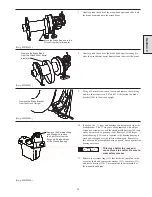
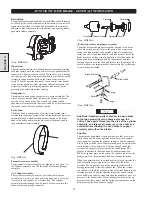
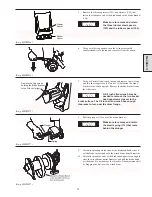
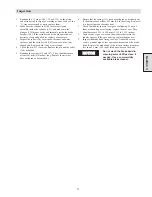
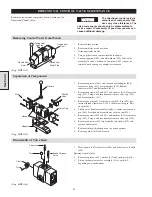
If the air pressure is adequate and the brake is properly adjusted, remove the pneumatic release assembly from the winch and continue
troubleshooting.
Symptom
Cause
Remedy
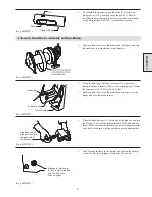
The band brake does not
release.
Air is leaking past the piston (123) inside the
cylinder (121).
Replace the ‘O’ rings (109, 110, and 122) that prevent air
from leaking inside the cylinder.
The retainer ring (111) that fastens the cylinder
rod (108) to the piston (123) has failed.
Replace the retainer ring.
The cylinder rod (108) is sticking inside the
cylinder (121).
Make sure the cylinder rod slides smoothly inside the
cylinder.
The plunger (114) is sticking inside the brake
bracket (106).
Make sure the plunger slides smoothly inside the brake
bracket.
The spring (113) has collapsed or is bent.
Replace the spring.
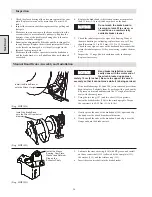
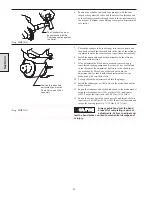
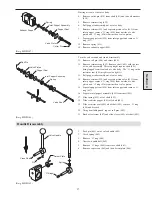
The band brake does not
hold the load.
The springs in the pneumatic release assembly
have collapsed.
Check the spring length. The springs (124) and (127)
should measure 203 mm (8.0 inches). If either spring
measures less than this dimension, replace.
The cylinder rod (108) is sticking in the
cylinder (121).
Make sure the cylinder rod is lubricated properly and
slides smoothly inside the cylinder.
The plunger (114) is sticking inside the brake
bracket (106).
Make sure that the plunger is lubricated properly and
slides smoothly inside the brake bracket.
The roller (116) or dowel pin (115) is worn or
broken.
Inspect the roller and dowel pin for wear. Replace if
necessary.
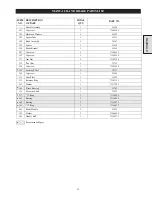
Содержание FA5A
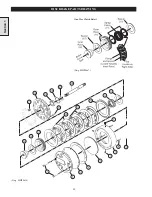
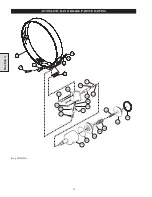
Страница 10: ...10 DISC BRAKE PARTS DRAWING Dwg MHP0667 Dwg MHP0630 One Way Clutch Detail Section 1...
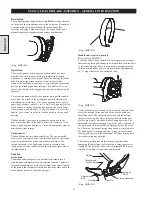
Страница 19: ...19 Section 2 SERVICE NOTES...
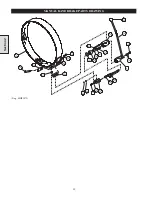
Страница 54: ...54 REDUCTION GEAR ASSEMBLY PARTS DRAWING Dwg MHP1221 Section 5...
Страница 57: ...57 SERVICE NOTES...
Страница 58: ...58 SERVICE NOTES...
Страница 59: ...59 SERVICE NOTES...


