background image

 Product Manual for the Six-Unit Calibration Station for Ventis™ 


© 2010, 2016 Industrial Scientific Corporation      35


Figure 8. 

Components tab. 


The components tab lists all components installed in the instrument. The 
software user can highlight a component and select “Open” to view and modify 
its settings (e.g., Sensor Details window shown below in Figure 9).  


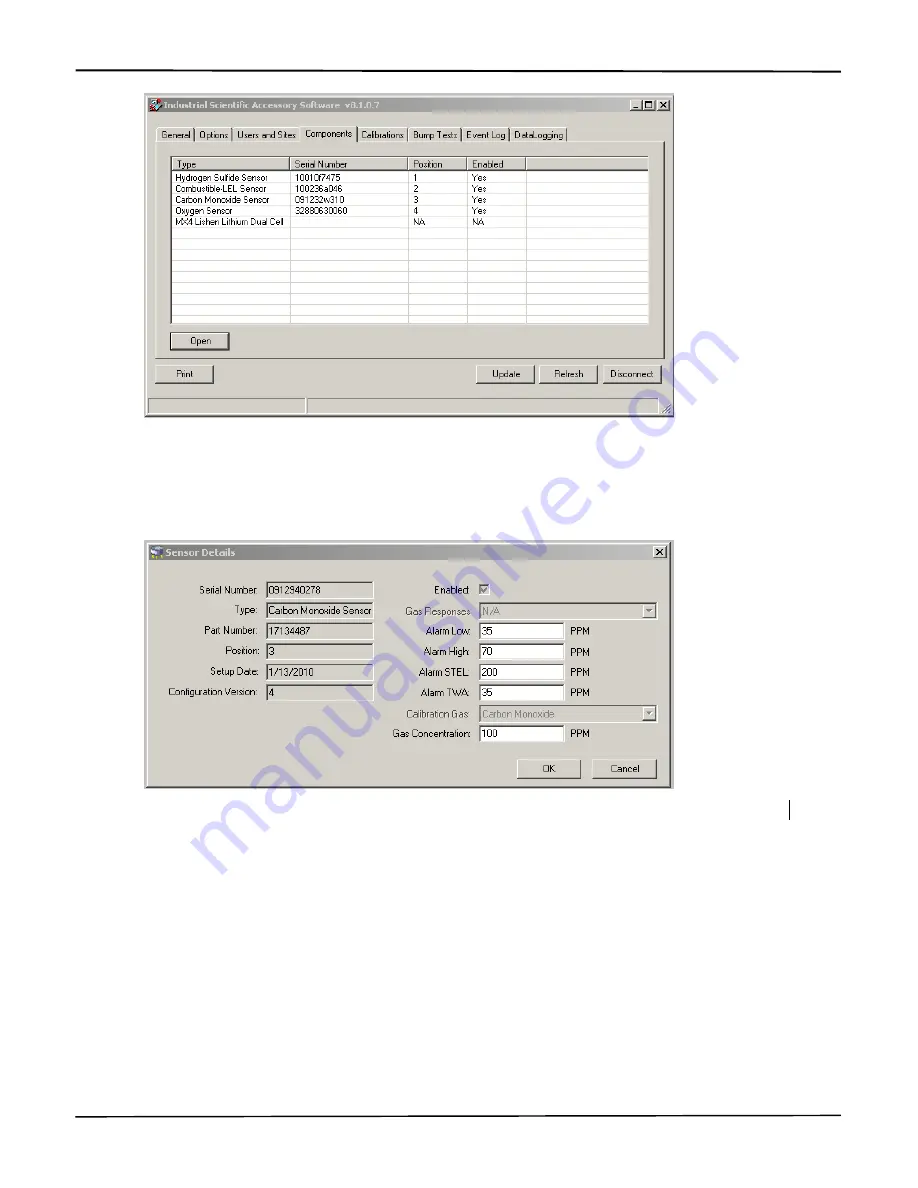
Figure 9. 

Sensor Details window.


The sensor details screen allows the software user to change alarm set points as 
well as the calibration gas concentrations for the installed sensors. 
 

Содержание V-CAL

Страница 1: ...Part Number 17153100 1 Version 2 Six Unit Calibration Station for VentisTM Product Manual Set up Operation ...

Страница 2: ...Overview Front 8 Hardware Overview Back 9 Software Installation and Hardware Connections 10 Station Use 12 Power on and off 12 Start up Mode 12 Idle Mode 14 Set up Mode 14 Docking and Removing the Instrument 20 Calibration and Bump Testing 21 Status and Error Messages 24 Software Use 30 Software Functions 30 Using the Software 31 Diagnosing Common Problems 42 Specifications 42 Performance Specific...

Страница 3: ...ith the instructions and warnings as marked on the cylinder and the appropriate Material Safety Data Sheets NOTE The station should be cleaned only with a soft cloth do not use solvents or other liquids NOTE This equipment has been tested and found to comply with the limits for a Class A digital device pursuant to part 15 of the FCC Rules These limits are designed to provide reasonable protection ...

Страница 4: ...radles 1 and 4 Cradle number Back row 4 5 6 Front row 1 2 3 Internal pump 1 2 3 Each internal pump has a solenoid that controls the flow of gas and fresh air to the cradles These solenoids are referred to in this manual as cradle solenoids A fourth solenoid referred to as the gas solenoid controls the flow of calibration gas and fresh air from the station s intake ports The station communicates di...

Страница 5: ...ftware enabled capabilities for the host PC Read and write instrument and calibration station settings Read the instrument data log Read the instrument event log Access bump test and calibration records from the station The following operating systems support Accessory Software Windows XP Windows Vista Windows 7 Windows 8 ...

Страница 6: ... Hardware Overview NOTE one 0 1524 m 6 tube with a t fitting is provided for each aspirated cradle 1 17093659 Urethane tubing 1 219 m 4 1 17121310 USB cable 1 17118027 Fitting for calibration gas port 1 17124074 Fitting for fresh air port 1 17121070 Industrial Scientific Accessory Software Suite CD 1 17124447 Data link manual 1 17135864 Service card 1 17123787 Warranty card 1 17153158 Reference to...

Страница 7: ...failed calibration 1 Cal Passed 2 Cal Failed Throughout this manual any LCD message that indicates the status of a particular cradle has the designation X For example X Cal Passed where X will display on the LCD as 1 2 3 4 5 or 6 The station s two pushbuttons BUMP and CALIBRATE are used to initiate the performance of those functions when one or more instruments are docked These buttons are also us...

Страница 8: ...Ventis 8 2010 2016 Industrial Scientific Corporation STATION PREPARATION Hardware Overview Front Diagram Number Feature 1 Cradle lid 2 Cradle lid latch diffusion cradles only 3 LED indicators 4 Bump button 5 LCD display 6 Calibrate button 7 Instrument inlet ...

Страница 9: ...oration 9 Hardware Overview Back Diagram Number Feature 8 Printer port 9 USB port 10 Fresh air port 11 Calibration gas port 12 Power input 13 Cradle inlet 14 Cradle tubing for use when station door in attached 14 Cradle tubing with T fitting for use when station door is removed Aspirated cradles only ...

Страница 10: ...y on the PC Be sure to choose the desired language for the software user interface This is completed from the drop down menu that appears on one of the first installations screens The choices are Chinese simplified English United States French Standard German or Spanish Highlight the desired language and click the OK button to continue HARDWARE CONNECTIONS Attaching cables and cords 1 USB cable o ...

Страница 11: ... the docked instrument follow the instructions below for option 1 OR option 2 Option 1 the instrument door remains attached to the cradle NOTE The station ships from the factory with this option enabled 1 Locate the cradle inlet on the back of the cradle 2 Locate the tubing that has a white fitting at one end the other end of the tubing has no other fittings Fasten the white fitting to the cradle ...

Страница 12: ...st the red LEDs turn on for all affected cradles A system error message displays on the LCD to describe each failure encountered These messages are defined in the manual section Status and Error Messages DISPLAY INSTRUCTIONS V Cal 6 Unit Calibration Station No user action required V Cal v 1 00 07 Displays station name and software version number shown v 3 00 07 No user action required Warming Up V...

Страница 13: ...s simultaneously turn on then off in this order red amber green and all No user action required Displays to verify pixel integrity No user action required Checking V Cal Clock Displays as the functionality of the real time clock is checked No user action required 22 Jan 2010 12 34 56 Displays current date and time in 24 hour format if the clock check was successful No user action required ...

Страница 14: ... to the station Delete all saved calibration and bump test records from the station Run station diagnostics Station settings Calibration interval days Time and date LCD display language In set up mode each procedure or setting option is presented to the user in the order shown below Instructions are provided for completing or bypassing each task NOTE In set up mode when no button is pressed within...

Страница 15: ... button presses and USB communications Print V Cal Records This procedure sends all bump test and calibration records from the station memory to the printer Press BUMP to bypass the procedure the user advances to the next set up mode feature Clear V Cal Records Press CALIBRATE to begin the printing procedure Print Records NO YES Displays to allow the user to confirm or cancel the print command Pre...

Страница 16: ...and the user advances to the next set up mode feature Cal Interval Days Press CALIBRATE to delete all records saved to the station memory V Cal Records Cleared Displays to indicate the records have been successfully deleted from the station s memory No user action required Cal Interval 30 Days Displays the current setting for the number of days between calibrations shown 30 Allows the user to set ...

Страница 17: ...13 34 56 Displays the current date and time in 24 hour format Each value can be changed Values are presented to the user in this order month day year hour and minutes Press BUMP TEST to bypass the setting process the user advances to the next set up mode feature Select Language Press CALIBRATE to edit any of the time or date values Set Time and Date 22 Jan 2011 The first date value subject to chan...

Страница 18: ...user to power on the printer The paper is automatically fed by the printer when a new roll is inserted Press BUMP to bypass the procedure Press CALIBRATE to power on the printer During this time the V Cal will display Insert New Paper Roll OK Press CALIBRATE again to power off the printer Note The Insert New Paper Roll OK screen will not time out to allow the user as much time as necessary to chan...

Страница 19: ... alarm event in seconds o Time and date the alarm occurred o Instrument user setting o Instrument site setting A blank for the user s signature A blank for the user to enter the date A blank for the user to enter the time Industrial Scientific Corp Name of calibration station and its software version Date and time of calibration or bump test Instrument serial number Instrument software version Ins...

Страница 20: ...ument to secure it in the cradle if needed slide the instrument forward to secure 3 Close the cradle lid Docking the DIFFUSION instrument 1 When the station faces the user its cradle lid hinge is at the top of the cradle Lift up to open 2 To properly place the instrument in the cradle complete or observe the following The instrument s display faces the user and its logo is readable Press down on t...

Страница 21: ...tion runs a check to determine if any instruments were just calibrated NOTE If a printout of the calibration report is desired ensure the printer is connected to the station DISPLAY INSTRUCTIONS Cradles 1 2 5 Cal Again Displays to indicate which if any instruments have just been calibrated and their cradle numbers Press CALIBRATE to begin the recalibration of the instrument s Press BUMP TEST to sk...

Страница 22: ...ed cradle X Cal in Progress Displays during the calibration process The amber LED turns on for each affected cradle No user action required The station reads and applies the calibration gas settings from the instrument X Cal Passed X Cal Failed Displays along with a red or green LED to indicate which instruments have passed green or failed red calibration The calibration report for each instrument...

Страница 23: ...ted For example X 25 0 ppm H2S No user action required The station reads and applies the bump test parameters gas percentage and response time settings from the instrument The station determines if any installed sensor for any instrument is in a calibration fail or zero fail state For those instruments the station automatically cancels the bump test and performs a calibration If the calibration is...

Страница 24: ...ding data or communicating with the station No user action required The bump test and calibrate functions are not available Set up mode is not accessible USB communications are accepted and processed Check V Cal Pump X Or X Check Pump Displays to indicate which of the station s three pumps has failed The red LED turns on for each affected cradle Contact factory Bump test and calibration functions ...

Страница 25: ...A D failure All six red LEDs turn on Contact factory Bump test and calibration functions are not available Set up mode is accessible USB communications are accepted and processed V Cal Memory Error Displays to indicate the station cannot read from or write to its memory All six red LEDs turn on Contact factory The bump test and calibrate functions are not available Set up mode is accessible USB co...

Страница 26: ...ccepted and processed X Charging Displays to indicate the station is charging an instrument equipped with a Li ion battery The amber LED turns on for each affected cradle NOTE Always refer to the instrument s battery icon to assess the level of charge The bump test and calibrate functions are available Set up mode is accessible USB communications are accepted and processed X Close Lid May display ...

Страница 27: ... with the instrument is established within three minutes one of two messages displays depending on the status of the battery X Charging or X Ready If communication is not established within three minutes this error message displays X Inst Comm Error No user action required The bump test and calibrate functions are available Set up mode is accessible USB communications are accepted and processed X ...

Страница 28: ...s one or more failed sensors The instrument LCD indicates which sensor s is in failure The user can attempt to correct the error by replacing the sensor s Error Cradle X Cal Gas Mismatch Displays during a bump test or calibration to indicate one of these conditions exists among the instruments to be calibrated or bump tested More than 4 different sensor types are installed LEL and CH4 sensor types...

Страница 29: ...isplay when a station attempts to print Indicates the temperature inside the station is below 10 C 14 F The printer functions are not available The bump test and calibrate functions is available after the Printer Fault screen times out Setup mode is accessible after the Printer Fault screen times out USB communications are accepted and processed ...

Страница 30: ...ociated with each instrument can view saved records or download the latest Bump Tests Shows bump test data associated with each instrument can view saved records or download the latest Event Log Shows log files and associated data for each instrument Data Logging Shows data log files and associated data for each instrument Beginning with the General tab each tab is reproduced in the following page...

Страница 31: ... communications port the default is the port with the highest port number Choose Connect to complete the connection with the installed instrument The software opens to the main screen the General tab where data are editable and the download function is accessible Work offline Choose Work offline to view previously downloaded data and reports with no device connected to the PC The next window to op...

Страница 32: ...ne instrument access window The software user can highlight an instrument serial number and select Open to view that instrument s downloaded data The accessible read only data includes that which is associated with these tabs General Components Event Log and Data Logging plus any downloaded calibration and bump test records ...

Страница 33: ...l Scientific Corporation 33 Figure 5 General tab The opening software screen after connecting to a docked instrument or connecting to work offline The fields shown in white are editable The Select Instrument drop down allows the user to access the datalog for any installed instrument ...

Страница 34: ...ment configuration options can be initially set and subsequently changed from this screen A check mark indicates the option is enabled Figure 7 Users and Sites tab The software user can assign to the docked instrument one active user name and one active site name This information is saved in the instrument but not viewable on the instrument ...

Страница 35: ...l components installed in the instrument The software user can highlight a component and select Open to view and modify its settings e g Sensor Details window shown below in Figure 9 Figure 9 Sensor Details window The sensor details screen allows the software user to change alarm set points as well as the calibration gas concentrations for the installed sensors ...

Страница 36: ...ration results that have been downloaded for the instrument If the software user highlights a certificate and selects the Open File command that calibration certificate opens in a new window When the Download command is selected all calibration certificates are downloaded from the station Figure 11 Sample Calibration Certificate The user can print the certificate if needed ...

Страница 37: ...st results that have been downloaded for this instrument If the software user highlights a certificate and selects the Open File command that bump test certificate opens in a new window When the Download command is selected all bump test certificates are downloaded from the station Figure 13 Sample Bump Test Certificate The software user can print the certificate if needed ...

Страница 38: ...ation Figure 14 Event Log tab Lists all downloaded event logs for the docked instrument If the software user highlights a log file and selects the Open File command that event log report opens in a new window When the Download command is selected all event logs are downloaded from the connected instrument ...

Страница 39: ...ion for Ventis 2010 2016 Industrial Scientific Corporation 39 Figure 15 Sample printout for event log A similarly formatted report is also available for data logs when the Print command is selected from the Data Logging tab Figure 16 Data Logging tab ...

Страница 40: ...nnected instrument When the user highlights a session the command buttons will accomplish the following The Summary command opens a new window with all sensor data for that session The Print command opens in a new window that is similar in content and format to the Event Log Report as shown above in Figure 15 The Open File command allows the software user to view the next level of detail for a hig...

Страница 41: ... on the Detail button the user can view a complete list of readings for that sensor for that sensor session The sensor session can be printed shown graphically or exported to a comma separated variable file by using the Print Graph or Export command buttons respectively The Compare feature allows the user to compare the sensor session data for two or more highlighted components ...

Страница 42: ...nnection window of the software V Cal does not communicate with instrument Ensure IR ports on both the V Cal and the instrument are clean from dirt and debris V Cal PC software will not connect to instrument Ensure instrument is placed in the instrument cradle Ensure IR ports on both V Cal and instrument are clean from dirt and debris SPECIFICATIONS Feature Specification Instruments supported Vent...

Страница 43: ...ATIONS Category Specification Operating Temperature Range 0ºC to 50ºC Storage Temperature 20ºC to 60ºC Operating Humidity Range 0 to 80 RH up to 31ºC decreasing linearly to 50 RH at 40ºC External Power Supply Ratings Supply voltage 110 240 VAC Frequency range 50 60 Hz Current Rating 1 5A Installation Category 2 Pollution Degree 2 ...

Страница 44: ...R SUCH CLAIM IS PLEADED IN CONTRACT OR IN TORT INCLUDING STRICT LIABILITY IN TORT It shall be an express condition to Industrial Scientific s warranty that all products be carefully inspected for damage by Buyer upon receipt be properly calibrated for Buyer s particular use and be used repaired and maintained in strict accordance with the instructions set forth in Industrial Scientific s product l...

Страница 45: ...Product Manual for the Six Unit Calibration Station for Ventis 2010 2016 Industrial Scientific Corporation 3 ...

Страница 46: ......

Страница 47: ......

Страница 48: ...ne 1 412 788 4353 or 1 800 DETECTS 338 3287 E mail info indsci com Fax 1 412 788 8353 Industrial Scientific France S A S 5 Rue Frédéric Degeorge CS 80097 62002 Arras Cedex France Web www indsci com Phone 33 0 1 57 32 92 61 E mail info eu indsci com Fax 33 0 1 57 32 92 67 英思科传感仪器 上海 有限公司 地址 中国上海市浦东金桥出口加工区桂桥路290号 邮编 201206 电话 86 21 5899 3279 传真 86 21 5899 3280 E mail info ap indsci com 网址 www indsci...

Отзывы: