background image

C080

 - Check all electrical connections and drive belts of the drive motors

Carrying out the maintenance activities described below requires

special knowledge. For this reason, these maintenance activities

must only be carried out by staff that has received adequate training

by the machine manufacturer!

Orientation

This activity is merely a test to check the power and encoder connections for proper

seating and tightness. Simultaneously, all drive belts are subjected to a visual

inspection.

Requirement

Move the tool carriers to a suitable position.

It may also be necessary to remove various covers or plates for carrying out a visual

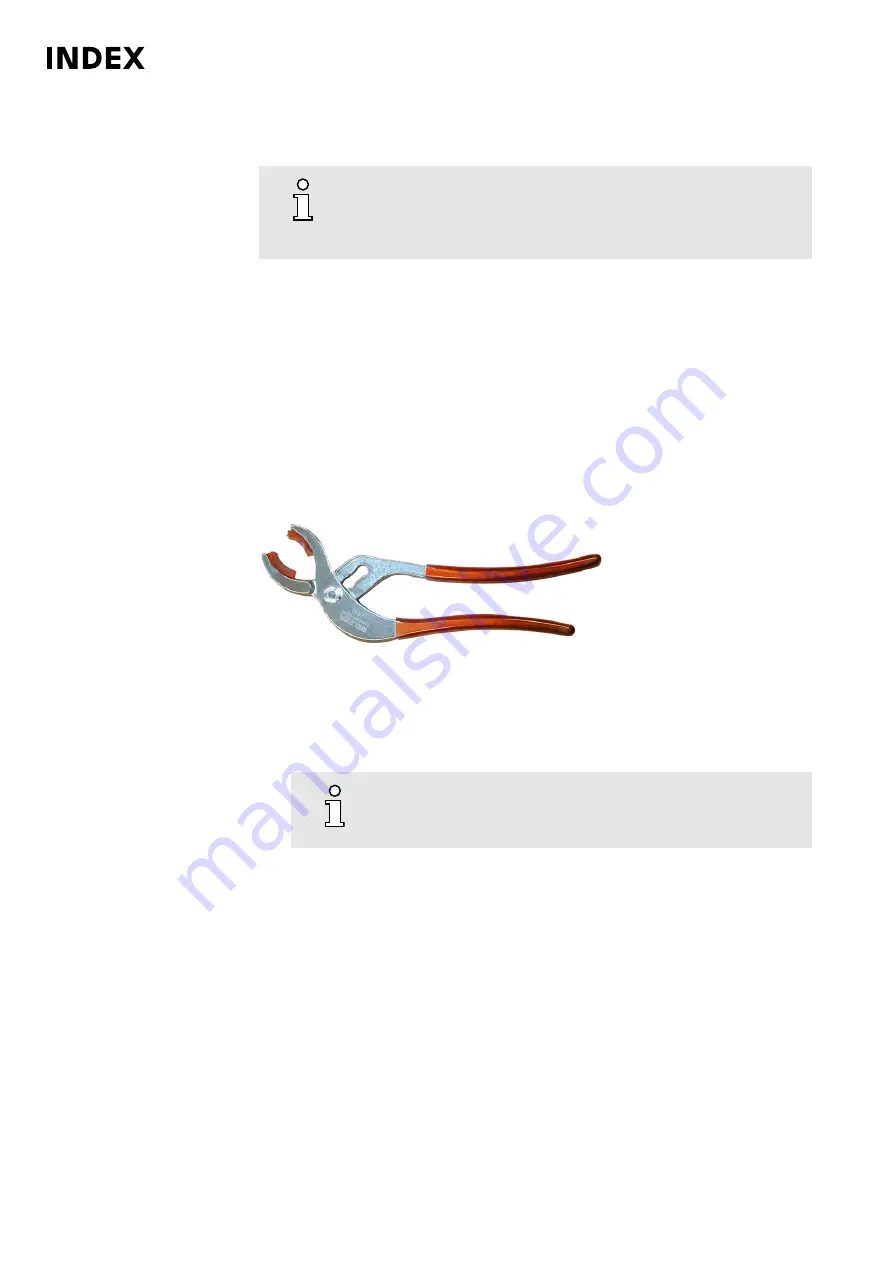
inspection. Furthermore, a special pair of pliers is needed for tightening the power

and encoder connections.

Example: Special pliers for tightening power and encoder connections on the motors

Procedure

1. Loosen connector and check for corrosion and leaks.

2.

If traces of corrosion or moisture are visible, they must be

eliminated and their causes must be determined. If the

connectors cannot be cleaned, they must be replaced.

Maintenance Summary - 2.000 Operating hours

52

Maintenance Instructions

ABC.2

DIE244EN - 15.08.2022

Содержание ABC 2 Series

Страница 1: ...Maintenance Instructions ABC 2 OPERATING INSTRUCTIONS Maintenance Instructions DIE244EN 15 08 2022 2022 08 15 Sp Wartungsanleitung 20207502 ...

Страница 2: ...advances A Word on Copyright This document is proprietary and was originally written in German Its reproduction and distribution in whole or in individual parts without permission of the copyright owner is prohibited and will be prosecuted under criminal or civil law All rights reserved including for translation Copyright by INDEX Werke GmbH Co KG Hahn Tessky ...

Страница 3: ...vels of the fluid tanks 20 A080 Clean and lubricate clamping device 23 A090 Check electrical lines visual inspection 25 A095 Visual inspection of all fluid lines and electrical cables 26 A100 Clean cooling lubricant outlet on clamping cylinder 27 A110 Clean filter screens on chip conveyor 28 A120 Check cooling lubricant visual inspection 30 A147 Check work area light visual inspection 32 A170 Clea...

Страница 4: ...Service Interval 4 000 Operating hours 67 Maintenance Summary 4 000 Operating hours 68 D010 Cleaning of the machine 69 D020 Check the pressure accumulator 71 D050 Check the lubrication system 72 D060 Check the pneumatic system 74 D080 Check the sealing air on the synchronizing device 77 D100 Check main spindle 78 D170 Check the system for reconditioning the cooling lubricant 83 D180 Check fire ext...

Страница 5: ...g the pneumatically pilot controlled cooling lubricant valves 105 I020 Replace the pressure accumulator 106 Service Interval 8 Years 109 Maintenance Summary 8 Years 110 J020 Replace the window pane 111 Table of contents III Maintenance Instructions ABC 2 DIE244EN 15 08 2022 ...

Страница 6: ...Table of contents IV Maintenance Instructions ABC 2 DIE244EN 15 08 2022 ...

Страница 7: ...ayed on the controller iXpanel Depending on the respective machine type and the different controller types a corresponding message is issued on the controller when a maintenance interval is reached The maintenance instructions stored on the respective controller provide information maintenance log explaining the service and maintenance activities to be performed Cleaning of the machine Do not clea...

Страница 8: ... in the data sheets of the respective manufacturers and the information in the document Notes on Operating Materials Pressure accumulators 1 L Pressure accumulators with a volume of 1 L are not subject to testing and labeling according to the current issue of the pressure equipment directive The guidelines and regulations applicable in the country of use must be followed Safety Instructions Safety...

Страница 9: ...r removing machine parts suitable lifting gears and a variety of tools must be used Removed machine parts must be placed in a safe position and secured against falling over All maintenance work on the machine must be carried out with utmost care Fasteners must be loosened carefully and parts must be secured against falling down When elastic items springs are removed replaced appropriate devices mu...

Страница 10: ...h the laws and regulations of the country of use with regard to the use of hydraulic hoses We recommend inspection and documentation of the hydraulic hose lines installed inside the machine and not directly visible every 12 months For hydraulic hose lines visible in the work area or mounted outside the machine and connecting components to the machine we recommend inspection and documentation every...

Страница 11: ...Service Interval Care activities Service Interval Care activities 5 Maintenance Instructions ABC 2 DIE244EN 15 08 2022 ...

Страница 12: ...an covers A040 Check pneumatic system visual inspection A055 Check filters on main spindle cooling fan A060 Check filter on control cabinet cooling fan A070 Check filter on air conditioner cooling fan A075 Check fill levels of the fluid tanks A080 Clean and lubricate clamping device A090 Check electrical lines visual inspection A095 Visual inspection of all fluid lines and electrical cables A100 C...

Страница 13: ...rocess is accelerated even further If the window pane is damaged it must be replaced This is necessary regardless of the extent of damage Even with minimal damage the impact resistance of the pane can no longer be guaranteed Heavily soiled or damaged wipers may cause damage to the inner pane Moreover it may be possible that the work area door can be moved only with considerable effort due to heavy...

Страница 14: ...moved only with effort determine the cause Possible causes include depending on the work area door defective or improperly adjusted wipers Chips on the guide bar or between the door and wiper or in the guide rollers of work area door Maintenance Summary Care activities 8 Maintenance Instructions ABC 2 DIE244EN 15 08 2022 ...

Страница 15: ...han 32 according to DIN ISO 3448 is not admissible For all work in connection with operating materials the information in the data sheets of the respective manufacturers and the information in the document Notes on Operating Materials must be observed Example Hydraulic system ABC Screws on the hydraulic system the connected components and the supply lines must be tightened to the manufacturer s sp...

Страница 16: ...y determine the cause and correct the error If in doubt take a sample for analysis and contact the manufacturer of the hydraulic fluid 3 Check pressure setting on pressure gauge and adjust if necessary The operating pressure is different depending on the machine type See the fluid charts for the correct pressure setting 4 Check supply and fluid lines damage and leakage Supply and fluid lines must ...

Страница 17: ...view the respective manufacturer s documentation Filters are hazardous waste and must be disposed of in a controlled manner Requirement It is essential to keep the filter described here in stock It is not permitted to owner the machine without this filling and breathing filter Use only the original filters according to the spare or wear parts list Only filters with retained particle sizes describe...

Страница 18: ... 1 Example Filling and breathing filters of hydraulic and lubrication systems by ARGO HYTOS GmbH Replace breathing filter Maintenance Summary Care activities 12 Maintenance Instructions ABC 2 DIE244EN 15 08 2022 ...

Страница 19: ...Clean covers of Tur II Remove and clean covers Eliminate any damages or replace covers 2 Clean wipers of Tur II Unscrew and clean wipers Eliminate any damages or replace wiper Maintenance Summary Care activities 13 Maintenance Instructions ABC 2 DIE244EN 15 08 2022 ...

Страница 20: ...of the respective manufacturers be sure to review the respective manufacturer s documentation Procedure 1 Check oil level at oiler optional 2 Check pressure setting on pressure gauge and adjust if necessary An operating pressure of 6 bar has been set at the factory 3 Check supply and fluid lines damage and leakage Supply and fluid lines must be checked for damage Pre damage such as kinks or abrasi...

Страница 21: ...5 Drain condensate not applicable to auto drain Maintenance Summary Care activities 15 Maintenance Instructions ABC 2 DIE244EN 15 08 2022 ...

Страница 22: ...st Otherwise the machine is at risk of sustaining serious damage due to overheating Requirement A sufficient number of filters must be available Procedure 1 Remove side panels from the main spindle 2 Remove wire basket over the cooling fan 3 Check filter 4 Clean air hoses of cooling fans Disconnect air hoses and remove any impurities Here also clean the air inlet and outlet openings directly on th...

Страница 23: ... of the air outlet Use only the original filters according to the spare or wear parts list Otherwise the machine is at risk of sustaining serious damage due to overheating Requirement A sufficient number of filters must be available Procedure 1 Remove machine covers and or filter housing cover 2 Example Filter on the control cabinet Check filter Maintenance Summary Care activities 17 Maintenance I...

Страница 24: ...3 Example Filter and filter cover Reinstall all covers Maintenance Summary Care activities 18 Maintenance Instructions ABC 2 DIE244EN 15 08 2022 ...

Страница 25: ...he opening of the air outlet Use only the original filters according to the spare or wear parts list Otherwise the machine is at risk of sustaining serious damage due to overheating Requirement A sufficient number of filters must be available Procedure 1 Remove cover frame 2 Check the filters replace if necessary 3 Reinstall all covers Maintenance Summary Care activities 19 Maintenance Instruction...

Страница 26: ...should always be near the top mark when the machine is switched off During production the oil level may drop after several consumers have been connected The interval for this maintenance activity is strongly dependent on the operating profile of the machine If the machine is used in three shift operation this maintenance activity must be carried out much more frequently Requirement For all work in...

Страница 27: ...dem a Filler neck b Base plate of hydraulic system c Fill level check d Drain plug e Accumulator drain valve Check fill level at hydraulic fluid tank 3 Check fill level at cooling lubricant tank Maintenance Summary Care activities 21 Maintenance Instructions ABC 2 DIE244EN 15 08 2022 ...

Страница 28: ...cling system Knoll X Fill level indicator Check the fill level at the cooling lubricant reconditioning system option 5 Check fill level of the coolant tank option Maintenance Summary Care activities 22 Maintenance Instructions ABC 2 DIE244EN 15 08 2022 ...

Страница 29: ... the materials to be machined e g brass cast iron and the number of shifts per day more frequent cleaning of the chuck is necessary For this the clamping device must be removed and completely cleaned Here also the labyrinth ring spindle cover and the space behind the ring must be cleaned Requirement Example Three jaw chuck from different manufacturers Do not use cotton waste for cleaning When clea...

Страница 30: ...follow manufacturer s instructions 2 Lubricate clamping devices according to manufacturer s instructions 3 Clean labyrinth ring and space behind the labyrinth ring Maintenance Summary Care activities 24 Maintenance Instructions ABC 2 DIE244EN 15 08 2022 ...

Страница 31: ...ical lines Electric shock Switch off machine and accessory units and arrange for immediate replacement of damaged lines by an electrically trained technician Check electrical lines to chip conveyor 2 Check electrical lines to cooling lubricant system 3 Check electrical lines to workpiece feeder 4 Check electrical lines to workpiece removal unit 5 Electrical leads for the pedal switches 6 Check ele...

Страница 32: ... leakage of fluids under high pressure Be sure to use personal protective equipment during visual inspection Requirement Should defective points be found on fluid lines or electrical cables during the visual inspection the machine must be switched off and the damaged lines or cables must be promptly replaced Replaced fluid lines must be tightened to the torque specified by the manufacturer Procedu...

Страница 33: ...t be cleaned at regular intervals Procedure 1 Disassemble the machine enclosure in the area ofthe spindles 2 Example Cooling lubricant outlet G160 Remove any screws X and the acrylic glass cover on the cooling lubricant tank 3 Clean cooling lubricant collection bin 4 For assembly follow the steps in reverse order Ensure proper cleanliness during the installation Maintenance Summary Care activities...

Страница 34: ...erating Materials must be observed The chip conveyor must not be operated without the filters and filter plates provided by the manufacturer Follow the manufacturer s documentation Example Insert screens ABC Procedure 1 Caution Cooling lubricant splashing out of the chip conveyor Skin irritation and damage to the eyes Wear personal protective equipment e g safety gloves and safety goggles Remove c...

Страница 35: ... on the cooling lubricant pump Alternatively the following procedure can be used Extract cooling lubricant remove screen directly from the cooling lubricant pump and clean it Maintenance Summary Care activities 29 Maintenance Instructions ABC 2 DIE244EN 15 08 2022 ...

Страница 36: ...etermine the cause of the oil ingression Synthetic cooling lubricants or cooling lubricant based on esters are not admissible If the type of cooling lubricant or the manufacturer is changed make sure that the cooling lubricant meets the required specifications See the manufacturer s documentation for the fill quantities Regularly checking the cooling lubricant is necessary in particular if cooling...

Страница 37: ... Supply and fluid lines must be checked for damage Pre damage such as kinks or abrasions should be logged and replacement should be initiated Maintenance Summary Care activities 31 Maintenance Instructions ABC 2 DIE244EN 15 08 2022 ...

Страница 38: ...re be checked regularly Damaged lighting fixtures must be replaced immediately Procedure 1 Check all lamps visual inspection 2 Example Work area light G200 G300 Check lamp protective glass for damage If cooling lubricant has already penetrated into the lamp protective glass of the work area light the lamp must be repaired Maintenance Summary Care activities 32 Maintenance Instructions ABC 2 DIE244...

Страница 39: ...After cleaning the telescopic cover must be coated with low viscosity oil The oil must not resinify and sediments must not form when exposed to other fluids or machining residues e g metallic dust Otherwise the service life of the wipers would be considerably impaired Requirement Before starting the cleaning move the tool slides to positions that are more convenient for the cleaning process Power ...

Страница 40: ...eas is particularly important Requirement Only the agents described in the documentation may be used for the cleaning and after treatment of the machine Always use the proper tool to remove chips The following tools are required for cleaning chip hooks chip brushes spray bottles of cleaners or cooling lubricant a sufficient quantity of rags oil to apply to the telescopic plates and all other bare ...

Страница 41: ... hand In doing so follow the current lubrication chart for the machine Screws on the lubrication system the connected components and the supply lines must be tightened to the manufacturer s specified torques Procedure 1 Lubricate machine according to lubrication chart Maintenance Summary Care activities 35 Maintenance Instructions ABC 2 DIE244EN 15 08 2022 ...

Страница 42: ...fter 200 hours Afterwards bearings and bevel gears of the synchronous spindles must be lubricated with lubricating oil every 200 operating hours The oil nipple X see sketch for oil lubrication is on the side of the synchronous spindle housing Procedure 1 Example ABC Synchronous X Grease nipple Y Gap seal Lubricate in sync Press in oil until it comes out at the gap seal Y on the synchronous spindle...

Страница 43: ...terrupt the motion of the conveyor belt by opening the work area door or switching off the chip conveyor before commencing cleaning work around the discharge chute The conveyor belt can only move when the chip conveyor is switched on and the work area door is closed Procedure 1 Clean the chip conveyor Sweep accumulated chips from the tool carriers and chip deflectors onto the chip conveyor belt Pr...

Страница 44: ...late option should be cleaned weekly or as appropriate depending on the degree of contamination of the chip conveyor Insert a second non built in insert screen at the motor side This prevents sludge deposits and chips from entering the suction area of the pump Then remove and clean the dirty screen and have it ready for the next maintenance interval 6 Remove and clean pre filters option on the coo...

Страница 45: ... on the cooling lubricant pump Alternatively the following procedure can be used Extract cooling lubricant remove screen directly from the cooling lubricant pump and clean it Maintenance Summary Care activities 39 Maintenance Instructions ABC 2 DIE244EN 15 08 2022 ...

Страница 46: ...gans Furthermore raised dirt particles or chips may reach spots where they cause technical problems Do not use cotton waste for cleaning When cleaning with cotton waste fibers or thread can get loose causing safety problems Procedure 1 Loosen and remove the screws on the labyrinth ring X of the spindle The number of screws that are necessary to fasten the labyrinth ring may differ depending on the...

Страница 47: ...Service Interval 1 000 Operating hours Service Interval 1 000 Operating hours 41 Maintenance Instructions ABC 2 DIE244EN 15 08 2022 ...

Страница 48: ...ocument the maintenance activities carried out by using the appropriate maintenance log The maintenance log has the document number DIE245EN 15 08 2022 B010 Customer area Maintenance Summary 1 000 Operating hours 42 Maintenance Instructions ABC 2 DIE244EN 15 08 2022 ...

Страница 49: ... for testing the cooling lubricant Maintenance contents from the user documentation of additionally purchased peripheral devices that were not obtained from INDEX can also be transferred to this area The procedure for creating your own individual maintenance intervals contents is described in the iXpanel document This document is both the contents of the user documentation in paper form and can be...

Страница 50: ...Maintenance Summary 1 000 Operating hours 44 Maintenance Instructions ABC 2 DIE244EN 15 08 2022 ...

Страница 51: ...Service Interval 2 000 Operating hours Service Interval 2 000 Operating hours 45 Maintenance Instructions ABC 2 DIE244EN 15 08 2022 ...

Страница 52: ...ear guides C080 Check all electrical connections and drive belts of the drive motors C110 Replace filter on main spindle cooling fan C120 Replace filter on control cabinet cooling fan C130 Replace filter on air conditioner cooling fan C140 Check cooling unit for cooling lubricant C155 Check coolant C170 Lubricate in sync C190 Clean labyrinth rings of spindles C510 Check backup data carrier C520 Ch...

Страница 53: ...ce intervals The logs may contain important indications as to work that may be necessary beyond the maintenance activities Similarly the logs can be used for determining the cause of malfunctions due to incorrect or inadequate maintenance activities carried out Procedure 1 Check maintenance or inspection logs Maintenance Summary 2 000 Operating hours 47 Maintenance Instructions ABC 2 DIE244EN 15 0...

Страница 54: ...ed only with increased effort it can be expected that the wipers are already destroyed by accumulation of chips and swarf compaction Requirement Example Chip hook and chip brush Use appropriate tools to remove coarse chips chip nests and other debris Procedure 1 Example 1 Removing chip nest using appropriate tools e g chip hooks Maintenance Summary 2 000 Operating hours 48 Maintenance Instructions...

Страница 55: ...hip brush for this purpose 3 Example 3 upper wipers G300 Clean wipers Alternatively the following procedure can be used In case of heavy soling or adhesion of chips to the wipers the wipers and associated cover panels should at any rate be completely removed and cleaned In this case also clean the area behind the wipers 4 Make sure that the wipers evenly contact the work area door before tightenin...

Страница 56: ...e again without much effort as usual 5 If cleaning or replacement of the wipers has not resulted in tangible improvement the soiled rollers and the guide rail of the work area door must also be cleaned Clean rollers and guide rail of the work area door Maintenance Summary 2 000 Operating hours 50 Maintenance Instructions ABC 2 DIE244EN 15 08 2022 ...

Страница 57: ...re must be removed from the machine In most cases access to the wipers is best in the end positions of the respective axes To move to the positions in which the wipers can be checked it may be necessary to switch the machine on off several times Procedure 1 Move the tool carrier to the position required for checking 2 Caution Moving tool carriers spindles or belt drives Risk of bruising and lacera...

Страница 58: ...ual inspection Requirement Move the tool carriers to a suitable position It may also be necessary to remove various covers or plates for carrying out a visual inspection Furthermore a special pair of pliers is needed for tightening the power and encoder connections Example Special pliers for tightening power and encoder connections on the motors Procedure 1 Loosen connector and check for corrosion...

Страница 59: ...r When done checking reconnect plugs and tighten with special pliers see the example 3 Check belt on drive motors for any damage or wear Maintenance Summary 2 000 Operating hours 53 Maintenance Instructions ABC 2 DIE244EN 15 08 2022 ...

Страница 60: ...Otherwise the machine is at risk of sustaining serious damage due to overheating Requirement A sufficient number of filters must be available Procedure 1 Remove side panels from the main spindle 2 Remove wire basket over the cooling fan 3 Replace filter 4 Clean air hoses of cooling fans Disconnect air hoses and remove any impurities Here also clean the air inlet and outlet openings directly on the...

Страница 61: ... the air outlet Use only the original filters according to the spare or wear parts list Otherwise the machine is at risk of sustaining serious damage due to overheating Requirement A sufficient number of filters must be available Procedure 1 Remove machine covers and or filter housing cover 2 Example Filter on the control cabinet Replace filter Maintenance Summary 2 000 Operating hours 55 Maintena...

Страница 62: ...3 Example Filter Reinstall all covers Maintenance Summary 2 000 Operating hours 56 Maintenance Instructions ABC 2 DIE244EN 15 08 2022 ...

Страница 63: ... the air outlet Use only the original filters according to the spare or wear parts list Otherwise the machine is at risk of sustaining serious damage due to overheating Requirement A sufficient number of filters must be available Procedure 1 Example Filter Remove machine covers and or filter housing cover 2 Replace filter 3 Reinstall all covers Maintenance Summary 2 000 Operating hours 57 Maintena...

Страница 64: ...e technical data of the respective equipment If in doubt contact the manufacturer of the equipment or the cooling lubricant vendor Requirement Prerequisite for effective operation within the cooling circuit is the condition of the cooling lubricant To check the condition of the cooling lubricant a refractometer is required With the help of this instrument it is possible to determine the concentrat...

Страница 65: ...the information in the document Notes on Operating Materials must be observed Requirement Replenish only coolant of the same manufacturer having the same specification Mixing different coolants may lead to corrosion of the cooling system and degradation of the coolant Required glycol concentration min 25 When switching the coolant to another product or changing the manufacturer the cooling system ...

Страница 66: ...rasions and for liquid leaks Replace supply and fluid lines if necessary Record the age or date of replacement of supply and fluid lines in the service testing and maintenance schedules or reports Maintenance Summary 2 000 Operating hours 60 Maintenance Instructions ABC 2 DIE244EN 15 08 2022 ...

Страница 67: ... after 200 hours Afterwards bearings and bevel gears of the synchronous spindles must be lubricated with lubricating oil every 200 operating hours The oil nipple X see sketch for oil lubrication is on the side of the synchronous spindle housing Procedure 1 Example ABC Synchronous X Grease nipple Lubricate in sync Press in oil until it comes out at the gap seal Y on the synchronous spindle face Des...

Страница 68: ...Furthermore raised dirt particles or chips may reach spots where they cause technical problems Do not use cotton waste for cleaning When cleaning with cotton waste fibers or thread can get loose causing safety problems Procedure 1 Loosen and remove the screws on the labyrinth ring X of the work spindle The number of screws that are necessary to fasten the labyrinth ring may differ depending on the...

Страница 69: ...PC 2 If the data carrier is not recognized it is damaged To create a new backup data carrier contact the machine manufacturer If the data carrier is recognized make a copy to the hard disk Create a folder named Backup Copy at a suitable location in the directory tree 3 Copy the entire contents of the backup data carrier to this folder If the copying process finished without displaying an error mes...

Страница 70: ...ectric shock Power off the machine and wait approx 30 minutes Check with a meter if there is still voltage applied to the intermediate circuit Check settings of the fuses For this purpose review the information in the wiring diagram 2 Check the screw caps of the fuses for tight seating 3 Check the screws of drives 611D terminals control modules connectors bus device bus and intermediate circuit bu...

Страница 71: ...be abrasive to cables or hoses and damage them Under unfavorable circumstances defective clamps may lead to entangling of the cables hoses which may result in tearing off entire bundles Procedure 1 Check cables for chafing and kinks 2 Check cable and hose clamps for tight seating In case of moving drags or bundles check for any movement within the function 3 Example Power cabling G400 Check strain...

Страница 72: ...Maintenance Summary 2 000 Operating hours 66 Maintenance Instructions ABC 2 DIE244EN 15 08 2022 ...

Страница 73: ...Service Interval 4 000 Operating hours Service Interval 4 000 Operating hours 67 Maintenance Instructions ABC 2 DIE244EN 15 08 2022 ...

Страница 74: ...e D170 Check the system for reconditioning the cooling lubricant D180 Check fire extinguishing system visual inspection D230 Replace belts and check belt tension D370 Check and potentially replace the end position dampers D380 Replacing hydraulic fluid D460 Check blanking plugs of the sliding tracks on the linear guides D480 Replace wipers on the trolleys of the linear guides D490 Replacing wipers...

Страница 75: ... areas is particularly important Requirement Only the agents described in the documentation may be used for the cleaning and after treatment of the machine Always use the proper tool to remove chips The following tools are required for cleaning chip hooks chip brushes spray bottles of cleaners or cooling lubricant a sufficient quantity of rags oil to apply to the telescopic plates and all other ba...

Страница 76: ...ts Follow the manufacturer s documentation Cleaning of the spindle carriers of the main and counter spindles Remove machine covers in the area of the spindles Then remove and clean the spindle covers 9 Clean the machine base Remove accumulations of chips especially in the area of the counter spindle For this purpose move the counter spindle towards the main spindle and flush the area with cooling ...

Страница 77: ...higher loads Screws on the hydraulic system the connected components and the supply lines must be tightened to the manufacturer s specified torques Procedure 1 Check the pressure accumulator With the machine powered on not during the program or continuous run slowly open the accumulator drain valve on the hydraulic fluid tank and watch the needle on the system pressure gauge The pressure gauge nee...

Страница 78: ... operating materials the information in the data sheets of the respective manufacturers and the information in the document Notes on Operating Materials must be observed Screws on the lubrication system the connected components and the supply lines must be tightened to the manufacturer s specified torques Requirement The maintenance of the lubricating oil supply requires the following auxiliary or...

Страница 79: ... protective equipment Check supply and fluid lines damage and leakage Supply and fluid lines must be checked for damage Pre damage such as kinks or abrasions should be logged and replacement should be initiated 2 Check lubrication pressure and related sensors 3 Activate lubrication pulse in the control ten times 4 Monitor the area around the lubricating oil distributor for leakage Maintenance Summ...

Страница 80: ...air Due to different requirements and or specifications of the respective manufacturers be sure to review the respective manufacturer s documentation Example Pneumatic maintenance unit by Festo Norgren Procedure 1 Power off the machine to depressurize the pneumatic system and secure against accidental switching on Check oil level at oiler optional 2 Check supply and fluid lines damage and leakage ...

Страница 81: ...damage to the machine Check sealing air supply To protect measuring systems or other components from the ingress of liquids or dirt they are pressurized 0 6 bar In this case a low hiss is noticeable To ensure trouble free operation periodic checks of the sealing air supply are necessary 9 Check all fluid lines of the sealing air supply for damage 10 Check the pressure setting on the sealing air pr...

Страница 82: ...the components and cover the opening of the fluid line with your finger A slight counter pressure should be felt Then connect the fluid line again Maintenance Summary 4 000 Operating hours 76 Maintenance Instructions ABC 2 DIE244EN 15 08 2022 ...

Страница 83: ...pneumatic supply unit the sealing air supply unit comprises a pressure regulating valve with high precision pressure gauge a micro filter 0 01 µm and a pressure regulating valve with pressure sensor Procedure 1 Check all fluid lines of the sealing air supply for damage A reliable method is the use of a suitable pressure gauge The pressure gauge is attached to the line that is screwed off to monito...

Страница 84: ...sual inspection of the hydraulic accessory units Check aligning and indexing units clamping cylinder for leaks Check supply and exhaust pipes on the main spindle Check filters on the air supply to the spindle Check cooling lubricant and stopper unit with cooling lubricant rotary distributor Check aligning and indexing unit Check O rings on the clamping devices replace if necessary Procedure 1 Remo...

Страница 85: ...ng units solid or hollow clamping cylinders for leaks 6 Check supply and exhaust pipes on the main spindle Defective intake and exhaust air pipes on the main spindle may cause overheating and thus damage to the spindle 7 Whether air flow exists can quickly and easily be made visible by attaching a thread at the opening of the air outlet Check filters on the air supply to the spindle The use of dir...

Страница 86: ...should escape from the rotary distributor when the machine and cooling lubricant pump are switched on and the work area door is closed 9 Example Remove bar stop Remove bar stop 3 10 Example Measure the installation size of the stopper unit Measure the installation size of the stopper unit 1 and the guide ring 2 and record the values Maintenance Summary 4 000 Operating hours 80 Maintenance Instruct...

Страница 87: ...the new Glyd ring and insert it into the recess Carefully precalibrate the Glyd ring in the guide ring 2 using the cooling lubricant and stopper unit 1 After a few minutes remove the guide ring 2 from the cooling lubricant and stopper unit 1 14 Reinstall the cooling lubricant and stopper unit 1 securing it with the screws 6 Then position the cooling lubricant and stopper unit 1 according to the se...

Страница 88: ...nd position e g 0 deg Softkey Position Softkey Lock Monitor the setup to see whether hydraulic fluid flows out 20 Due to different requirements and or specifications of the respective manufacturers be sure to review the respective manufacturer s documentation Check and potentially replace O rings or other seals on the clamping devices O rings and other seals on the clamping devices prevent that ch...

Страница 89: ...with operating materials the information in the data sheets of the respective manufacturers and the information in the document Notes on Operating Materials must be observed Due to different requirements and or specifications of the respective manufacturers be sure to review the respective manufacturer s documentation Requirement To determine the concentration of cooling lubricant in the cooling l...

Страница 90: ...horization by the manufacturer Be sure to read the operating instructions of the manufacturer Procedure 1 Visual inspection for obvious defects 2 Example Inspection stickers Kraft Bauer Check sticker for manufacturing date 3 Check sticker for inspection date 4 Check sticker for battery replacement Maintenance Summary 4 000 Operating hours 84 Maintenance Instructions ABC 2 DIE244EN 15 08 2022 ...

Страница 91: ... values in Hertz Hz for belt tension Procedure 1 Caution Uncontrolled movements of axes or machine components Severe cut and crush injuries Secure all axes or components against uncontrolled movements during maintenance or repair work Move the tool slides to a suitable position 2 Replace X1 belt 3 Measure belt tension frequency meter and adjust belt 4 Replace Z1 belt 5 Measure belt tension frequen...

Страница 92: ...st belt 12 Replace S2 C200 4 belt 13 Measure belt tension frequency meter and adjust belt 14 Replace S8 C200 4D belt 15 Measure belt tension frequency meter and adjust belt Maintenance Summary 4 000 Operating hours 86 Maintenance Instructions ABC 2 DIE244EN 15 08 2022 ...

Страница 93: ...earing supports of the ballscrews the following utilities and tools are needed servicing testing and maintenance schedules logs of the customer rags for cleaning various sizes of jaw and box wrenches and Allen keys Depressurize the hydraulic system by opening the accumulator drain valve e turn off the machine and prevent it from restarting Procedure 1 Check end position dampers Alternatively the f...

Страница 94: ...er 3 Remove screws and replace dampers 4 The damper has a slit on one side and can be pushed over the ballscrew by rotating it 5 For assembly follow the steps in reverse order Ensure proper cleanliness during the installation Maintenance Summary 4 000 Operating hours 88 Maintenance Instructions ABC 2 DIE244EN 15 08 2022 ...

Страница 95: ...ment Notes on Operating Materials must be observed Requirement Specification and quantity of hydraulic fluid as specified in the technical data Before replacing the hydraulic fluid make sure that the required spare parts such as seals and filters are available Use only the original filters according to the spare or wear parts list Procedure 1 Extract old fluid through the filler neck a or drain th...

Страница 96: ...draulic fluid tank 3 Replace the seal on the cleaning cover b 4 Screw on the cleaning cover b again paying attention to the correct seating of the seal and the cleaning cover b 5 Dispose of the fluid in the filter bowl Y do not refill into the hydraulic tank Maintenance Summary 4 000 Operating hours 90 Maintenance Instructions ABC 2 DIE244EN 15 08 2022 ...

Страница 97: ...l sump and used filter Z from the filter bowl Y and dispose of them according to environmental regulations 6 Only filters with retained particle sizes described in the fluid plans must be used Example Filter Z Clean filter bowl Y and insert a new filter Z Reinstall the filter bowl Y and tighten by hand until it stops Then back off the filter bowl Y 1 8 turn Maintenance Summary 4 000 Operating hour...

Страница 98: ... new hydraulic fluid 9 Switch on the machine and hydraulic system 10 Check and if necessary replenish hydraulic fluid level 11 Vent hydraulic system To bleed the hydraulic system open the accumulator drain valve s for approx 10 seconds and then close it again Maintenance Summary 4 000 Operating hours 92 Maintenance Instructions ABC 2 DIE244EN 15 08 2022 ...

Страница 99: ...rement Move the tool slides to a suitable position To replace the blanking plugs on the guide bars the following utilities and tools are needed small hand drill drill bits of various diameters and taps in various sizes pin puller sanding screen and a fine oil stone Arkansas oil stone small straight edge Procedure 1 Example Blanking plug for Z1 axis linear guide G200 Check blanking plug of linear g...

Страница 100: ...ing screen Be careful that the guide bar is not damaged 5 Check with the straight edge that the blanking plugs are flush with the linear guide and no longer protrude This must be ensured to prevent damage to the wipers Maintenance Summary 4 000 Operating hours 94 Maintenance Instructions ABC 2 DIE244EN 15 08 2022 ...

Страница 101: ...e machining result of the lathe or on the surface of the workpieces Procedure 1 Move the tool slide to an appropriate position 2 Replace outer wipers Loosen screws of wipers accessible from the outside and remove the wipers Replace wipers Alternatively the following procedure can be used Replace external and internal wipers Loosen and remove screws of the accessible trolley Always remove one troll...

Страница 102: ... effort it can be expected that the wipers are already destroyed by accumulation of chips and swarf compaction Requirement Example Chip hook and chip brush Use appropriate tools to remove coarse chips chip nests and other debris Procedure 1 Example 1 Removing chip nest using appropriate tools e g chip hooks Maintenance Summary 4 000 Operating hours 96 Maintenance Instructions ABC 2 DIE244EN 15 08 ...

Страница 103: ...ottom Use a chip brush for this purpose 3 Clean the area behind the wipers 4 Example 3 upper wipers G300 Replace wipers Depending on the version or design of the machine plastic or metal wipers are installed Plastic wipers need to be replaced every 4000h while metal wipers only need to be replaced as needed 5 Make sure that the wipers evenly contact the work area door before tightening the screws ...

Страница 104: ...en and close again without much effort as usual 6 If replacement of the wipers has not resulted in tangible improvement the soiled rollers and the guide rail of the work area door must also be cleaned Clean rollers and guide rail of the work area door Maintenance Summary 4 000 Operating hours 98 Maintenance Instructions ABC 2 DIE244EN 15 08 2022 ...

Страница 105: ...If machine data have been modified as part of maintenance or repair work a data backup must be performed In this case a backup of the PLC and NC archives is sufficient The data can be saved to a floppy disk or USB flash drive depending on the machine control equipment In a system recovery the backup CD DVD created when the machine was delivered is restored on the machine Afterwards the PLC and NC ...

Страница 106: ... hazardous waste and must be disposed of in accordance with environmental guidelines and regulations of the country of operation When working in or on the control cabinet switch off the machine and secure it against power on Requirement Even with the machine powered off some devices or components in the control cabinet are still energized Observe the specific electrical diagrams for this machine P...

Страница 107: ...ated e g between the control cabinet and cabinet doors and between the base and the machine bed 9 Check cable assemblies for damage replace if necessary Maintenance Summary 4 000 Operating hours 101 Maintenance Instructions ABC 2 DIE244EN 15 08 2022 ...

Страница 108: ...at has received adequate training by the machine manufacturer Procedure 1 Danger Electric shock Power off the machine and wait approx 30 minutes Check with a meter if there is still voltage applied to the intermediate circuit Check setting of electrical fuses note this information in the electrical diagrams Maintenance Summary 4 000 Operating hours 102 Maintenance Instructions ABC 2 DIE244EN 15 08...

Страница 109: ...Service Interval 5 Years Service Interval 5 Years 103 Maintenance Instructions ABC 2 DIE244EN 15 08 2022 ...

Страница 110: ...by using the appropriate maintenance log The maintenance log has the document number DIE245EN 15 08 2022 I010 Renewing the pneumatically pilot controlled cooling lubricant valves I020 Replace the pressure accumulator Maintenance Summary 5 Years 104 Maintenance Instructions ABC 2 DIE244EN 15 08 2022 ...

Страница 111: ... pneumatic control lines To avoid consequential damage INDEX recommends replacing these valves after 5 years Requirement Due to different requirements and or specifications of the respective manufacturers be sure to review the respective manufacturer s documentation Power off the machine to depressurize the pneumatic system and secure against accidental switching on Procedure 1 Renew valves Mainte...

Страница 112: ...tor after 5 years to avoid an internal inspection that is laborious and expensive for this size of pressure accumulator Due to different requirements and or specifications of the respective manufacturers be sure to review the respective manufacturer s documentation The machine operator is obliged to check the pressure accumulator according to applicable rules and directives Defective pressure accu...

Страница 113: ...2 Example Pressure accumulator Connect and secure the pressure accumulator Observe the tightening torque Maintenance Summary 5 Years 107 Maintenance Instructions ABC 2 DIE244EN 15 08 2022 ...

Страница 114: ...Maintenance Summary 5 Years 108 Maintenance Instructions ABC 2 DIE244EN 15 08 2022 ...

Страница 115: ...Service Interval 8 Years Service Interval 8 Years 109 Maintenance Instructions ABC 2 DIE244EN 15 08 2022 ...

Страница 116: ...t the maintenance activities carried out by using the appropriate maintenance log The maintenance log has the document number DIE245EN 15 08 2022 J020 Replace the window pane Maintenance Summary 8 Years 110 Maintenance Instructions ABC 2 DIE244EN 15 08 2022 ...

Страница 117: ...tative The window pane consists of three panes the inner pane of tempered glass the central pane of polycarbonate and the outer pane also made of polycarbonate The inner pane is relatively resistant It can be cleaned with any commercially available cleaning agents Only the center pane is essential for the impact resistance of the window pane The polycarbonate panes are subject to natural aging and...

Страница 118: ...INDEX Werke GmbH Co KG Hahn Tessky Plochinger Str 92 D 73730 Esslingen Germany Fon 49 711 3191 0 Fax 49 711 3191 587 info index werke de www index werke de ...

Отзывы: