background image

13

Slave mode 1: The slave unit is syn-
chronized with the master unit.

Slave mode 2: The slave unit is tem-
porarily controlled opposite to the
master unit.

d) To memorize, press the button ENTER.

e) To exit the setting mode, keep the button

MENU pressed until the unit starts the show
program or wait for one minute.

Once the slave units receive the control signals
from the master unit, the red LED SLAVE (11) lights
up on the slave units.

5.4 Remote control via LC-3

The cable remote controller LC-3 available as an
accessory allows to control different functions.

1) Connect the remote controller LC-3 to the jack

REMOTE CONTROL (6).

2) No DMX signal must be present at the DMX

INPUT (5). The yellow LED MASTER (8) must
light up.

3) The DMX OUTPUT (7) allows to connect further

LED-142RGB units (

chapter 5.3) in order to

control them together with the master unit via the
remote controller.

4) To activate or deactivate the light beams, press

the button STAND BY on the remote controller.
When the light beams are deactivated, the LED of
the button STAND BY lights up as an indication.

5) Press the button MODE on the remote controller

to select the operating mode:

1. If the LED of the button MODE does not light

up, keep the button FUNCTION on the
remote controller pressed to activate one of
the three stroboscope functions:

permanent stroboscope

stroboscope alternating on master unit and
slave units

music-controlled stroboscope
Activate the music control for this purpose
(

chapter 5.1).

Each time you keep the button FUNCTION
pressed again, the next stroboscope function
is activated.

2. When the LED of the button MODE lights up,

press the button FUNCTION to select the
show program (Sh 1 – 

8). The display (9)

shows the number selected.

3. When the LED of the button MODE starts

flashing, press the button FUNCTION to set
the speed of rotation in three levels. The
music control is deactivated in this case.

6

Operation via DMX light controller

For operation via a light controller with DMX 512
protocol (e. g. DMX-1440 or DMX-510USB from
“img Stage Line”), the LED-142RGB is equipped
with 3 DMX control channels. However, to only run
the different show programs, it can be switched to
the 1-channel mode. For the functions and the
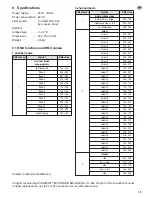
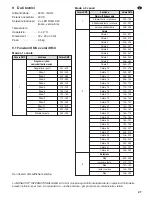
DMX values see chapter 9.1.

DMX is the abbreviation of 

d

igital 

m

ultiple

x

and means dig-

ital control of several DMX units via a common control
cable.

6.1 DMX connection

As a DMX interface, 3-pole XLR connectors with
the following pin configuration are provided:

pin 1 = ground, 2 = DMX-, 3 = DMX+

For connection, special cables for high data flow
are recommended. Standard microphone cables
with screening and a minimum cross section of 2 ×
0.22 mm

2

and with a capacity as low as possible

can only be recommended for a total cable length
of up to 100 m. For cable lengths exceeding 150 m,
it is generally recommended to insert a DMX level
matching amplifier (e. g. SR-103DMX from “img
Stage Line”).

1) Connect the DMX input (5) to the DMX output of

the light controller.

2) Connect the DMX output (7) to the DMX input of

the following light effect unit; connect its output
again to the input of the following unit, etc. until
all DMX-controlled units have been connected in
a chain.

3) To prevent interference in signal transmission, in

case of long cables or a multitude of units con-
nected in series, terminate the DMX output of
the last DMX unit in the chain with a 120 Ω resis-
tor (> 0.3 W): Connect a corresponding termi-
nating plug (e. g. DLT-123 from “img Stage
Line”) to the output jack.

6.2 Setting the start address and 

the number of DMX channels

For controlling the LED-142RGB with a light con-
troller, it is necessary to set the DMX start address
for the first DMX channel. If e. g. address 17 on the
DMX controller is provided for controlling the func-
tion of the first DMX channel, set the start address
17 on the LED-142RGB. The other functions of the
LED-142RGB are automatically assigned to the fol-
lowing addresses. An example using start address
17 can be found below:

GB

Содержание LED-142RGB

Страница 1: ...UNIT DMX PER EFFETTI DI LUCE CON LED LED 142RGB Bestellnummer 38 5630 BEDIENUNGSANLEITUNG INSTRUCTION MANUAL MODE D EMPLOI ISTRUZIONI PER L USO VEILIGHEIDSVOORSCHRIFTEN CONSEJOS DE SEGURIDAD RODKI BE...

Страница 2: ...w programs nein no Blackout ja yes Slave Modus Slave mode ein on Display aus off Betriebsstunden Fixture hours Firmware Version Reset ein on Sound Modus Sound mode aus off normale Ansicht normal mode...

Страница 3: ...g mycket gl dje med din nya img Stage Line produkt L s igenom s kerhetsf re skrifterna innan enheten tas i bruk f r att undvika skador till f ljd av felaktig hantering Beh ll instruktionerna f r framt...

Страница 4: ...nur im Innenbereich und sch tzen Sie es vor Tropf und Spritzwasser hoher Luftfeuchtigkeit und Hitze zul ssiger Ein satztemperaturbereich 0 40 C G Stellen Sie keine mit Fl ssigkeit gef llten Ge f e z...

Страница 5: ...h mehrere LED 142RGB miteinander verbinden 4 3 Grundeinstellungen Mit den Tasten MENU und ENTER 10 las sen sich ber ein Men siehe Seite 2 folgende Grundeinstellungen durchf hren Die Taste MENU so oft...

Страница 6: ...iklautst rke oder den Abstand zwischen dem LED 142RGB und den Lautsprechern ver ndern 5 2 Show Programm w hlen Es stehen acht verschiedene Show Programme zur Verf gung 1 Zum W hlen eines Show Programm...

Страница 7: ...DMX ist die Abk rzung f r Digital Multiplex und bedeutet digitale Steuerung von mehreren DMX Ger ten ber eine gemeinsame Steuerleitung 6 1 DMX Anschluss Als DMX Schnittstelle besitzt das Ger t 3 poli...

Страница 8: ...des Ger tes Die Auswahl mit der Taste ENTER best tigen und das Display zeigt die gew nschte Information an Zum Zur ckschalten auf den vorherigen Betriebs modus die Taste MENU eine Sekunde gedr ckt ha...

Страница 9: ...4 024 031 Farbe 5 032 039 Farbe 6 040 047 Farbe 7 048 055 Farbe 8 056 063 Farbe 9 064 071 Farbe 10 072 079 Farbe 11 080 087 Farbe 12 088 095 Farbe 13 096 103 Farbe 14 104 111 Farbe 15 112 119 Farbe 1...

Страница 10: ...ase G The unit is suitable for indoor use only Protect it against dripping water and splash water high air humidity and heat admissible ambient tempera ture range 0 40 C G Do not place any vessel fill...

Страница 11: ...ution Never connect the unit to the mains volt age via a dimmer For a more convenient operation it is recom mended to connect the unit to a mains socket which is switched on and off via a light switch...

Страница 12: ...e display starts flashing 3 Press the button or to activate or deactivate the music control 4 To memorize press the button ENTER The dis play shows 5 To exit the setting mode keep the button MENU pres...

Страница 13: ...his case 6 Operation via DMX light controller For operation via a light controller with DMX 512 protocol e g DMX 1440 or DMX 510USB from img Stage Line the LED 142RGB is equipped with 3 DMX control ch...

Страница 14: ...ware version operating system of the unit Press the button ENTER to confirm The display shows the desired information To return to the pre vious operating mode keep the button MENU pressed for one sec...

Страница 15: ...032 039 colour 6 040 047 colour 7 048 055 colour 8 056 063 colour 9 064 071 colour 10 072 079 colour 11 080 087 colour 12 088 095 colour 13 096 103 colour 14 104 111 colour 15 112 119 colour 16 120 1...

Страница 16: ...t type de projections d eau des claboussures d une humidit lev e de l air et de la chaleur plage de temp rature de fonctionnement autoris e 0 40 C G En aucun cas vous ne devez pas poser d objet conten...

Страница 17: ...ux plusieurs LED 142RGB 4 3 R glages de base Avec les touches MENU und ENTER 10 vous pouvez effectuer les r glages de base sui vants via un menu voir page 2 Appuyez sur la touche MENU autant de fois q...

Страница 18: ...Remarque Si la gestion par la musique ne fonctionne pas de mani re optimale modifiez le volume de la musique ou la distance entre le LED 142RGB et les enceintes 5 2 S lection du programme Show Huit p...

Страница 19: ...t d filer Vous trouverez dans le chapitre 9 1 les fonctions et valeurs DMX DMX est l abr viation de Digital Multiplex et signifie une gestion num rique de plusieurs appareils DMX via un c ble commun d...

Страница 20: ...ficher la version firmware syst me d exploitation de l appareil Confirmez la s lection avec la touche ENTER et l affichage indique l information souhait e Pour revenir au mode de fonctionnement pr c d...

Страница 21: ...Show 11 230 249 changement al atoire 250 255 Canal DMX Fonction Valeur DMX 1 dimmer stroboscope dimmer sombre clair 000 199 stroboscope lent rapide 200 247 aucun stroboscope 248 255 2 couleur couleur...

Страница 22: ...amente anche i seguenti punti G Usare l apparecchio solo all interno di locali e pro teggerlo dall acqua gocciolante e dagli spruzzi d acqua da alta umidit dell aria e dal calore temperatura d impiego...

Страница 23: ...ti MENU und ENTER 10 si pos sono eseguire tramite un men vedi pagina 2 le seguenti impostazioni base Premere il tasto MENU tante volte finch sul display 9 si vede la funzione richiesta Quindi premere...

Страница 24: ...ella musica oppure la distanza fra il LED 142RGB e gli altoparlanti 5 2 Scegliere il programma show Sono disponibili otto programmi show differenti 1 Per scegliere un programma show premere il tasto M...

Страница 25: ...MX tramite una linea comune di comando 6 1 Collegamento DMX Per il collegamento DMX sono presenti dei contatti XLR a 3 poli con la seguente piedinatura pin 1 massa 2 DMX 3 DMX Per il collegamento si d...

Страница 26: ...azione richiesta Per ritor nare al modo precedente di funzionamento tener premuto per un secondo il tasto MENU oppure aspettare un minuto 7 3 Reset Nel caso di malfunzionamento dell apparecchio possib...

Страница 27: ...229 Show 11 230 249 Cambio casuale 250 255 Canale DMX Funzione Valore DMX 1 Dimmer Stroboscopio Dimmer scuro luminoso 000 199 Stroboscopio lento veloce 200 247 nessuno stroboscopio 248 255 2 Colore Co...

Страница 28: ...aso los consejos de seguridad siguientes Si informaciones adiciona les son necesarias para la operaci n del aparato estas se encuentran en el texto ingl s de estas instrucciones Notas de Seguridad El...

Страница 29: ...nie jest zasilane wysokim napi ciem 230 V Wszelkie naprawy nale y zleci przeszkolonemu personelowi Nie wolno umieszcza niczego w otworach wentylacyjnych Mo e to spowodowa pora enie pr dem elek tryczny...

Страница 30: ...te toimii hengenvaarallisella j n nitteell J t huoltotoimet valtuutetun huoltoliik keen teht v ksi l peit tuuletusaukkoja Asian tuntematon k sittely saattaa aiheuttaa s hk iskun vaaran FIN L s igenom...

Страница 31: ...MONACOR INTERNATIONAL GmbH Co KG Zum Falsch 36 28307 Bremen Germany Copyright by MONACOR INTERNATIONAL All rights reserved A 1274 99 01 09 2011...

Отзывы: