background image


6-5. DI(Sensor Input ) Status / DO(Alarm Output ) Control 

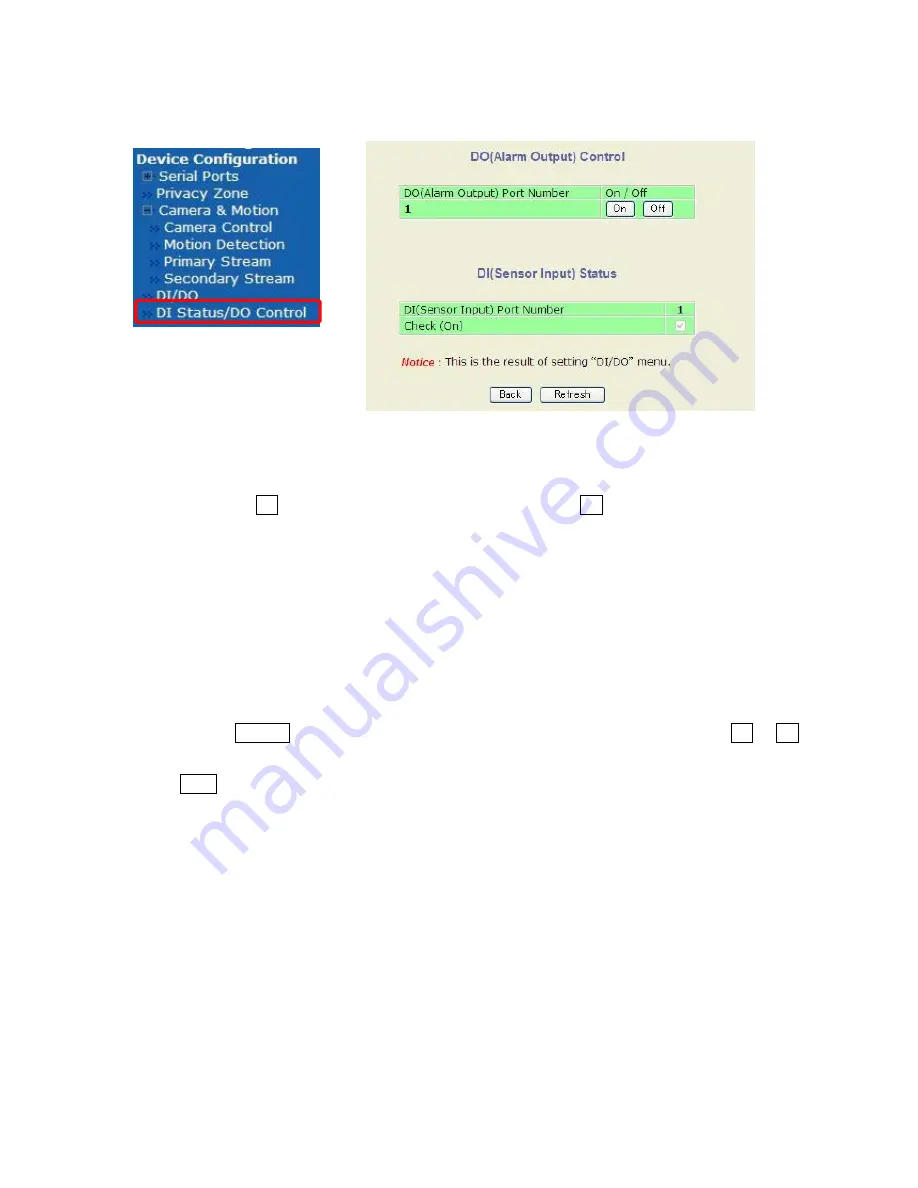
Click DI Status/DO Control item on Menu, below. 


DO(Alarm Output ) Control 
It can simulate the Alarm output as triggered by event. 
When click the On button and the relay output is closed, click Off button and the relay output 
is opened. 
 

DI(Sensor Input ) Status 
It can confirm the Input Status from Sensor. 
Through above DO Control click On or Off button, then if the Check mark is on Check(On) field, 
it means DI/DO is worked completely. If not, it means DI/DO is not worked. 
It should be confirmed the setting for DI/DO. 


When click the Refresh button, the status data will be reset and waiting next click for On or Off 

button. 

If click Back button, new setting data will be cancelled and the screen will be back to previous 

screen display. 

33 

Содержание IPD-BX11

Страница 1: ...Carefully read this manual before use in order to keep these products at full capacity ...

Страница 2: ...s Adobe Reader English Edition is required Please download and install the latest edition from the Adobe Systems site Microsoft Windows and Internet Explorer are registered trademarks of Microsoft Corporation in the USA and other countries Adobe Reader is a registered trademark of Adobe Systems in the USA and other countries Other corporate names and proprietary names are trademarks or registered ...

Страница 3: ...lay and Audio control Audio function only for IPD DM11 IPD VR11 6 3 3 2 Mouseover buttons 7 3 3 3 Mouse Right button click Menu 9 4 System Configuration 11 4 1 Server Name 11 4 2 Date Time 12 4 3 Admin Password 13 4 4 Access Control 13 4 5 User Registration Limited Access 14 4 5 1 Add 14 4 5 2 Edit 16 4 5 3 Delete 16 5 Network Configuration 17 5 1 Network Configuration 17 5 1 1 Static IP 17 5 1 2 ...

Страница 4: ...nced Configuration 34 7 1 Advanced Services 34 7 2 E mail 35 7 2 1 E mail E mail Service Configuration 35 7 2 2 Camera E mail Service Setup for Each Channel 36 7 2 3 Condition 37 7 3 FTP Buffered 38 7 3 1 FTP Buffered 38 7 3 2 Camera FTP Service Configuration 39 7 3 3 Condition 40 7 4 FTP Periodic 41 7 4 1 FTP Periodic 41 7 4 2 Camera FTP Service Configuration 42 7 4 3 Condition 43 7 5 Sensor Noti...

Страница 5: ...8 4 Recording Mode 59 8 5 SD Status Report 60 8 6 Clear Recording Config 61 8 7 Delete Recorded Data 61 9 Utilities 62 9 1 System Log 62 9 2 Save Configuration 63 9 3 Reboot 63 9 4 Factory Default 64 9 5 System Update 64 9 5 1 All Firmware RAM disk System Web Update 65 9 5 2 System and Web Update 68 9 5 3 Web Only Update 68 9 5 4 Sensor Device Driver Update 68 9 5 5 Flexible Extra system 68 INDEX ...

Страница 6: ...ot After input Login Name User Name and Password press OK button Once logged in the Password can be changed to new one Now the Configuration screen is displayed as below The left of screen is displaying Main menu Each Item can be clicked and showing Setup Menu with details on the left of screen Below screen is e g for Quick Configuration 1 Camera Login and Login Screen Notes IE Pop Up blocker shou...

Страница 7: ... a Step 2 Step 3 Step 4 Step 5 IPD DM11 IPD V11 Finish System Configuration Server Name n a n a Date Time Admin Password Access Control User Registration Network Configuration Network Configuration n a n a Network Ports Bandwidth Control View Network Status NetworkStatus Notify IP CCTV DNS Port Forwarding UPnP RTP RTSP SNMP Device Configuration Serial Ports Serial Input Mode n a Serial Output Mode...

Страница 8: ...ra 1 Camera 2 Sensor Notification Input 1 Input 2 Alarm Output Output 1 Recording Configuration SD Configuration SD Status Format SD Information n a Recording Configuration Built in Module 0 Camera 1 Camera 2 Recording Profile n a n a Recording Mode SD Status Report Clear Recording Config Delete Recorded Data Utilities Player Displayed only IPD DM11 IPD VR11 with SD card n a n a System Log Save Co...

Страница 9: ...figuration Static IP Click Step 3 the Setup Menu for 5 1 1 Static IP is displayed 2 4 Step 4 IP CCTV DNS Setup This function is not supported Click Step 4 the Setup Menu for 5 6 IP CCTV DNS Setup is displayed 2 5 Step 5 Recording Configuration Click Step 5 the Setup Menu for 8 2 Recording Configuration is displayed This function is only for IPD DM11 and IPD VR1 When it is connected with IPD BX11 t...

Страница 10: ...ed into SD card slot of IPD DM11 and or IPD VR11 it is able to record and replay to from SD card by Live Viewer IPD BX 11 has no SD card slot 3 1 ActiveX installation Connect to the camera on IE click the Live Viewer on Configuration screen then below window screen is displayed If confirmation window for ActiveX install is displayed select Install Click the OK button then Active X is automatically...

Страница 11: ... Audio level and line on off by click this button This icon also displayed to connect IPD BX11 but it is not functioned Ratio Mode If live video is smaller than the screen it is displayed as original size If live video is larger than screen it is adjusted to fit the screen with original aspect ratio by Stretch Mode Live video is resized to fill the entire screen by click this button Audio control ...

Страница 12: ...D card slot If Each button is mouseovered the function of each button is shown on screen as below right screen e g AVI button function 1 Snap shot button It can be captured for currently displayed live video and saved it as image file either in JPEG or BMP format in PC When click the Snap shot button below saving screen is displayed with captured image Enter the folder and file name and click the ...

Страница 13: ... needed to record again click this button again The recorded video files Max 1 minute file are saved in the SD every start stop the recording Also Player of Utilities menu of Configuration menu only shown when SD card inserted can playback above 3 recorded video files and backup it Please refer INSTRUCTION MANUAL PLAYER INSTRUCTION as separate volume 4 Instant Play back Only for IPD DM11 IPD VR11 ...

Страница 14: ...verse playback 1frame playback every click 1frame reverse playback every click Pause Stop 3 3 3 Mouse Right button click Menu When the right button of Mouse is clicked on the Live Viewer window below pop up menu will be displayed as extended menu 1 Pause Click Pause button to stop and resume live view video 2 FPS Frame Sec Not supported 9 ...

Страница 15: ...ke on and off Mute the Audio Also please refer 3 3 1 Video Display and Audio control 5 Do1 Set Alarm output On Off for only IPD DM11 IPD VR11 Click this button to control relay output is On or Off for checking connected lighting alarm products and etc 6 Navigation Live view position navigation When click the Time Stamp below saving screen is displayed with captured image attach TimeStamp Enter the...

Страница 16: ...anged the name on Server name field but other item name values are not allowed to change Enter the new server name in the Server Name field which can be used up to 21 alphanumeric or up to 10 Unicode characters Finished the name print click the Apply button to save the setting and it will take effect immediately If click Back button new setting data will be cancelled and the setup screen will be b...

Страница 17: ...ynchronized time from NTP server If Time Zone is not corrected tick Change Time Zone and select the right time zone area then set the date and time For save changed date and time click Apply button When it is needed exact correct time use NTP server service and click Get NTP Server Time button Click Refresh button it will be displayed the Date Time retrieved If click Back button new setting data w...

Страница 18: ...ccess Control item below Access Control Configuration screen is displayed Full Access Any user can access the camera and use all futures without limit through RTSP Streaming Limited Access Only registered users can access the camera and have limit privileges through RTSP streaming After set this click the Apply button to save this selection Note The existing camera network connection was made up w...

Страница 19: ...numeric characters Now select one of System Resource Access Permission on below screen All Channels Access User can use all function except Administration setup page General Access only live viewing access User can use only Live View video No Access User is not permitted of any function Selective Access User is allowed to use only selected functions which is setup on below screen Note The registra...

Страница 20: ...t the permission to access for PTZ control Not supported Audio Control Set the permission to access for Audio control Only IPD DM11 VR11 Playback Set the permission to access for Playback control of recorded video Only IPD DM11 and IPD VR11 After finished above all registration process for Add click Apply button to save the added the user If click Back button new setting data will be cancelled and...

Страница 21: ... 4 5 1 Add procedure User ID Select the registered User ID for editing on this filed Password Enter same password between 4 and 23 alphanumeric Confirm Password Name Enter up to 31 alphanumeric characters After finished above setting click Apply button to save settings 4 5 3 Delete Click Delete radio button the below screen is displayed Select the User ID to delete which is shown on the User ID li...

Страница 22: ...ic IP screen is displayed 5 1 1 Static IP Click Static IP radio button the below screen is displayed Input the IP Address NetMask GeteWay DNS 1 DNS 2 After input I P address click the Apply button Then the pop up window to close the Browser is displayed close the Browser and start automatically the rebooting which is taking 1minite to 2minutes If click Back button new setting data will be cancelle...

Страница 23: ...t IP camera to PPPoE Modem provided ISP It is needed the verification ID and Password After setup click Apply button to save settings This function is not supported Note Above Network Status Notify function is not supported But it is only explained on 5 5 Network Status Notification Note Above Network Status Notify function is not supported But it is only explained on 5 5 Network Status Notificati...

Страница 24: ...ultiple users try to access camera streaming the users streaming share this setup limited data size each other Note If the HTTP port number is changed than default 80 the connected URL should be attached new Port number as below example http IP Address of camera HTTP PORT NUMBER Camera Address 192 168 1 100 and new port number is 8080 The URL should be http 192 168 1 100 8080 Note In H 264 it is r...

Страница 25: ... view screen is displayed This view screen shows the network status information at present When click the Refresh button the status data will be set as newest data If click Back button new setting data will be cancelled and the screen will be back to previous screen display 20 ...

Страница 26: ...1 2 DHCP Client Setup has been done and the camera has been given new IP address 5 1 3 PPPoE Setup has been done and the camera has been given new IP address by ISP or PPP server Mail Notification Enable Send email Disable Do not send email SMTP Server SMTP Sever Address for email service Authentication Login Enable User ID and Password are required Disable Not required User ID User ID for SMPT se...

Страница 27: ... register the camera with MAC address and Product Key Finished the above registration click the Enable radio button on Service item of above screen Then click the Apply button it can be display the registered information on screen After check this registration information click Confirm button This function is not supported Note When this function is not used it should not be setup The provided dom...

Страница 28: ...e the camera Port Forwarding menu of network hub with user assigned network port If it fails try to change user assigned port UPnP Auto Selected Port To use when users need to assign automatically the port for camera and router in the network After finished above setting click Apply button to save When click the Refresh button the status data will be set as newest data If click Back button new set...

Страница 29: ...r the number as below e g port number 445 rtsp 192 168 100 445 stream1 RTP StartPort Set the starting number of port for video transfer When video transfer connection is made by each time the port number also increases Multicast Address Set the address for multicast video transfer The multicast address 0 0 0 0 is for stopping multicast Multicast Port Port number for viewing the video stream with m...

Страница 30: ...tus of connected network products SNMP V1 and V2 are supported over MIB2 Management Information Base but few functions are not supported SNMP V1 V2 Enable Start SNMP service Disable Stop SNMP service Trap Enable Start SNMP Trap service Disable Stop SNMP Trap service Destination IP Address Set the IP address for product to receive SNMP Trap message Trap Community Key value used in SNMP Trap e g pub...

Страница 31: ...It can be set privacy zone if certain part of screen needs to unmonitored 6 2 1 Add Privacy Zone Privacy zone is marked with a rectangular shape as above screen display When click the New button red colored box will pop up and it can be changed size and location by Mouse Finished the setup this box zone click the Apply button then box is made to green color and finish the setting for this box zone...

Страница 32: ...the stream video format data on the video data Encoding speed audio control only IPD DM11 IPD VR11 Video quality motion detection and etc 2 formats of Streaming video as below H 264 against M JPEG It provides much higher compression but it is having dropped frames in video data under not very good network condition It can be set P frame number independently from I frames M JPEG against H 264 It is...

Страница 33: ... not supported Video with IP address IP address with Video data is sent This function is not supported Audio Audio function is to be used Applies Primary stream of IPD DM11 IPD VR11 only it can be streamed to PC and Audio out from PC speaker Frame Rate Set the frame numbers for Primary Stream the Secondary Stream numbers shall be under the Primary Stream fame numbers setting value 1fps 2 fps 3 fps...

Страница 34: ...ENU for camera is displayed on live video window It is able to setup DAY NIGHT AGC AWB and etc for camera with operating Up Down Left Right and Enter buttons The details of this camera setup is shown on INSTRUCTION MANUAL BASIC which is attached in camera package Note For re entering after exiting Camera setup menu OSD it should be to click Menu Enter button after 2 seconds from exiting setup menu...

Страница 35: ...n detection function Check All Effect all area for motion detection with one click this button UnCheck All No effect all area for motion detection with one click this button Motion Sensitivity Set the sensitivity of motion defined in Motion Detection area Select between 100 and 100 The high value is more sensitive After finished above setting click Apply button to save When click the Default butto...

Страница 36: ... video frame but encoded video quality is not stable related camera captured image Image Quality H 264 VBR Variable Bit Rate Mode and M JPEG Select between Low Compression Highest High Normal Low Lowest Low Compression side is realized high quality streaming video but it is required higher Bandwidth Lowest side is required lower Bandwidth but it is given decreased quality image Bit Rate Control H ...

Страница 37: ...event Select Normal Close Normal is CLOSE and goes opened when triggered by an event Alarm Output Type Select Normal Open Normal is OPEN for relayed output and closed when triggered by event an event Select Normal Close Normal is CLOSE for relayed output and opened when triggered by an event After finished above setting click Apply button to save settings If click Back button new setting data will...

Страница 38: ...sor Input Status It can confirm the Input Status from Sensor Through above DO Control click On or Off button then if the Check mark is on Check On field it means DI DO is worked completely If not it means DI DO is not worked It should be confirmed the setting for DI DO When click the Refresh button the status data will be reset and waiting next click for On or Off button If click Back button new s...

Страница 39: ...een is displayed Pre Alarm Buffer Size Set the buffer size of Pre Alarm which is storing image before event in unit frame Each Channel can be set different numbers of frame which are 10frames maximum in total Pre Alarm Speed Set the buffering speed between 0 1f s to 10 0f s and Fastest Each Cannel can be set different speeds After finished above setting click Apply button to save setting data If c...

Страница 40: ...Service Enable To use this E mail service Disable Not to use this E mail service SMTP server address Enter SMTP server address for sending email Authentication Login Select Enable if SMPT server requires ID and Password User ID Enter User ID to log in SMPT server Password Enter Password to log in SMPT server Sender Enter the email address of the sender 1st 3rd Recipient Enter the recipient s email...

Страница 41: ...bers of image frames to store before Alarm Post Alarm Images Set the size numbers of image frames to store after Alarm between 0 and 10 Pre Alarm Speed This field shows the speed which is setup with 7 1 Advanced Services Pre Alarm Speed Post Alarm Speed Set the recording speed for Post alarm images between 0 1f s to 10 0f s and Fastest Subject Subject of the E mail message to send 1 4 Contents lin...

Страница 42: ...e this condition Always This condition applies all the time Schedule or Event is not usable Schedule Only Use Week Time and Date in Condition parameter If none of weekdays is set it is activated every day Event Only It is activated only any of the following events occurs Sensor Motion Detection Sever Booting Schedule Event It is activated above Schedule and Event conditions After finished above se...

Страница 43: ...ervice Server Address Enter FPT Server Address Base Directory Name The base directory name in FTP server where the data will be uploaded It should be made the directory in FTP server before to use this service Base File Name The base file name of the data to be uploaded in FTP server User ID Enter User ID to log in to FTP server Password Enter the Password to log in to FTP server FTP Control Port ...

Страница 44: ...ice Configuration Click Camera1 Camera2 item on the Menu below setup screen is displayed Condition1 Condition 3 Select the Condition for FTP Buffered Service to be activated Click here then 7 3 3 Condition setup screen is displayed Pre Alarm Buffer Size The Buffer size assigned for Pre Alarm Check Video buffer Link to 7 1 Advanced Services for setup video buffer screen Pre Alarm Images The number ...

Страница 45: ... this condition Always This condition applies all the time Schedule or Event is not usable Schedule Only Use Week Time and Date in Condition parameter If none of weekdays is set it is activated every day Event Only It is activated only any of the following events occurs Sensor Motion Detection Sever Booting Schedule Event It is activated above Schedule and Event conditions After finished above set...

Страница 46: ...ble Not to use FTP Periodic service Server Address Enter FPT Server Address Base Directory Name The base directory name in FTP server where the data will be uploaded It should be made the directory in FTP server before to use this Base File Name The base file name of the data to be uploaded in FTP server User ID Enter User ID to log in to FTP server Password Enter the Password to log in to FTP ser...

Страница 47: ...button After finished above setting click Save button to apply the setting data and continue to next page If click Back button new setting data will be cancelled and the screen will be back to previous screen display 7 4 2 Camera FTP Service Configuration Click Camera1 Camera2 item on the Menu below setup screen is displayed Condition1 Condition3 Select the Condition for FTP Buffered Service to be...

Страница 48: ...e this condition Always This condition applies all the time Schedule or Event is not usable Schedule Only Use Week Time and Date in Condition parameter If none of weekdays is set it is activated every day Event Only It is activated only any of the following events occurs Sensor Motion Detection Sever Booting Schedule Event It is activated above Schedule and Event conditions After finished above se...

Страница 49: ...I between HTTP TCP and UDP Main IP address Enter IP address to use in CGI or other functions Aux1 Aux 3 IP address Enter 3 more addresses to use in CGI or other functions Port Enter the port number for CGI or other functions Default 80 CGI Path or Alarm Common Message Enter the CGI Path or message for other functions User ID Enter User ID to log in Password Enter the Password to log in After finis...

Страница 50: ... able to setup for Input of Sensor Notification service condition CGI Name or Alarm Port Message Enter the contents of CGI or Alarm Port Message when it is used After finished above setting click Save button to apply the setting data If click Back button new setting data will be cancelled and the screen will be back to previous screen display 45 ...

Страница 51: ...e this condition Always This condition applies all the time Schedule or Event is not usable Schedule Only Use Week Time and Date in Condition parameter If none of weekdays is set it is activated every day Event Only It is activated only any of the following events occurs Sensor Motion Detection Sever Booting Schedule Event It is activated above Schedule and Event conditions After finished above se...

Страница 52: ...ack button new setting data will be cancelled and the screen will be back to previous screen display 7 6 2 Output Click Output1 item on Menu below screen is displayed Condition1 Condition3 Link to Setup screen for 7 6 3 Condition Alarm Output Duration Set the hold time for Alarm trigger between 1 to 30 and Infinite If Infinite is set Alarm is kept till cancel operating After finished above setting...

Страница 53: ...e this condition Always This condition applies all the time Schedule or Event is not usable Schedule Only Use Week Time and Date in Condition parameter If none of weekdays is set it is activated every day Event Only It is activated only any of the following events occurs Sensor Motion Detection Sever Booting Schedule Event It is activated above Schedule and Event conditions After finished above se...

Страница 54: ...ecording conditions which have been setup Recording Mode Select recoding mode when SD card capacity becomes full of video data SD Status Report Set the Notifications for SD full SD capacity SD Error Clear Recording Config Clear settings for Recording configuration which had been made Deleat Recorded Data Delete the recorded Image data 8 1 SD Configuration If SD card is needed to insert the camera ...

Страница 55: ...ormatted In that case click Back button and click SD Status Format item on followed screen displayed Now the below screen is displayed which is showing the list of available SD card Unformatted The SD card is not formatted Formatted The SD card is formatted To perform the auto formatting for unformatted SD card on above screen click 1st SD item After finished the formatting it is needed to reboot ...

Страница 56: ...maged bad block of SD card If select this option the formatting time may be several hours depend on the size of SD card After formatting is finished below window is pop up for informing it Click OK button Note If the formatting program is terminated during the format process by causing Power is stopped e g the SD card may be damaged To avoid this problem make sure to close the program in right way...

Страница 57: ...ith IE And click SD Information item on Menu it is able to show the SD card formatted result on displayed screen as below The below screen shows SD card 2GB e g 8 2 Recording Configuration Camera1 Primary Stream and Camera2 Secondary Stream can be setup for recording option which are included Motion detection recording 24hour continuous recording event driven recording and etc 2 5 Step 5 Recording...

Страница 58: ...eam 2 Camera1 Secondary Stream Camera Name It shows entered Camera name Up to 31 alphanumeric characters or up to 15 Unicode Pre Alarm Images Set the image frames up to 5 frames to record before Event occurs Valid only for set Event mode recoding Pre Alarm Speed Set the recording speed before Event between 0 1f s to 10 0f s and Fastest Valid only for set Always or Schedule mode recording Post Alar...

Страница 59: ... least one of the conditions it meets 8 2 2 Condition 1 Caution Event Alarm Sensor details can be set by 6 4 DI Sensor Input DO Alarm Output Event Motion Detection details can be set by 6 3 3 Motion Detection Event Number 1 2 are referred Stream number or motion detection If the number box is checked it means Event recording had been set with this number for Sensor Motion detect If two number boxe...

Страница 60: ...ken 24 hours day Date Set the date month day for Recording If Date is not set it is taken all the months Event Alarm Sensor Each of 1 2 refers to the Stream number and checked when Event driven recording is selected If two sensors are checked together recording is enabled only when two sensors are activated IPD BX11 IPD DM11 IPD VR11 are functioned with Alarm Sensor number 1 and 2 only Motion Dete...

Страница 61: ...cording Condition If click Back button new setting data will be cancelled and the screen will be back to previous screen display When it is clicked Save button on above Condition1 Recording Configuration Screen is displayed as right screen Condition1 This field shows SUN SAT schedule recording and M1 Motion Detect 1 D1 Alarm Sensor 1 Event recording setting Also this setting condition is shown gra...

Страница 62: ... displaying Recording as above If new recording condition are setup properly and the video is not being recorded at the moment it is needed to click the Record button to start recording When the conditions is meet the setup value in recording condition the video is recorded to the SD card Note The Stop button as above screen is displayed in Recording Status When it is needed to stop the recording ...

Страница 63: ... Pre Alarm Images 5 Post Alarm Images 5 Pre Alarm Speed 1 fps Post Alarm Speed 10fps Under this mode Pre Alarm Speed Post Alarm Speed and Pre Alarm Images Post Alarm Images are effected Then Pre Alarm recording is done by 1fps recording speed and 5 frames This means Pre Alarm recording time is 5seconds Also Post Alarm recording is done by 10fps recording speed and 5 frames This means Post Alarm re...

Страница 64: ...is full of recorded data and made space Pause at full To stop the recording when the SD card is full of recorded data and display STOP Status information on screen The base file size for recorded video is 630MB in SD card Circulation Colum If check the box of Restrict Duration the Days setting field is enabled to enter numbers of Days The default is 90 days and it can be changed between 1 and 3650...

Страница 65: ...il SD Error Notification Select Enable if it is needed to receive Notification of SD Error SMTP Server Enter IP address of SMTP server for email service Authentication Login Select Enable if SMTP server requires ID and Password User ID Enter User ID to login SMTP server Password Enter Password to login SMPT server Sender Enter the email address of the sender 1st 3rd Recipient Enter the recipient s...

Страница 66: ... in camera This function is useful to clear the configuration for multiple cameras at once 8 7 Delete Recorded Data Click Delete Recorded Data item on Menu below window displayed It can be deleted all stored video data by this function Select SD card radio button to be delete and click Delete button on above window Then pop up confirmation window is displayed click OK button to delete all stored v...

Страница 67: ...D slot of IPD DM11 IPD VR11 can playback recorded video files in SD card and backup it Please refer INSTRUCTION MANUAL PLAYER INSTRUCTION as separate volume 9 1 System Log Click System Log item on Menu below login list is displayed on screen The displayed items of login list are follows for each line Day of Week Month Day Hour Minute Second Year Category IP Address User ID 9 Utilities With Player ...

Страница 68: ...us screen display 9 3 Reboot Click Reboot item on Menu below widow is displayed It is recommended to reboot the camera after configuration setup changed and saved for camera To reboot click Reboot button on displayed window and click OK button on pop up confirmation window as above to start the rebooting Then next pop up window is displayed it is only to confirm closing of web browser for connecte...

Страница 69: ...onfiguration setup data is back to factory default except IP address If it is clicked Cancel button the window will be back to previous screen display 9 5 System Update Click System Update item on Menu below screen is displayed Note The camera might be in trouble if this update work is not correctly done Please ensure to read carefully below instructions and to take proper procedure step by step F...

Страница 70: ...play If click Cancel button the window will be back to previous screen display Step 2 Firmware Upload Click Browse button it can be found and selected the firmware image file a_ker_ds in PC Once the firmware image file is selected click Next button to proceed If click Skip button it is skipped current file Update skip to STEP4 shown Step 3 Firmware Confirm Note If the Pop up window is not display ...

Страница 71: ...roceeded next step If click Previous button this screen is backed Step 2 screen If it is needed to stop the Update procedure click Cancel button The camera is rebooted automatically with previous firmware The below Step4 Step5 and Step6 proceeding follow same step as Step2 and Step3 above Step 4 RAM disck File Upload Step 5 System File Upload Step 6 Web File Upload 66 ...

Страница 72: ... button to execute the Update processing which is shown next displayed window If this all Upload proceeding has is not all right click Factory Default button to back the Update file version which had been done by Factory It will back Factory default except IP address Step 8 Update finished After all Update processing is done above window is displayed Click the Reboot button to reboot the camera 67...

Страница 73: ...b Only Update To proceed the Update go through same steps from Step6 to Step8 of 9 5 1 All Firmware RAM disk System Web Update 9 5 4 Sensor Device Driver Update 9 5 5 Flexible Extra system Displayed on Menu but function is not implemented Displayed on Menu but function is not implemented This function is not supported This function is not supported 68 ...

Страница 74: ...nhattan Beach Blvd Redondo Beach C A 90278 Phone 310 297 1900 FAX 310 536 9550 Ikegami Electronics Europe GmbH Ikegami Strasse 1 D 41460 Neuss Germany Phone 02131 123 0 FAX 02131 102820 Ikegami Electronics Europe GmbH U K Branch Unit E1 Cologne Court Brooklands Close Windmill Road Sunbury on Thames Middlesex TW16 7EB UK Phone 01932 769700 FAX 01 92 769710 NNA005484 00 ...

Отзывы: